
GICT knowledge base
How to Remove Image Backgrounds Locally with rembg
Published
Product photos often need the same edit: keep the item and remove everything behind it. The open-source rembg command-line tool can do that on your own Linux computer or VPS, producing a PNG with a transparent background. You do not need to send the image to a hosted background-removal API.
This guide targets Ubuntu 24.04 and installs the CPU workflow in a Python virtual environment. It downloads a model and processes individual images or a folder without a hosted inference API.
Choose a CPU VPS and a small model
If you do not already have a VPS, an interServer Linux VPS gives you a place to process images without leaving your desktop running. Start with Ubuntu 24.04, two vCPUs, 4 GB of RAM, and at least 10 GB of available disk space for this small-model workflow and a modest image collection. This is a starting recommendation, not a measured minimum or a provider performance benchmark. An existing Linux computer is also suitable.
A GPU is not required here. Consider GPU hosting only if sustained image volume or a larger model makes CPU processing too slow, and verify the model’s supported backend first. Installing a GPU package on an ordinary VPS does not provide a GPU.
We will explicitly select u2netp, the lightweight U-2-Net model. It is useful for learning the workflow and processing clearly separated objects, but it can lose fine leaves, hair, shadows, and transparent details. rembg’s default model can change, and different models have different resource and licensing requirements; keep -m u2netp in the commands below.
Install rembg in an isolated environment
Run these steps in a Bash terminal on the machine that will process the images. Use your normal account; only the Ubuntu package installation needs sudo. Each $ is a displayed shell prompt, not part of the command to copy.
On Ubuntu 24.04, install Python’s virtual-environment support if it is missing:
$ sudo apt-get update
$ sudo apt-get install -y python3-venv
Create a new working directory and activate its environment:
$ mkdir -p ~/rembg-work
$ cd ~/rembg-work
$ python3 -m venv .venv
$ source .venv/bin/activate
$ python --version
$ python -m pip install "rembg[cpu,cli]==2.0.84"
$ python -m pip check
This version supports Python 3.11 through 3.13; Ubuntu 24.04 supplies Python 3.12. The cpu extra installs the CPU inference backend, and cli adds the terminal commands. Keep the virtual environment rather than using sudo pip or bypassing Ubuntu’s externally managed Python protection.
Limit the model’s thread setting and keep its downloaded files in this project:
$ export OMP_NUM_THREADS=2
$ export REMBG_HOME="$PWD/models"
$ rembg d u2netp
Allow disk space for the model, Python dependencies, caches and images; measure the actual installation rather than equating model size with total storage. Leave integrity checks enabled. In each new shell, activate the environment and restore the project’s REMBG_HOME and thread settings. Check for an older U2NET_HOME override if the cache location differs.
Remove one background
Make separate input and output directories:
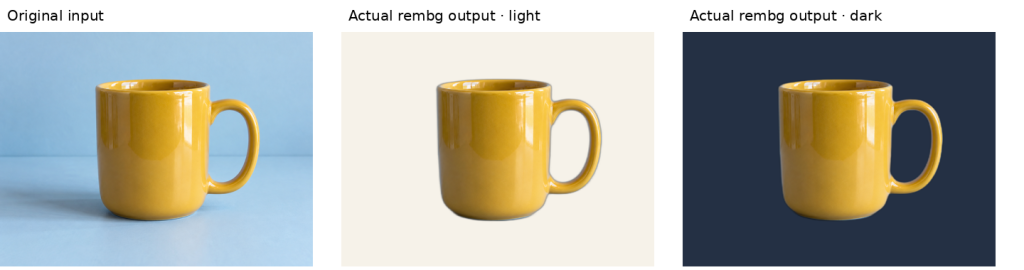
$ mkdir -p input outputPlace a photo you own or have permission to process at input/product.png, using SFTP when working on a VPS. Preserve the original. The comparison images below illustrate edge-quality differences; this article does not provide a downloadable input pack.
$ rembg i -m u2netp input/product.png output/product-cutout.pngDownload the result with SFTP and open it in an image editor. A white viewer background does not prove that removal failed: many viewers display transparent pixels on white. Place the PNG over a contrasting color or enable the editor’s checkerboard view. Inspect the mug handle, object outline, and any remaining shadow at full size.
Keep the output as PNG. Saving it as JPEG removes its alpha channel; it cannot remain transparent. A successful command means a file was produced, not that every edge is correct.
To check the output technically, create check-output.py in the working directory with these contents:
from PIL import Image

with Image.open("input/product.png") as source:
    original_size = source.size
with Image.open("output/product-cutout.png") as result:
    print("Size:", result.size)
    print("Mode:", result.mode)
    assert result.size == original_size, "Dimensions changed"
    assert "A" in result.getbands(), "No alpha channel"
    low, high = result.getchannel("A").getextrema()
    print("Alpha range:", low, high)
    assert low < 255, "No transparent pixels found"
    assert high > 0, "The entire image is transparent"
Run it after the conversion:
$ python check-output.pyThe checker should report matching input/output dimensions, an RGBA image and an alpha range that includes transparent pixels. Read your actual output; a successful check cannot judge whether the correct object survived.
This checks dimensions and the presence of transparency. It cannot tell whether the correct object was retained; the visual review still matters.
Process a folder without replacing originals
Place additional images in input, then use a new destination directory:
$ mkdir -p batch-output
$ rembg p -m u2netp input batch-output
Folder mode reuses the model session, avoiding a separate model startup for every file. Do not put the destination inside the input folder, and avoid the delete-input option. Keep originals until you have checked every output.
Give inputs unique filename stems and use an empty output directory: different extensions can map to the same output name, and existing outputs may be skipped. Check the expected file count, errors and every cutout rather than relying on a successful exit status or progress bar.
Compare the edges, not just file validity
The existing mug comparison retains the handle opening and most of the outline, though the edge is soft in places. Inspect your own output at full size against both light and dark backgrounds.
The fern comparison shows a failure: most foliage is missing while the pot remains. A PNG can have valid transparency and still be unusable.
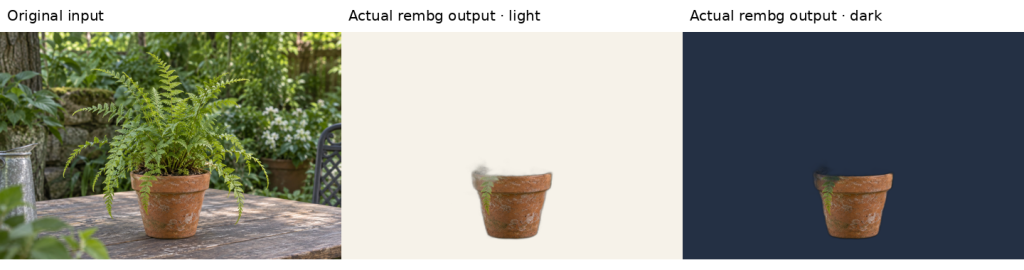
The original article identifies these inputs as AI-generated fixtures. They are illustrations, not an accuracy or VPS performance benchmark. Measure your own elapsed time and memory use with representative images, and test offline operation separately after caching required models.
When automatic removal is not enough
The small model is a foreground estimator, not a precise clipping-path tool. Busy backgrounds, foliage, glass, fur, and objects close to the background color can confuse it. Check results on both light and dark backgrounds before publishing product images. Higher input resolution alone does not guarantee a better mask.
For an occasional photograph with difficult edges, manual selection may take less time than trying many models. For repeated failures on a product category, compare another model against representative images, checking its license and memory requirements before changing the production command. Do not assume the largest model will solve every image.
If the command fails or the result looks wrong
rembg: command not found: return to the project directory and activate.venv. Install throughpython -m pipfrom that environment.- The model downloads again: check that you repeated
REMBG_HOMEfrom the correct working directory and are using the same account. Do not remove the cache between jobs. - A download or checksum error: retry on a working connection. Do not disable certificate or model-integrity checks to hide a failed download.
- The process is killed: process one smaller image at a time and check available RAM. Avoid concurrent batches until you have measured their memory use. More vCPUs do not fix a memory shortage.
- A halo or missing detail: inspect the actual alpha edge. A PNG can contain valid transparency and still be a poor cutout. Keep the original and correct it manually if necessary.
You now have a local single-image and batch workflow. Keep the chosen model explicit, preserve the source photos, and review the PNGs before using them on your site.
Reference: rembg usage and model configuration. Check the documentation for your installed version before applying changes.
Related guides
How to Self-Host DocuSeal for Document Signing
Self-host DocuSeal with private administrator setup, PostgreSQL and HTTPS. Test signing, understand email data flows and create consistent backups.
Self HostedHow to Self-Host Docmost with Docker on Ubuntu 24.04
Install Docmost with Docker, PostgreSQL and Redis. Set up a private workspace and verify editing, live updates and attachment retrieval.
Self HostedHow to Translate Text Offline with Argos Translate
Translate plain text locally with Argos Translate. Install a language pair, prepare caches, verify offline operation and review translation quality.
Self HostedHow to Self-Host Vikunja with Docker on Ubuntu 24.04
Self-host Vikunja with Docker and PostgreSQL. Create an account privately, connect through SSH and verify tasks, attachments and persistent storage.