
GICT knowledge base
How to Integrate Helpscout plugin in your WordPress site
Published
Help Scout is also an effective help desk plugin for customer support. The plugin has over 90 integrations. Thus, you can easily connect Help Scout with any service. It uses an advanced formatting feature that provides formatting options for replies and notes. You can attach files up to 10 MB file size. The plugin offers auto-reply and bulk action features. Thus, you can quickly respond to the bulk question at one time. It also offers live chat to your users. However, you need to install a beacon on your site to activate live chats.
The plugin also provides a shortcode to display the contact submission form on your site. Or you can display it using the beacon. However, you will have to create an OAuth2 application to set up this plugin on your WordPress dashboard. You will also have excellent email support. Hence, you can communicate with your users via mail. Additionally, you can even manage emails of multiple brands and sites as well. You will be able to create multiple knowledge bases for your products. So, let’s discuss the basic features of this plugin in brief,
Features
- The plugin provides auto-reply and bulk action features. So, you can easily respond to clients at one time.
- Clients can also attach the files. However, it has a file size limit of up to 10 MB.
- You will get real-time alerts when people are viewing or replying to the same conversation.
- Moreover, Help Scout can parse incoming voicemails from 50+ different providers, unlike other plugins.
- However, you will have to create an OAuth2 application to set up the plugin on your site.
- Also, the plugin provides direct shortcodes to embed the contact submission form on your site.
- The premium plugin adds a full-featured customer portal to your WordPress site.
- Moreover, customers can submit inquiries, see their complete history and more.
- The plugin is free to use which is available in the WordPress plugin library. However, if you want to use this plugin’s integration and advanced features, you will have to purchase the pro version.
Pricing Details
Help scout plugin is free to use helpdesk plugin for WordPress. You can install it from the WordPress plugin directory. Moreover, it also offers a premium version. The plugin comes with three plans – Standard, Plus, and Company. The Standard costs $20 per month. The standard plan includes three mailboxes and a live chat feature.
Moreover, you will also get 50+ integrations in this plan. The plus plan costs $35 per month. Also, the Plus plan consists of custom fields and add-ons. You can have 15 days free trial before purchasing any plans. It does have separate plans for large-scale companies that include powerful features. Hence, the Helpdesk has affordable and feature-rich plans.
How to Install and Activate Help Scout Plugin
The installation process is Straightforward. You can follow the simple steps mentioned below to install and activate the plugin.
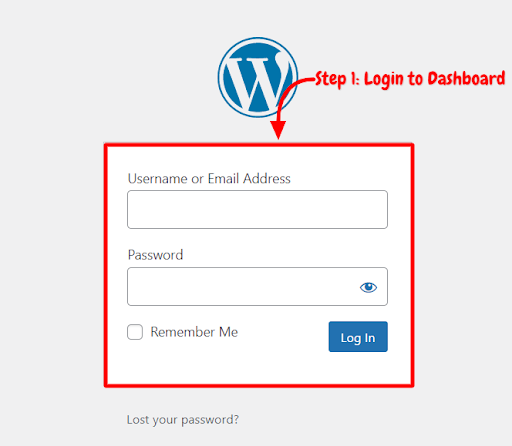
Step 1: First, you need to log in to the WordPress admin dashboard.
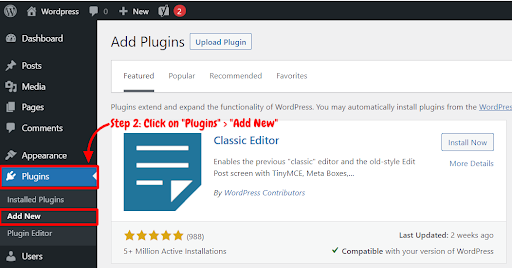
Step 2: Now, you will see the option “Plugins” on the left-hand side panel of the WordPress dashboard. Click on “Plugins,” then select “Add New.”
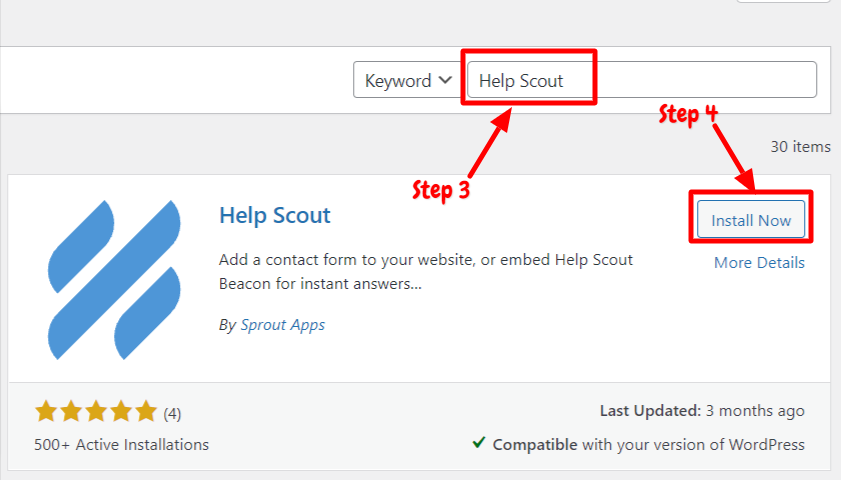
Step 3: You will see a search bar on the top right-hand side corner of the dashboard. Now, Search “Help Scout Plugin”
Step 4: After that, you need to click on “Install Now.”
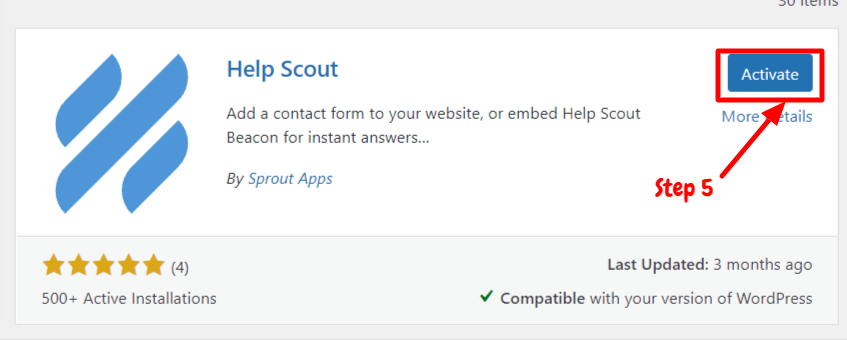
Step 5: After installation, you will need to activate the Help Scout Plugin in order to use it on your site. Now, click on “Activate.”
Now you have successfully installed and activated the plugin. You can display the contact submission and help desk using this plugin.
How to Set up Help Scout Plugin
After activating the plugin on your site, you can start using this plugin on your site. We have explained step by step guide below on how to use Help Scout Plugin,
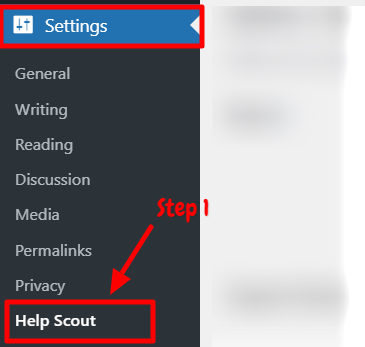
Step 1: First of all, go to the “Settings” option on the left-hand side panel of the WordPress dashboard. Then select the “help scout” option.
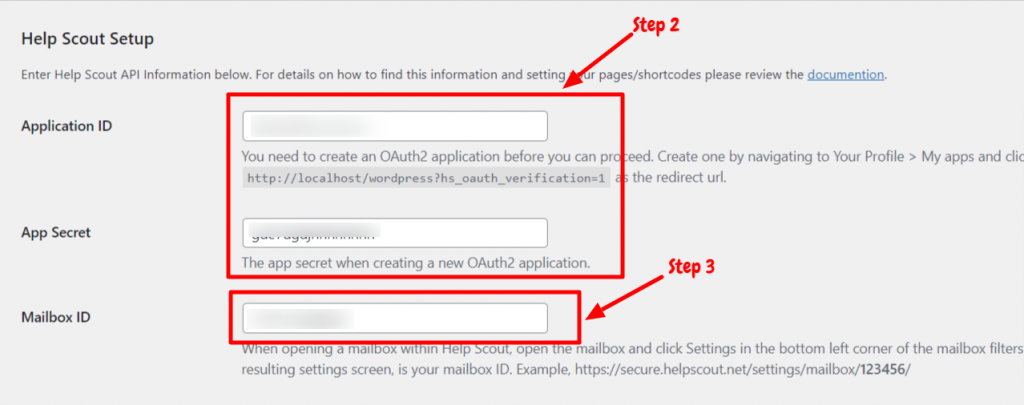
Step 2: You will see the setup page. You will enter the Help Scout API information to set up the plugin. You need to create an OAuth2 application before you can proceed. Also, you have to create one by navigating to Your Profile and then select “My apps”. After that, click “Create My App”. You will get your application ID, app secret, mailbox ID.
Step 3: When opening a mailbox within Help Scout, open the mailbox, click Settings in the bottom left corner of the mailbox filters list, and click in Edit Mailbox. In the URL of the resulting settings screen is your mailbox ID.
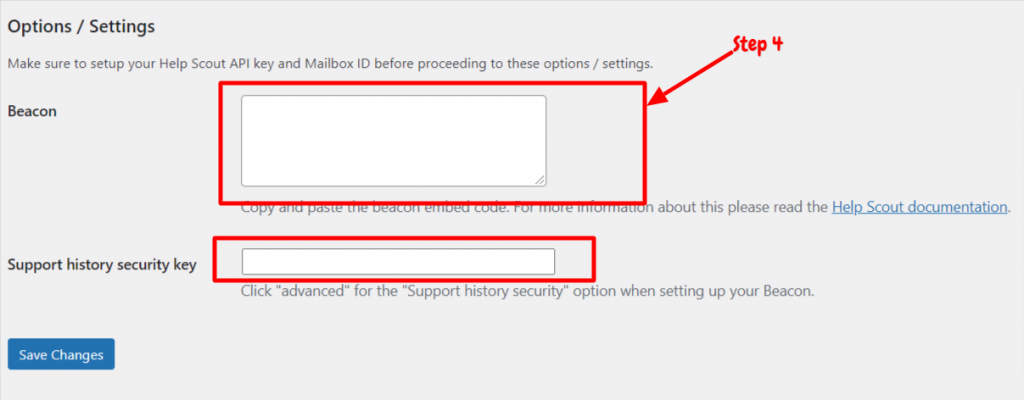
Step 4: Now, scroll down to the “Option/Settings” section. However, you have to Make sure to set up your Help Scout API key and Mailbox ID before proceeding to these options or settings. After that, you can use the “Beacon”. Copy and paste the beacon embedded code. Also, you can then enter the Support history security key. Click on “Save Changes”. This way, you can easily set up the Help Scout.
Moreover, you can also add [hsd_form] shortcode to a page or post to capture contact submissions OR use the Help Scout beacon. So, you can directly embed the contact submission form using shortcodes.
How to Display Contact Submission Form Using Shortcodes
For displaying the contact submission form, the plugin provides shortcodes on the page or post. You can follow the steps mentioned below to display the contact submission form.
Step 1: First, you will need to create a page or post. Or you can also use the existing page where you want to embed the contact submission form.
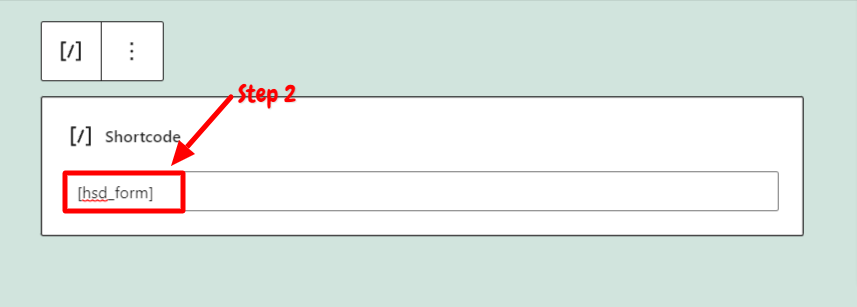
Step 2: Once you create the page or post, go to the editor. Click on the “+” sign in the editor. And search for shortcode blocks. You can use [hsd_form] shortcode to a page or post to capture contact submissions. Paste it in the shortcode block.
After that, you can “Update” or “Publish” the page or post. Now, check whether the contact submission form is displayed correctly or not.
Conclusion
Help Scout is one of the best help desk plugins for WordPress sites. You can easily display the help contact submission form using this plugin. Moreover, the plugin also provides a direct shortcode to embed the contact submission. Or you can also embed that using the beacon. You can set up the plugin easily with just a few clicks. However, you will have to create an OAuth2 application. The installation and setup process is very straightforward. The plugin provides auto-reply and bulk action features. So, you can easily respond to clients at one time.
The plugin is free to use. You can easily install the plugin from the WordPress plugin directory. It also provides a premium version. The premium version includes advanced features and 50 + integrations. You can purchase the pro version if you want to unlock the additional features of this plugin. You can follow the steps mentioned below to install and activate the plugin. Also, we have explained step by step guide on how to set up this plugin. We hope this article will help you set up the Help Scout plugin.
Related guides
7 Common Hosting Mistakes Beginners Make (And How to Avoid Them)
7 common hosting mistakes beginners make in 2026: no backups, ignored updates, bad host choice, weak passwords, single point of failure, no staging. With fixes for each.
WordPressWebsite Migration Backup Checklist: What to Save and How to Test
Prepare a website migration backup: inventory files, databases, email and DNS, check archive integrity, test recovery and plan a safe final synchronization.
WordPressCore Web Vitals in 2026: A Practical Fix Guide for Site Owners
Core Web Vitals 2026: practical fixes for LCP, INP, and CLS. Real root causes, what to measure, common misconceptions, and a priority order of fixes for site owners.
WordPressFixing the WordPress “Death Loop”: When Missing Files slow down your site
You’ve just launched your new WordPress site or pushed a big update. In your staging environment, everything ran perfectly.