
GICT knowledge base
How to install and use WP Menu Icons in WordPress
Published
WordPress is a compelling platform with several free plugins and themes. A Developer should always keep in mind that a user looks for a flexible and straightforward method to design their WordPress site. But sometimes, it comes to the very complicated task of managing things in WordPress. There is not any default plugin to simply customize the menu icons.
The WordPress Menu icon plugin gives you the ability to add image icons to your WordPress menu and customize them effectively. So As we already know, images are more powerful than written text. This WordPress Menu icon plugin gives you the wing to present your site more attractively than earlier. All you have to do is install the WP menu icons plugin and activate it. There are a few plugins that provide icon customization options but they are premium. While this plugin is completely free to use.
The menu icon list provides you varioud menu icon options like Dashicons, Elegant Icons, Elusive Icons, Font Awesome Icons, Foundation Icons, and Themify Icons. With the help of these icons, you can make different beautiful customized icons. These are the different companies or entities who creates and manages different icon libraries and allows you to use the icons for Free.
After your plugin gets installed and activated. Just go to the Appearance tab. It displays a menu under that tab. This menu icon enables you to edit your WordPress menus. It provides multiple functions of hiding the label of the icon. Also, vertical alignment, resizes icons with colour Options, setting up backgrounds, etc.
In this step-by-step tutorial, We will show you exactly how to install and activate the WP menu icons on your WordPress website. We will also show you everything you can do with the help of this plugin.
How to install WP Menu icons in WordPress
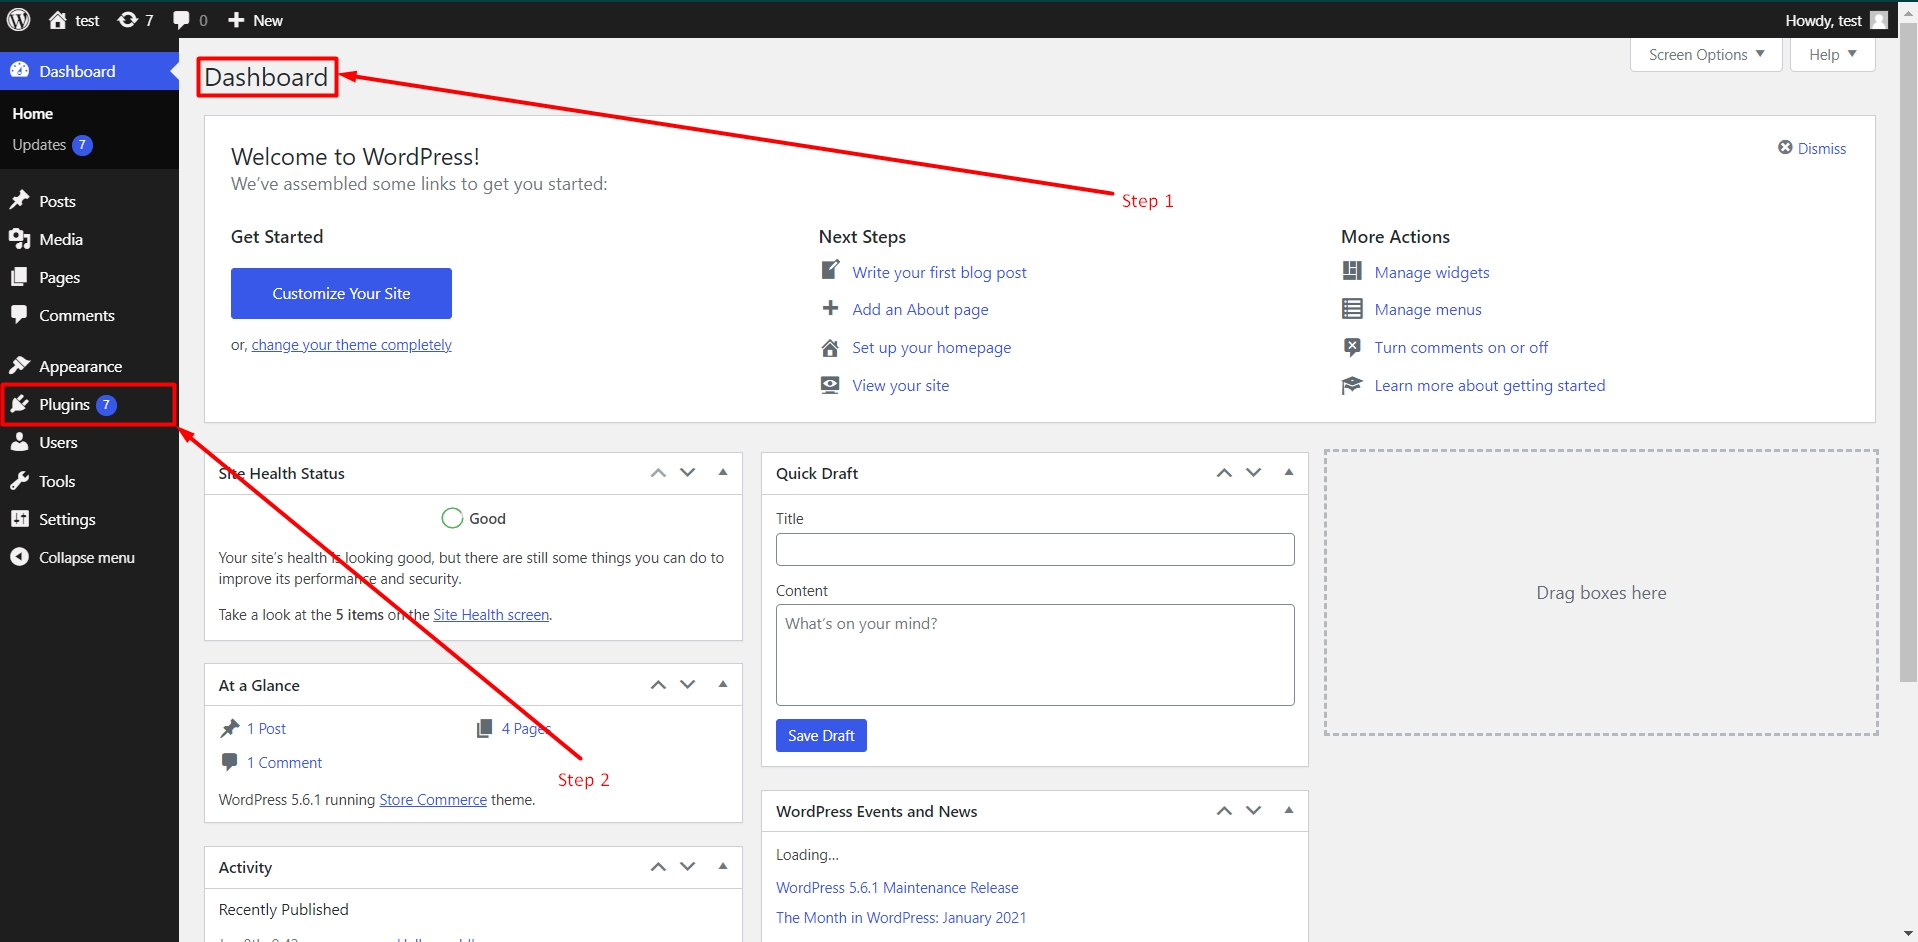
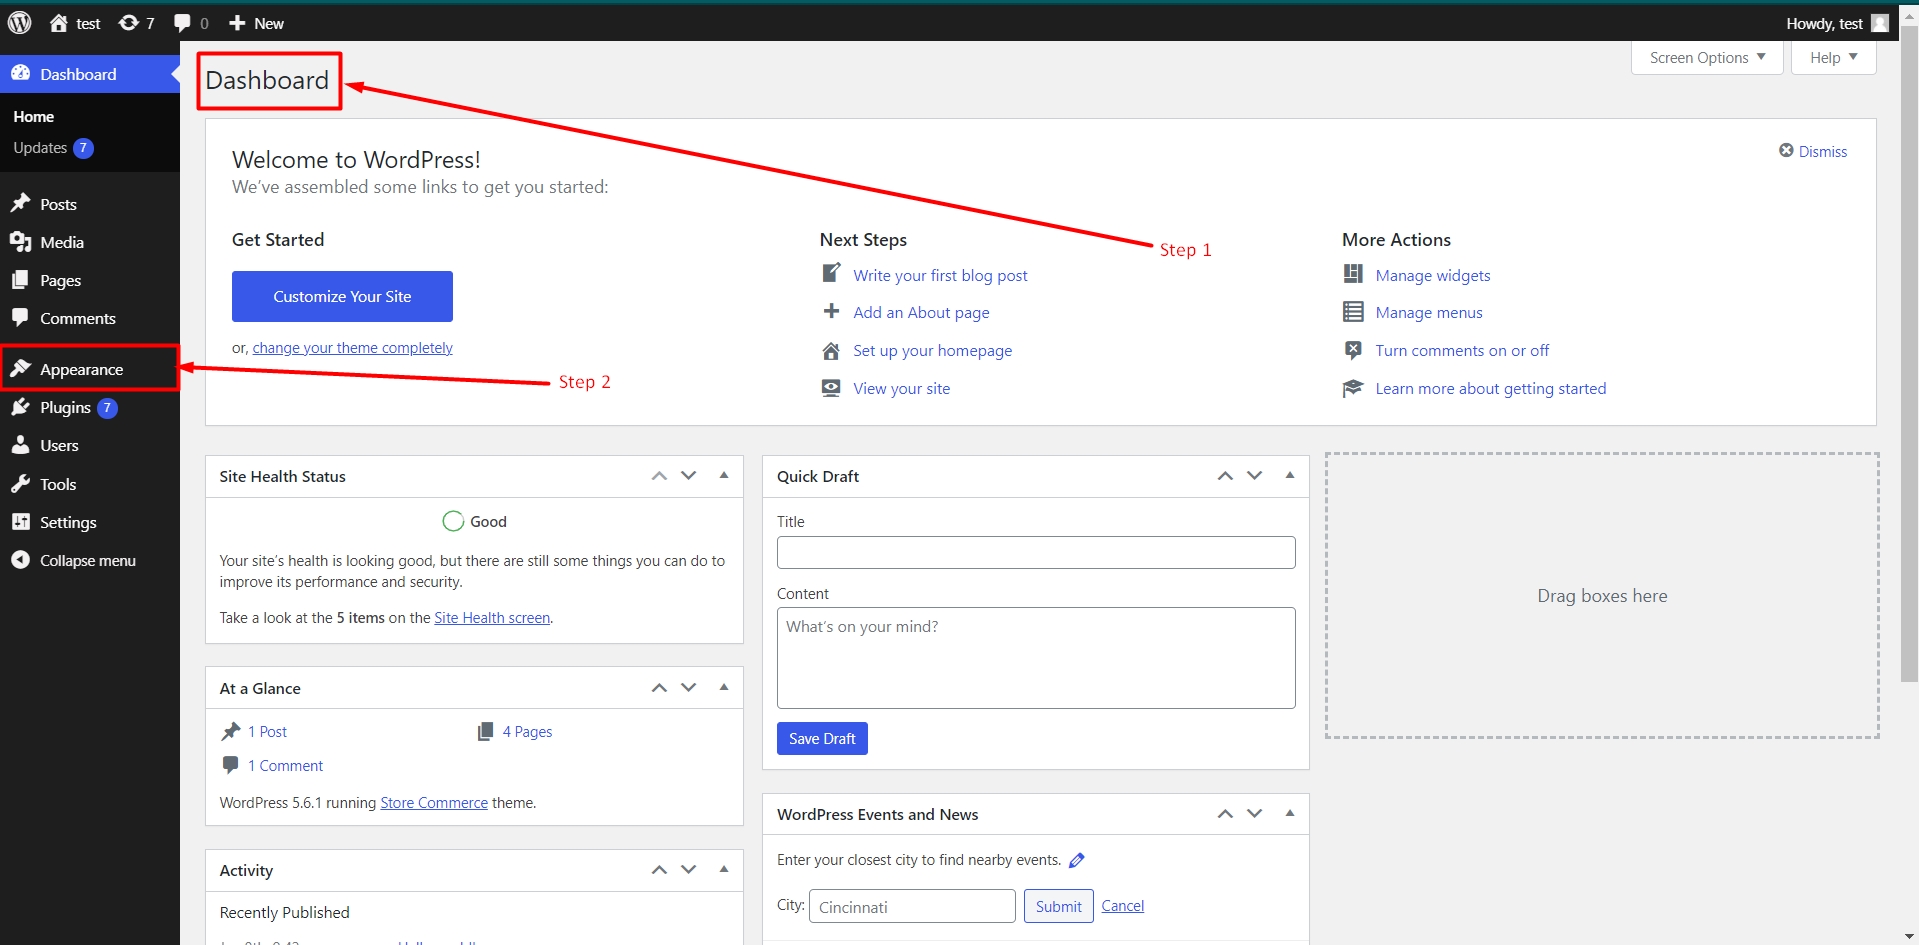
Step 1: Log in to the WordPress administrator area using administrator username and password.
The administrator access is required because we are going to install a plugin in our WordPress website.
Step 2: Then, click on the plugins tab from the left sidebar as highlighted in the following image.
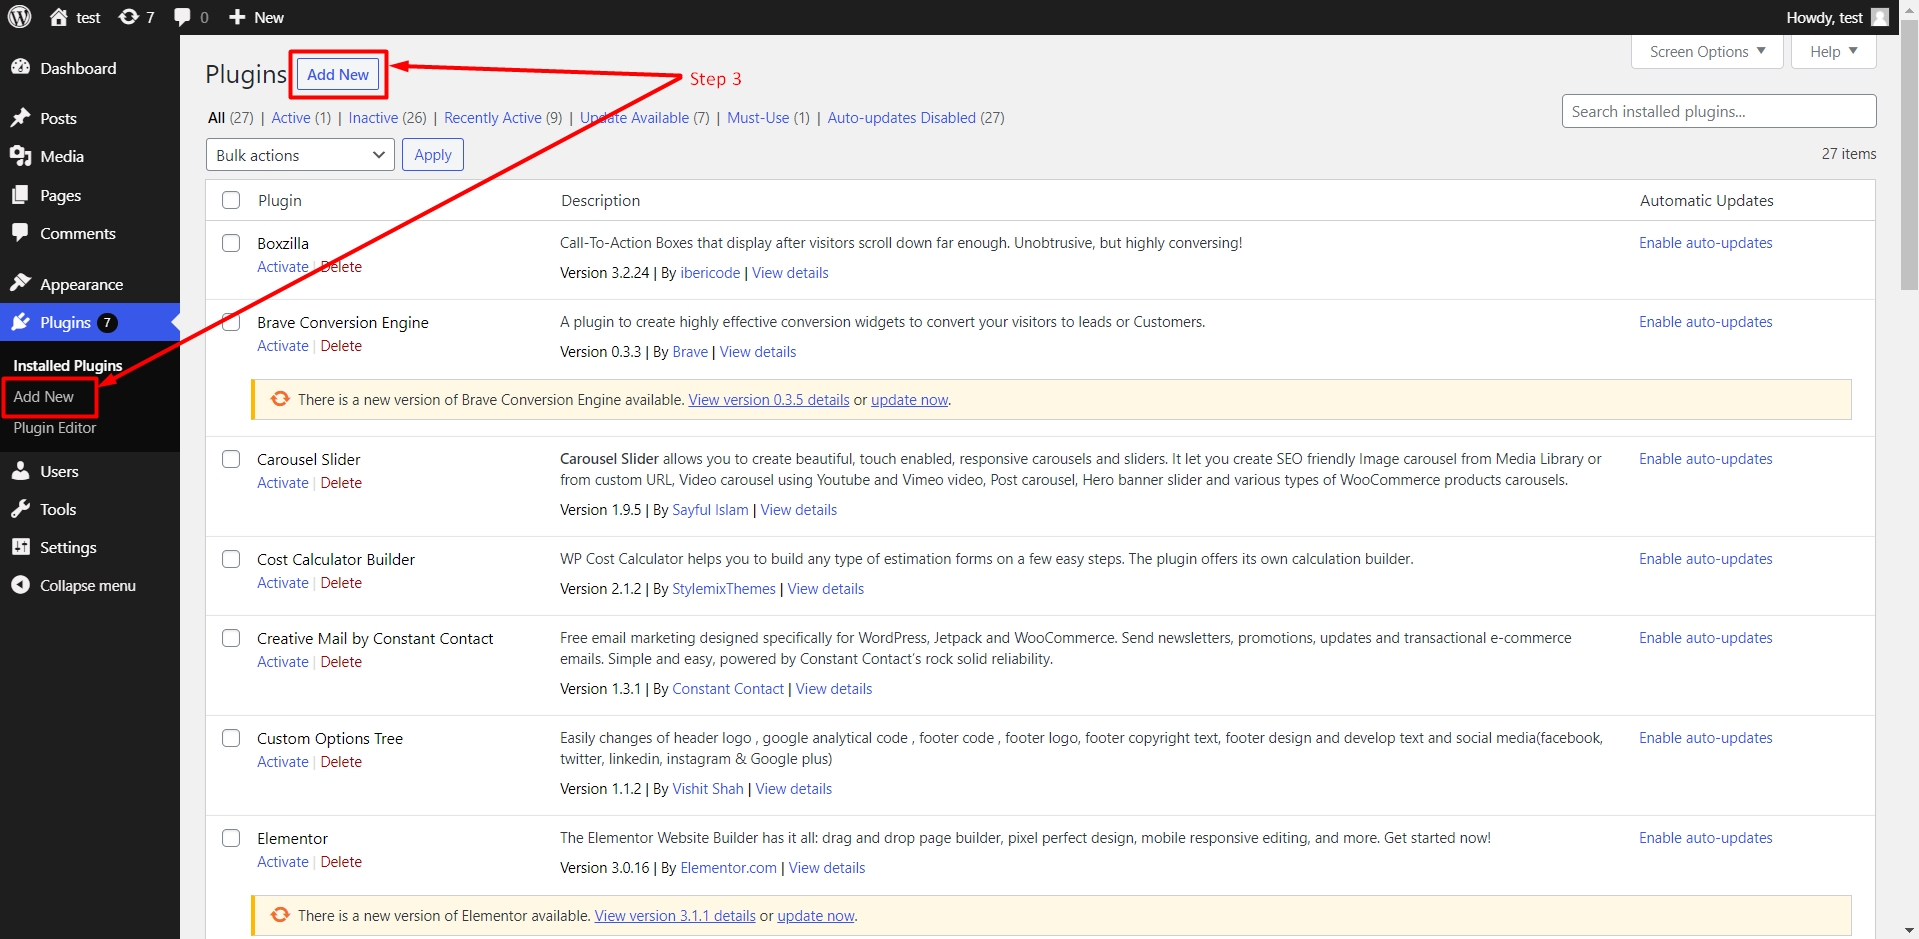
Step 3: Now click on the “Add New” button to add a new plugin.
You can either find the add new button in the left sidebar or just beside the title of the page “Plugins”.
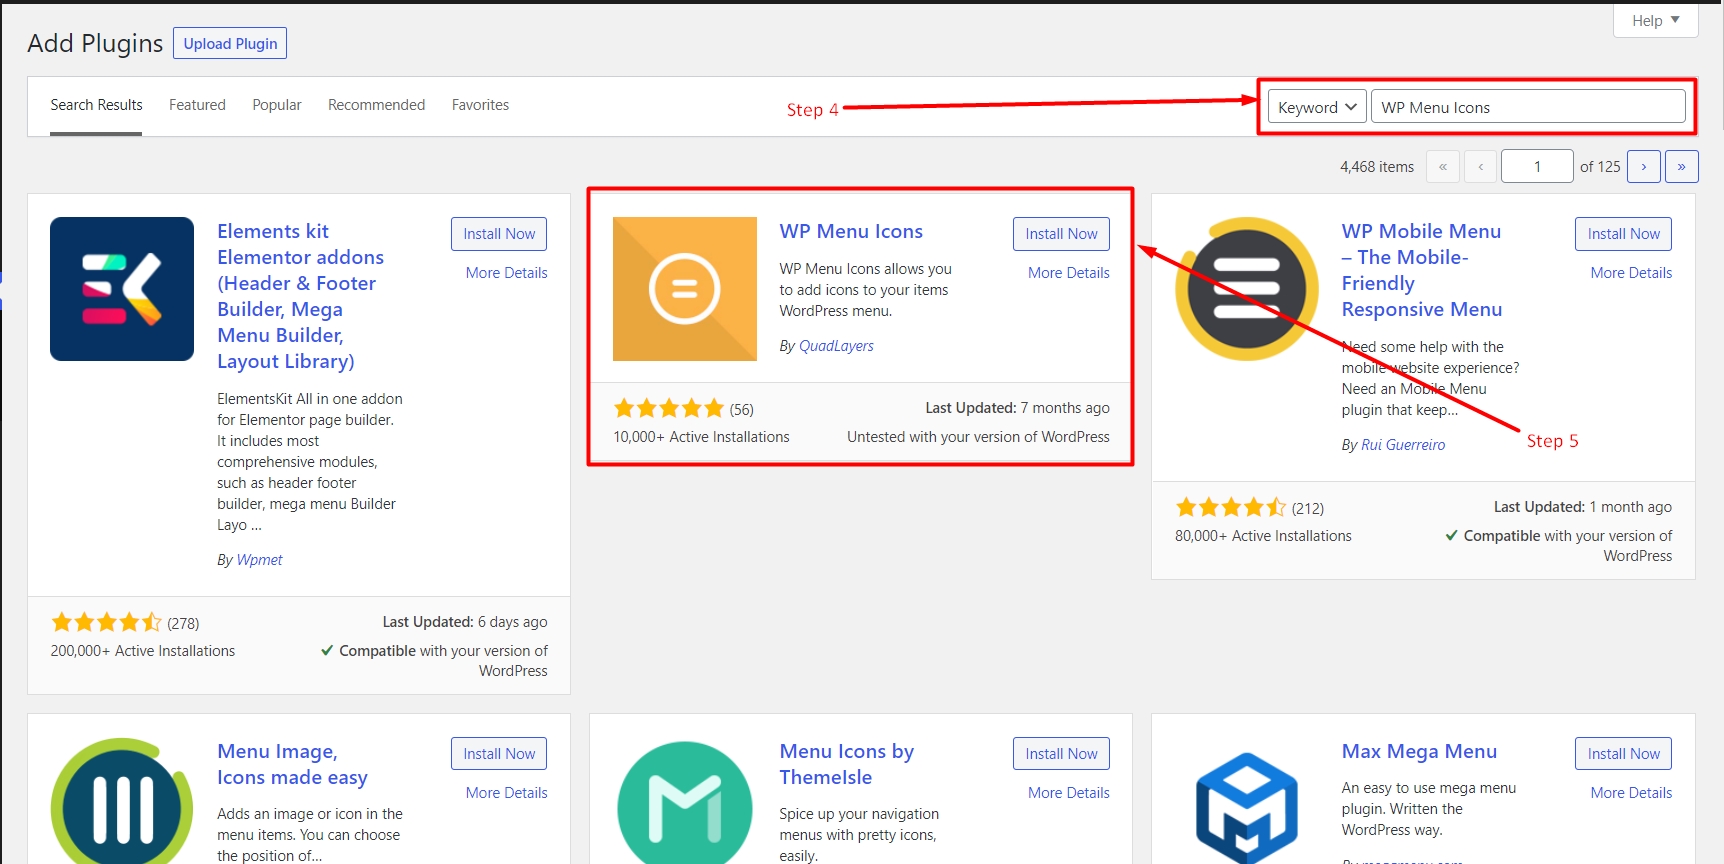
Step 4: After the click, WordPress will redirect to add new plugin page. You can easily search your plugin by writing a plugin name in the search box that is available on the right-top corner of the display as shown in the below image. After that, type your plugin name (WP Menu Icons) in the Search box.
Step 5: Then, find your file (WP Menu Icons) from the Search Results. In this step, you have to install your plugin on your WordPress account. You have to click on the Install Now button as shown in the below image.
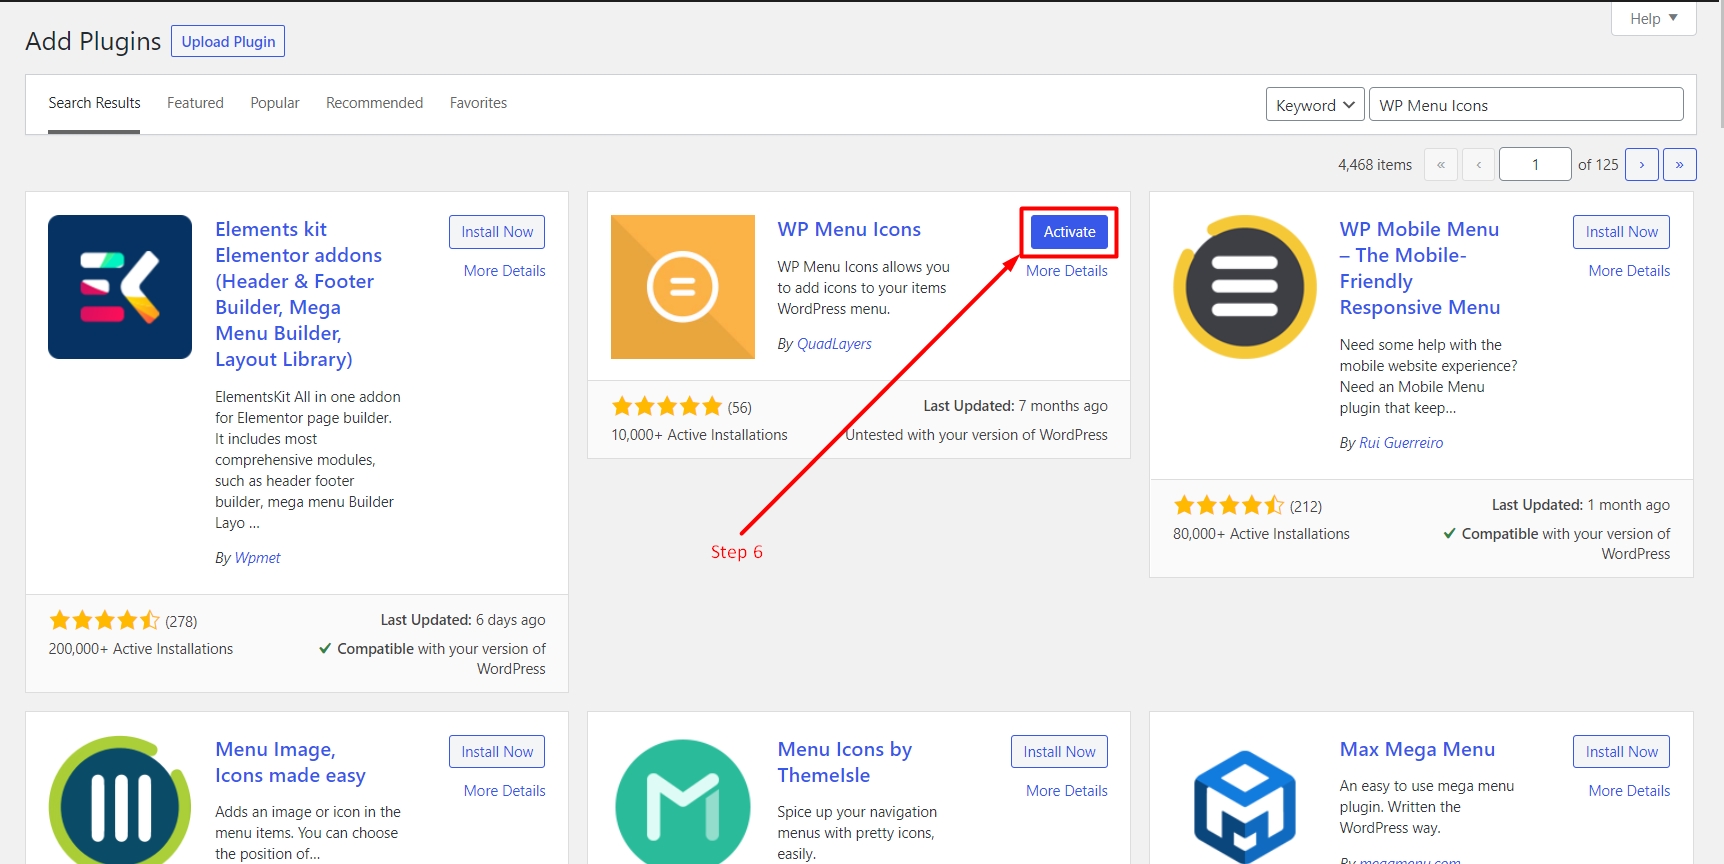
Step 6: Now, wait for a few minutes to complete the installation process. As soon as the installation process is complete, the Install Now button will change into the Activate button. Then, you have to click on the Activate button to activate your downloaded plugin.
So, that’s all you have to do to successfully install and activate the plugin in WordPress. Now let’s see what we can do with this plugin.
How to use WP Menu icons plugin in WordPress
Step 1: Log in to the WordPress admin area using administrator username and password.
The administrator access is only required if you don’t have access to this section of the website.
Step 2: Now click on the Appeareance tab from the left sidebar to see the list of all the apprearence customisation options.
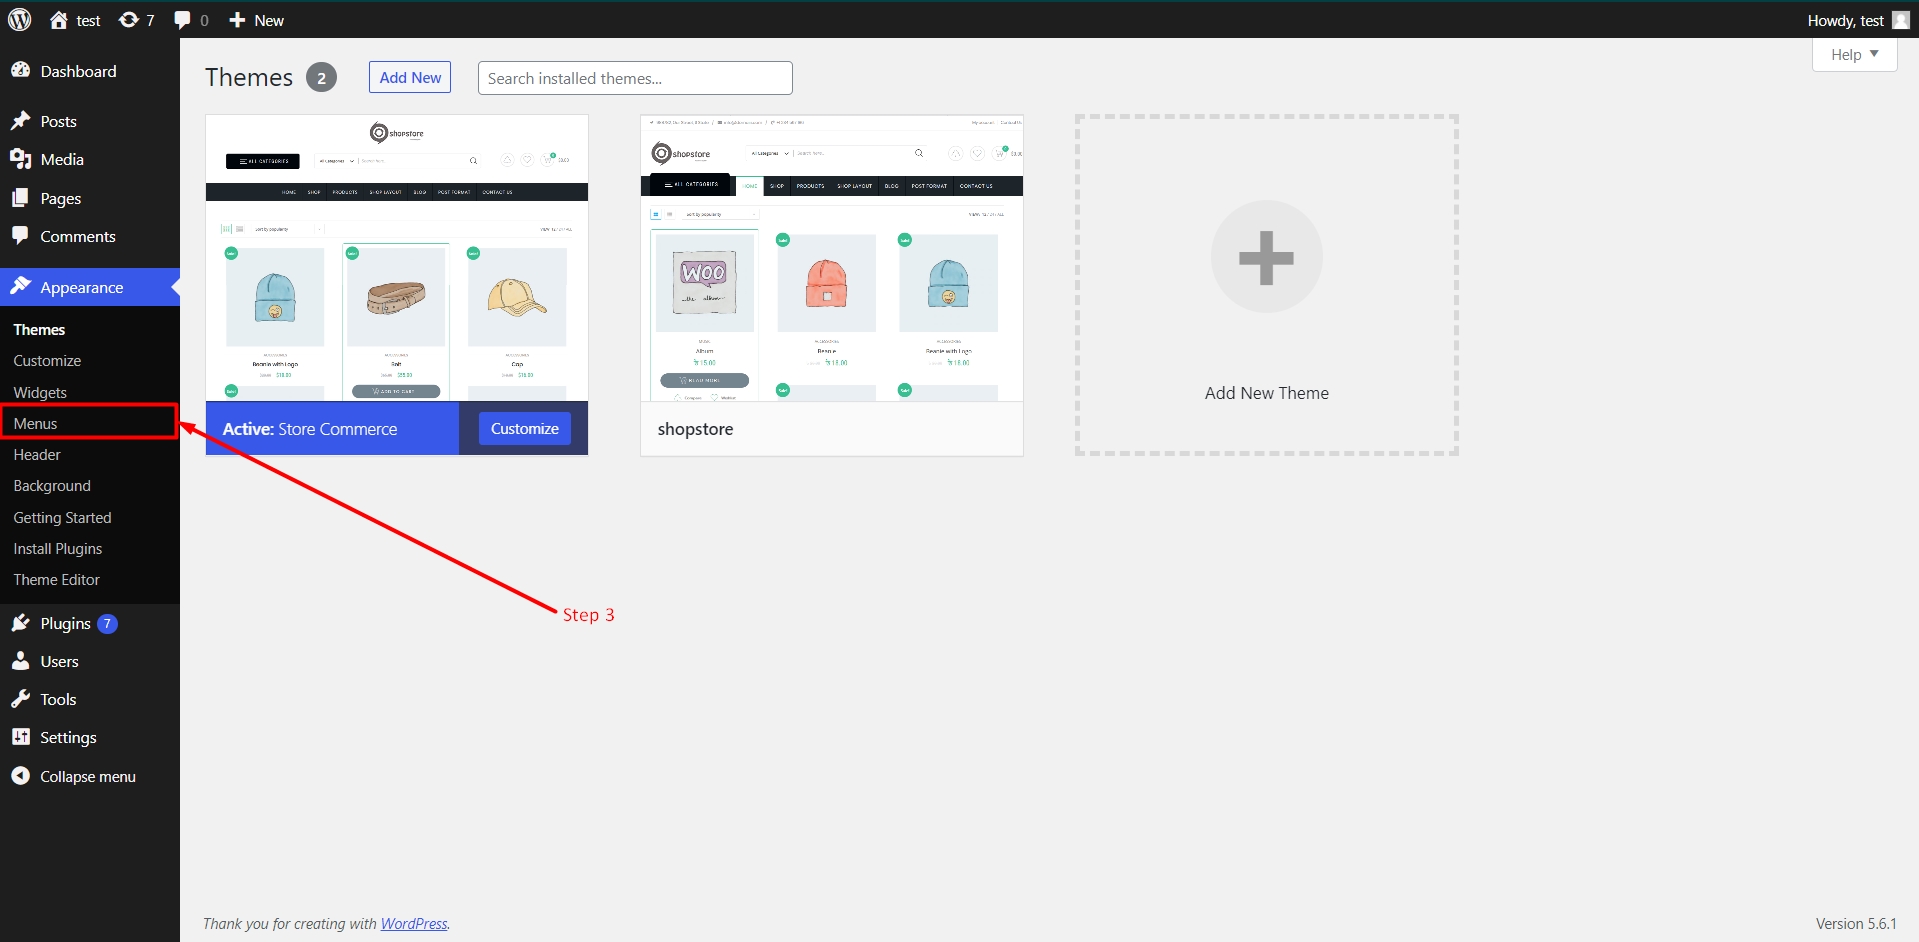
Step 3: From the list of Appearance customisation options, click on the Menus option to modify the menus on your WordPress website.
In this section, you can basically manage menus on your WordPress website. You can set internal/external links with desired links and labels from the menu management section in WordPress. However, with the help of this plugin, you can also set the desired icon for each menu icon.
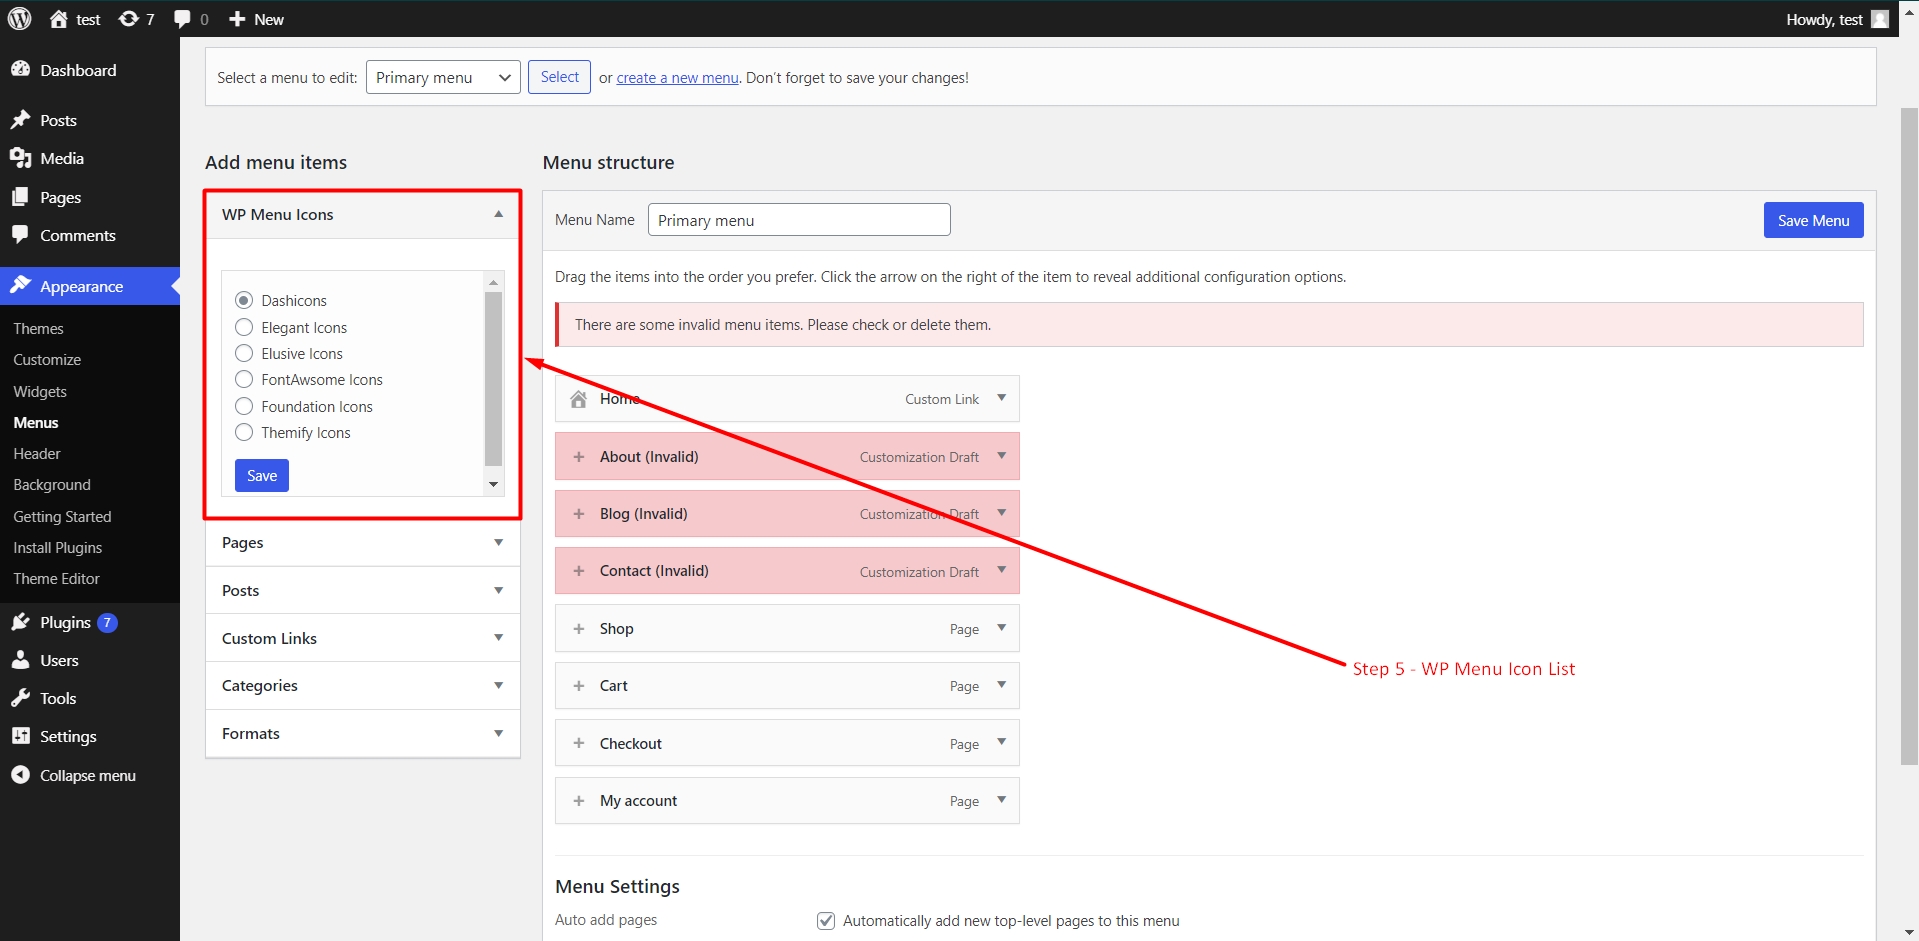
Step 4: In the menu section, you will see a new selection list in the left sidebar with the heading “WP Menu Icons”. From this box, you can see the list of icon libraries available for you. Here are the options available for you.
- Dashicons
- Elegant Icons
- Elusive Icons
- Font awesome icons
- Foundation icons
- Themify icons
The most popular library is the Font awesome icons. However, you can use different libraries according to your requirements.
Step 5: Select the icon library according to your requirements and click on the “Save” button given at the bottom of that box.
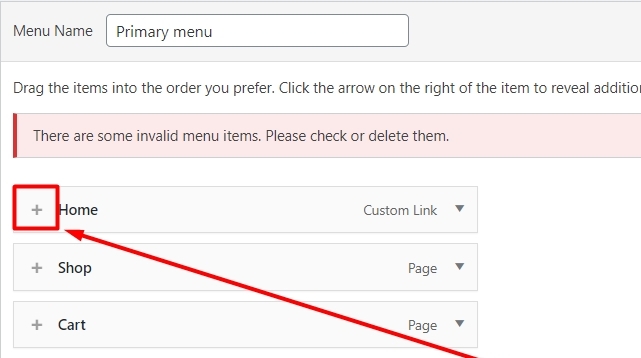
Step 6: Now, go to the list of menu options and you will see a “+” icon on the left side of the menu item label. Click on that button to add or modify the icon for that menu item.
Step 7: After clicking on the “+” button, you will see a huge pop-up box with lots of icons you can select.
You can change the icon library if you don’t find the desired icon in the list.
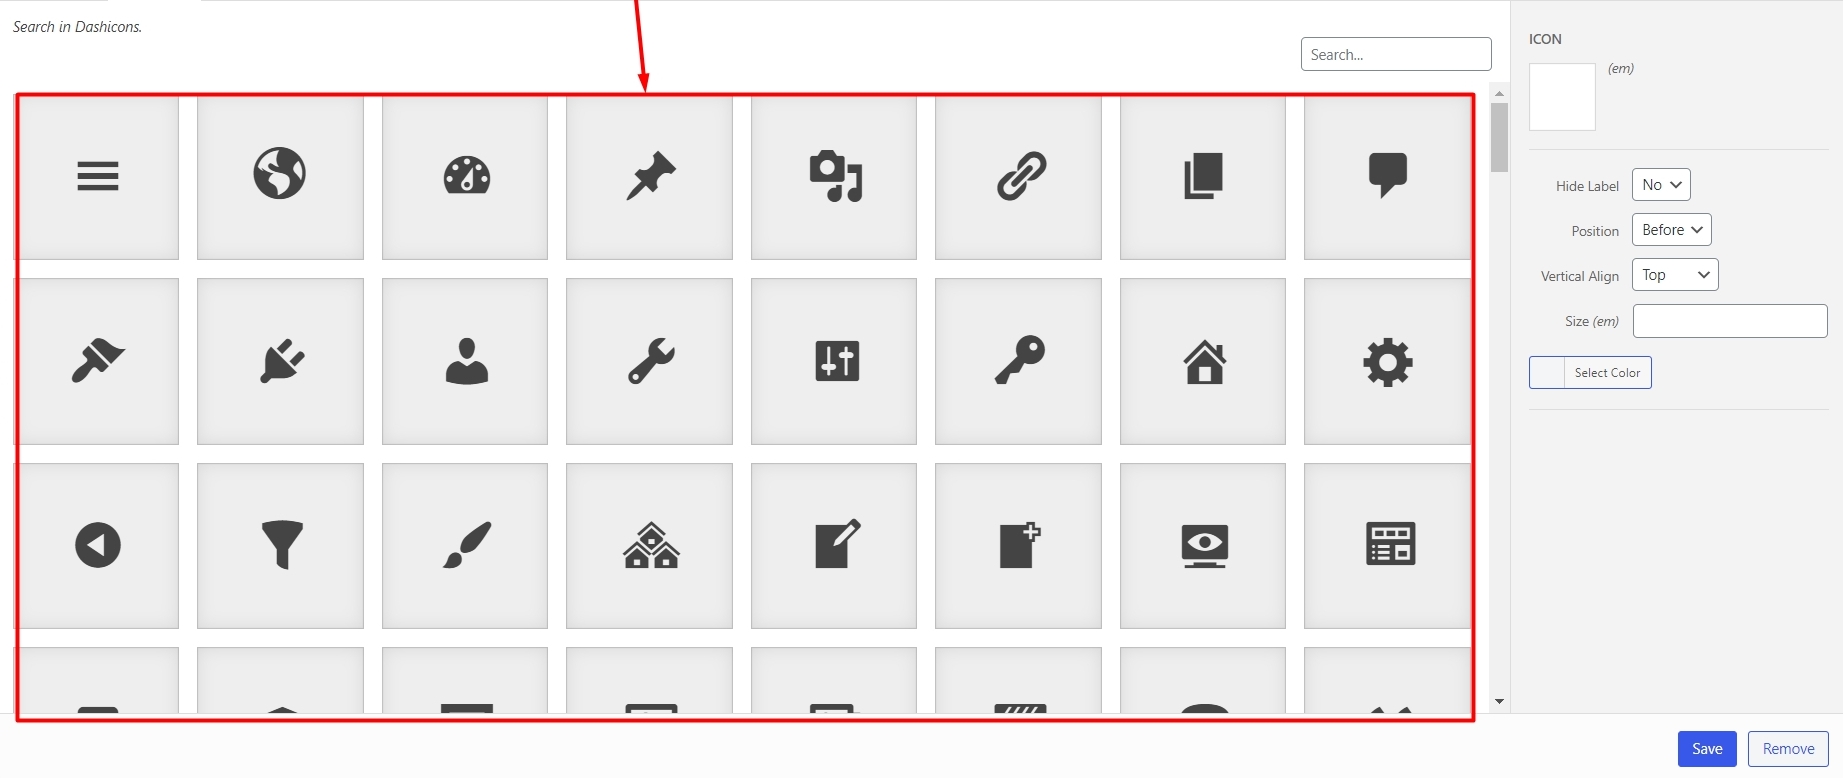
Step 8: You can also search for the desired icon using the search box. Once you have decided the icon you want to set on the menu item, click on that icon and then click on the “Save” button given at the bottom-right corner of the pop-up box.
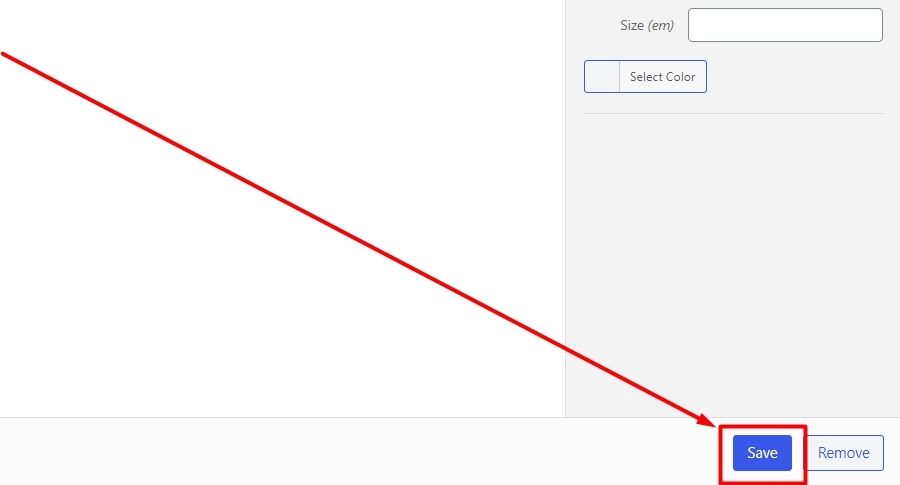
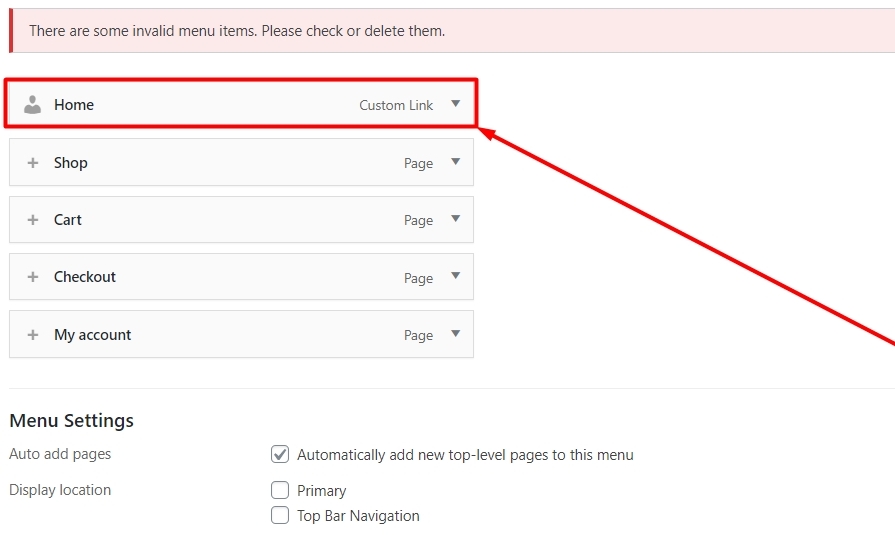
Step 9: After clicking on the “Save” button, You will see a selected icon on the left side of the Menu icon label. See the following image for reference.
Step 10: Finally, click on the “Save changes” button for the menu to save all the changes.
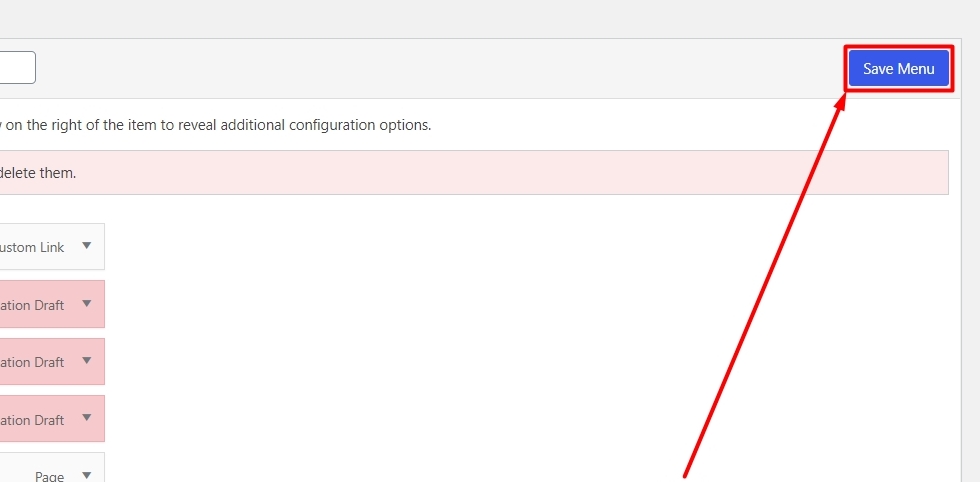
Once the changes are applied, you will see an icon along with the menu item on your WordPress website. You can set the menu icon for any type of menu item. You can also avoid the menu icon if you don’t want to set an icon for specific menu items.
Conclusion: So, this is how you can customise the WordPress menus to add menu icons. There are many other plugins available for the same purpose. But this plugin is the easiest to use, simply works and is free to use in any case. So, you can use this plugin on as many websites as you want for Free!
If you are facing any issue setting up the menu icons even after following this tutorial, please let us know in the comment section given below. If you are seeing broken images instead of icons, it’s most probably the issue with your internet service provider. You can use VPN in this case or wait for some time. If you are facing any other web hosting related issue, please contact our awesome support staff for quick help!
Related guides
7 Common Hosting Mistakes Beginners Make (And How to Avoid Them)
7 common hosting mistakes beginners make in 2026: no backups, ignored updates, bad host choice, weak passwords, single point of failure, no staging. With fixes for each.
WordPressWebsite Migration Backup Checklist: What to Save and How to Test
Prepare a website migration backup: inventory files, databases, email and DNS, check archive integrity, test recovery and plan a safe final synchronization.
WordPressCore Web Vitals in 2026: A Practical Fix Guide for Site Owners
Core Web Vitals 2026: practical fixes for LCP, INP, and CLS. Real root causes, what to measure, common misconceptions, and a priority order of fixes for site owners.
WordPressFixing the WordPress “Death Loop”: When Missing Files slow down your site
You’ve just launched your new WordPress site or pushed a big update. In your staging environment, everything ran perfectly.