
GICT knowledge base
How to Install MongoDB on Ubuntu 24.04
Published
MongoDB is a very popular NoSQL database and is very popular amongst people who work with large volumes of unstructured or semi structured datasets. If you are using Ubuntu 24.04 and looking forward to working on MongoDB, this guide is tailored for you.
This guide will ensure you have everything from the installation to the various testing steps complete and will even delve into some optional configuration such as how to access it remotely as well as from a security perspective.
What is MongoDB?
MongoDB is a document-based NoSQL database. Instead of storing data in tables like traditional SQL databases, MongoDB stores data in JSON-like documents, which makes it more flexible for modern applications.
This means you don’t need to define a strict schema beforehand, and you can easily scale your application as it grows.
Why Choose MongoDB for Ubuntu 24.04?
Ubuntu 24.04 LTS is a stable and secure Linux distribution that’s perfect for running databases. Here are some key benefits:
- Performance: MongoDB runs efficiently on Ubuntu’s optimized kernel
- Security: Ubuntu’s built-in security features complement MongoDB’s security measures
- Community Support: Large community of developers using this combination
- Long-term Stability: Both Ubuntu 24.04 LTS and MongoDB offer long-term support
Prerequisites Before Installation
Before installing MongoDB, make sure you have:
- A system running Ubuntu 24.04
- Sudo privileges (admin access)
- Stable internet connection
- At least 2GB of free disk space
- Basic knowledge of terminal (don’t worry, commands are copy-paste friendly)
Installing MongoDB Using Official Repository
This is the best way to install MongoDB on Ubuntu 24.04. I recommend this method because it’s more reliable and you get updates directly from the MongoDB team.
Step 1: Update Your System
First, let’s update your system to make sure everything is current:
sudo apt update
sudo apt upgrade -y
Step 2: Install Required Dependencies
Install the necessary packages that MongoDB requires:
sudo apt install wget curl gnupg2 software-properties-common apt-transport-https ca-certificates lsb-releaseStep 3: Import MongoDB GPG Key
Import the MongoDB public GPG key to verify package authenticity:
curl -fsSL https://www.mongodb.org/static/pgp/server-7.0.asc | sudo gpg --dearmor -o /usr/share/keyrings/mongodb-server-7.0.gpgStep 4: Add MongoDB Repository
Add the MongoDB repository to your system’s package list:
echo "deb [arch=amd64,arm64 signed-by=/usr/share/keyrings/mongodb-server-7.0.gpg] https://repo.mongodb.org/apt/ubuntu jammy/mongodb-org/7.0 multiverse" | sudo tee /etc/apt/sources.list.d/mongodb-org-7.0.listStep 5: Update Package List Again
Update the package list to recognize the newly added MongoDB repository:
sudo apt updateStep 6: Install MongoDB
Now install MongoDB Community Edition:
sudo apt install mongodb-org -yThis command installs several packages including:
- mongodb-org-server (the main database daemon)
- mongodb-org-mongos (sharding daemon)
- mongodb-org-shell (MongoDB shell)
- mongodb-org-tools (import/export tools)
Starting and Configuring MongoDB
Enable and Start MongoDB Service
After installation, enable MongoDB to start automatically on boot and start the service:
sudo systemctl enable mongod
sudo systemctl start mongod
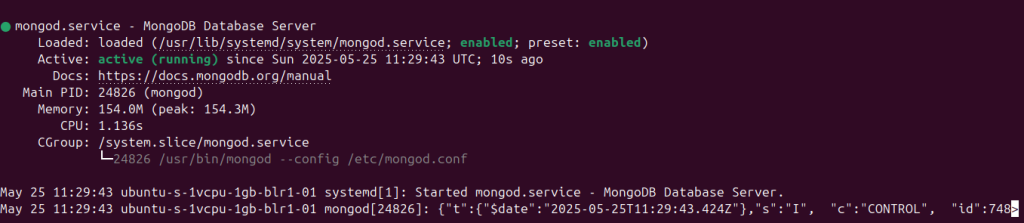
Check MongoDB Status
Verify that MongoDB is running correctly:
sudo systemctl status mongodYou should see an “active (running)” status, which means MongoDB is working properly.
Configure MongoDB for Remote Access (Optional)
By default, MongoDB only accepts connections from localhost. If you need remote access, edit the configuration file:
sudo nano /etc/mongod.confFind the bindIp line and change it from 127.0.0.1 to 0.0.0.0 to allow connections from any IP address. But make this change only if you’re aware of the security risks involved.
Testing Your MongoDB Installation
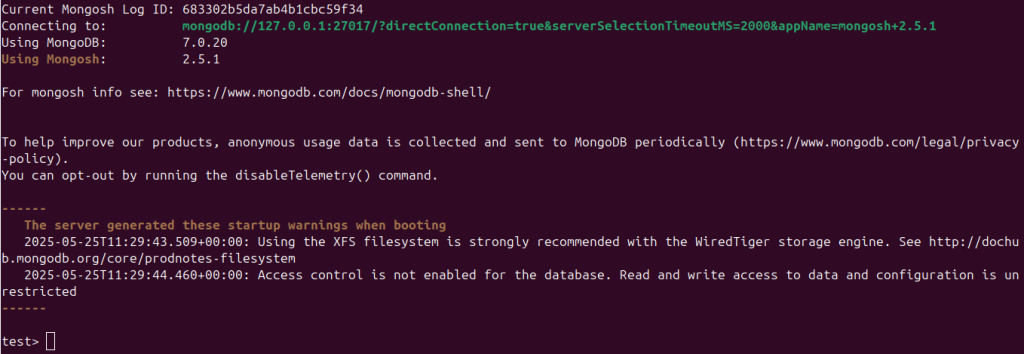
Connect to MongoDB Shell
Test your installation by connecting to the MongoDB shell:
mongoshIf the installation was successful, you’ll see the MongoDB shell prompt.
Create a Test Database
After entering the MongoDB shell, create a sample database:
use testdb
db.testcollection.insertOne({name: "Test User", email: "[email protected]"})
db.testcollection.find()
If you see your inserted document, congratulations! MongoDB is working correctly.
Common Issues and Troubleshooting
MongoDB Won’t Start
If MongoDB fails to start, check the logs:
sudo journalctl -u mongodCommon solutions include:
- Checking disk space availability
- Verifying file permissions
- Ensuring no other process is using the MongoDB port (27017)
Permission Issues
If you encounter permission errors, make sure the MongoDB user has proper access:
sudo chown -R mongodb:mongodb /var/lib/mongodb
sudo chown mongodb:mongodb /tmp/mongodb-27017.sock
Port Already in Use
If port 27017 is already in use, find the process and kill it:
sudo lsof -i :27017
sudo kill -9 [PID]
Security Best Practices
Enable Authentication
For production use, always enable authentication:
mongosh
use admin
db.createUser({user: "admin", pwd: "yourpassword", roles: ["userAdminAnyDatabase"]})
Then edit /etc/mongod.conf and enable security:
security:
  authorization: enabled
Configure Firewall
If using UFW firewall, allow MongoDB port:
sudo ufw allow 27017Regular Updates
Keep MongoDB updated by regularly running:
sudo apt update
sudo apt upgrade mongodb-org
Performance Optimization Tips
Where to Find MongoDB Configuration File
The MongoDB configuration file is located at:
/etc/mongod.confTo edit this file, use:
sudo nano /etc/mongod.confAdjust WiredTiger Cache Size
Open the config file and add or modify these settings to optimize memory usage:
storage:
  wiredTiger:
    engineConfig:
      cacheSizeGB: 2
Note: Set cacheSizeGB to roughly half of your system’s available RAM. For instance, if your system has 8GB of RAM, set the value to 4GB.
Enable Journaling
Make sure journaling is enabled for data safety. Add this to your /etc/mongod.conf:
storage:
  journal:
    enabled: true
Set Connection Limits
To handle more connections, add this section:
net:
  maxIncomingConnections: 1000
After Making Changes
Always restart MongoDB after changing the configuration:
sudo systemctl restart mongod
sudo systemctl status mongod
Check if Changes Applied
Verify your settings worked:
mongosh --eval "db.serverStatus().wiredTiger.cache"How to Uninstall MongoDB from Ubuntu 24.04
Sometimes you might need to remove MongoDB from your system. Here’s how to do it properly:
Stop MongoDB Service
First, stop the running MongoDB service:
sudo systemctl stop mongod
sudo systemctl disable mongod
Remove MongoDB Packages
Remove all MongoDB packages:
sudo apt purge mongodb-org*
sudo apt autoremove
Clean Up Files and Directories
Delete MongoDB data and log files:
sudo rm -rf /var/log/mongodb
sudo rm -rf /var/lib/mongodb
sudo rm -rf /etc/mongod.conf
Remove Repository (Optional)
If you want to remove the MongoDB repository completely:
sudo rm /etc/apt/sources.list.d/mongodb-org-7.0.list
sudo apt update
Conclusion
That’s it! You now know how to install, uninstall, and reinstall MongoDB on Ubuntu 24.04. I personally prefer using the official repository method because it’s more reliable and gives you better control over updates.
Don’t forget to backup your data before making any major changes. I’ve seen too many people lose important information because they skipped this step.
If you run into any problems, just go back to the troubleshooting section. Most issues can be fixed pretty easily once you know what to look for.
MongoDB works great on Ubuntu 24.04, and once you get it set up properly, it’s pretty smooth sailing from there.
Related guides
How to Find Services That Need a Restart After Updates with needrestart
Find services using outdated libraries with needrestart on Ubuntu. Read restart reports, review automatic restart policy and plan maintenance safely.
UbuntuHow to Enable Brotli Compression in Nginx on Ubuntu 24.04
Enable Brotli in Ubuntu Nginx, preserve gzip fallback, verify response headers and avoid stale precompressed assets. Measure savings on your own files.
UbuntuHow to Prevent Overlapping Cron Jobs with flock
Prevent overlapping cron jobs with flock. Use a shared lock, understand skipped runs and verify that every entry point follows the locking policy.
UbuntuSecuring Ubuntu 24 SSH and other best practices
How to Lock Down Your Ubuntu 24 Server: A Beginner's Guide So, you just spun up a brand new Ubuntu 24 server. You may find a lot of SSH brute force logins failures.