
GICT knowledge base
How to Install and Configure PostgreSQL on Ubuntu 24.04
Published
PostgreSQL is one of those databases that just works. If you’re running Ubuntu 24.04 and need to get PostgreSQL up and running, you’re in the right place. This guide covers everything from basic installation to advanced configuration.
Understanding PostgreSQL
PostgreSQL is an open-source relational database management system that handles both SQL and NoSQL workloads. It’s known for reliability, performance, and advanced features that many paid databases charge thousands for.
What sets PostgreSQL apart is its stability and feature set. Companies across all industries rely on it for critical applications because it rarely breaks and handles large datasets efficiently.
Why PostgreSQL Works Well on Ubuntu 24.04
Ubuntu and PostgreSQL make a solid combination. The installation process is straightforward, updates are seamless, and you don’t run into the compatibility issues that plague other operating systems.
The package management in Ubuntu means PostgreSQL updates happen smoothly. When security patches or new versions come out, upgrading takes just one command.
System Requirements
Before starting, make sure you have:
- Ubuntu 24.04 (server or desktop)
- Root or sudo access
- Internet connection for downloading packages
- At least 1GB free disk space
These requirements are pretty minimal. PostgreSQL runs well even on modest hardware configurations.
Standard Installation Process
The easiest way to install PostgreSQL is through Ubuntu’s package repository. This method works for most use cases and gives you a stable, tested version.
Update Your Package List
Start by refreshing your package information:
sudo apt update
sudo apt upgrade
This ensures you’re working with the latest package information and security updates.
Install PostgreSQL
Run the installation command:
sudo apt install postgresql postgresql-contribThe postgresql-contrib package includes additional utilities and extensions that extend PostgreSQL’s functionality. It’s worth installing alongside the main package.
Verify the Installation
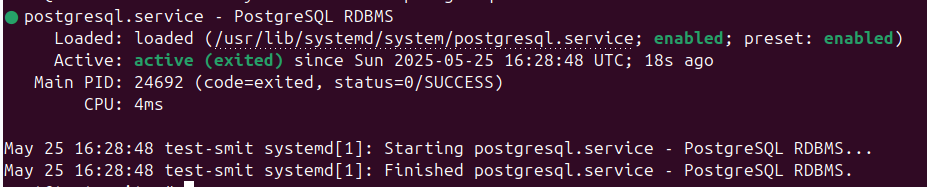
Check that PostgreSQL is running:
sudo systemctl status postgresqlYou should see “active (running)” status, which means the service started successfully.
Installing the Latest Version
Ubuntu’s repository might not have the newest PostgreSQL version. If you need specific features from the latest release, use PostgreSQL’s official repository.
Add Official Repository
sudo sh -c 'echo "deb http://apt.postgresql.org/pub/repos/apt $(lsb_release -cs)-pgdg main" > /etc/apt/sources.list.d/pgdg.list'Import Repository Key
wget --quiet -O - https://www.postgresql.org/media/keys/ACCC4CF8.asc | sudo apt-key add -Install Latest Version
sudo apt update
sudo apt install postgresql postgresql-contrib
Initial Database Setup
After installation, PostgreSQL creates a system user named postgres. This user has full administrative privileges over the database system.
Access PostgreSQL
Switch to the postgres user:
sudo -i -u postgresConnect to the PostgreSQL prompt:
psqlCreate Application User
Instead of using the default postgres user for applications, create a dedicated user:
CREATE USER appuser WITH PASSWORD 'secure_password';Grant database creation privileges:
ALTER USER appuser CREATEDB;Exit the PostgreSQL prompt:
\qReturn to your regular user account:
exitCreating Your First Database
Create a database for your application:
sudo -u postgres createdb myapp_dbAlternatively, create it from within PostgreSQL:
sudo -u postgres psql
CREATE DATABASE myapp_db OWNER appuser;
\q
The second method assigns ownership to your application user immediately.
Configuring Remote Access
PostgreSQL defaults to local connections only. For remote access, you need to modify two configuration files.
Edit Main Configuration
Open the PostgreSQL configuration file:
sudo nano /etc/postgresql/*/main/postgresql.confFind and modify the listen_addresses line:
listen_addresses = '*'This tells PostgreSQL to accept connections from any IP address.
Configure Client Authentication
Edit the host-based authentication file:
sudo nano /etc/postgresql/*/main/pg_hba.confAdd connection rules for your network:
host all all 192.168.1.0/24 md5Replace the IP range with your actual network configuration.
Restart PostgreSQL Service
Apply the changes:
sudo systemctl restart postgresqlEssential PostgreSQL Commands
These commands handle daily database operations:
- Connect to a database:
psql -h 127.0.0.1 -U appuser -d myapp_db - List all databases:
\l - Switch databases:
\c database_name - Show tables:
\dt - Describe table structure:
\d table_name - Exit PostgreSQL:
\q
Security Configuration
Database security requires attention to several areas:
Change Default Passwords
Always change the postgres user password:
sudo -u postgres psql
ALTER USER postgres PASSWORD 'strong_password_here';
\q
Configure Firewall
Allow PostgreSQL through the firewall if needed:
sudo ufw allow 5432/tcpOnly open this port if you require remote database connections.
Regular Updates
Keep PostgreSQL updated with security patches:
sudo apt update
sudo apt upgrade postgresql
Performance Optimization
Several configuration changes can improve PostgreSQL performance:
Memory Settings
Edit the main configuration file:
sudo nano /etc/postgresql/*/main/postgresql.confAdjust memory allocation:
shared_buffers = 256MB
work_mem = 4MB
effective_cache_size = 1GB
These values depend on your available system memory.
Apply Changes
Restart PostgreSQL after configuration changes:
sudo systemctl restart postgresqlTroubleshooting Common Issues
Service won’t start:
Check the system logs:
sudo journalctl -u postgresqlUsually indicates a configuration file error.
Connection refused:
Verify the service is running:
sudo systemctl status postgresqlCheck port availability:
sudo netstat -plunt | grep postgresAuthentication failures:
Review the pg_hba.conf file for correct authentication methods and IP ranges.
Backup and Recovery
Regular backups prevent data loss:
Create Database Backup
pg_dump -U appuser myapp_db > backup.sqlRestore from Backup
psql -U appuser myapp_db < backup.sqlAutomated Backups
Set up automated backups using cron jobs for production systems.
Database Maintenance
Regular maintenance keeps PostgreSQL running efficiently:
- Analyze database statistics:
ANALYZE; - Clean up dead tuples:
VACUUM; - Full maintenance:
VACUUM ANALYZE;
Monitoring Database Performance
Track database performance using built-in tools:
- Current connections:
SELECT * FROM pg_stat_activity; - Database sizes:
SELECT datname, pg_size_pretty(pg_database_size(datname)) FROM pg_database;
Advanced Configuration Options
PostgreSQL offers extensive configuration options:
- Connection pooling for high-traffic applications
- Replication for high availability
- Partitioning for large datasets
- Custom extensions for specialized functionality
Conclusion
Installing PostgreSQL on Ubuntu 24.04 provides a robust database foundation for applications of any size. The combination of Ubuntu’s stability and PostgreSQL’s advanced features creates a reliable platform for data management.
Start with the basic installation and gradually implement advanced features as your requirements grow. PostgreSQL’s extensive documentation and active community provide excellent support resources.
Whether you’re developing a small application or managing enterprise data, this PostgreSQL installation on Ubuntu 24.04 offers the performance, reliability, and scalability needed for modern applications.
Regular maintenance, proper security practices, and performance monitoring ensure your PostgreSQL installation continues serving your applications effectively over time.
Related guides
How to Find Services That Need a Restart After Updates with needrestart
Find services using outdated libraries with needrestart on Ubuntu. Read restart reports, review automatic restart policy and plan maintenance safely.
UbuntuHow to Enable Brotli Compression in Nginx on Ubuntu 24.04
Enable Brotli in Ubuntu Nginx, preserve gzip fallback, verify response headers and avoid stale precompressed assets. Measure savings on your own files.
UbuntuHow to Prevent Overlapping Cron Jobs with flock
Prevent overlapping cron jobs with flock. Use a shared lock, understand skipped runs and verify that every entry point follows the locking policy.
UbuntuSecuring Ubuntu 24 SSH and other best practices
How to Lock Down Your Ubuntu 24 Server: A Beginner's Guide So, you just spun up a brand new Ubuntu 24 server. You may find a lot of SSH brute force logins failures.