
GICT knowledge base
How to create Custom Dashboard Widgets in WordPress
Published
What if you can remove the default wordpress dashboard widgets and replace them with the custom one?. There is the solution that gives you an option to choose widgets and manage them on your own. Custom dashboard widgets plugin allows a user to have complete control over their wordpress site dashboard. You will be able to display different links based on wordpress admin roles. Like, author, admin, manager etc.
This plugin will enable you to create and remove widgets. And, it also helps the user to develop a client dashboard for the wordpress site too. You can create a client dashboard and replace the default plugins with your self-customized text, icons, logos and html widgets, etc. The customize widgets give you quick access to dashboard links and pages with many subcategories. You can easily insert the new links to your dashboard widget.
In other words, custom dashboard widgets plugin contains all the default links like contact, view site, post, and pages, etc. They are easily deletable when you need to. Because it has an advanced login customizer that treats you to take control of every wordpress login page. It also allows you to restrict some specific users based on their roles.
Its advanced features allow you to add video and contact form widgets to your dashboard. It also works with third-party plugins like elementor, beaver builder. This plugin has some icon options like view site, profile, post, media, users, pages, plugin, and settings. You are capable of customizing them entirely according to your requirement.
We hope this article will help you to understand the process of installation and configuration of this plugin.
How to install Custom Dashboard widgets in WordPress
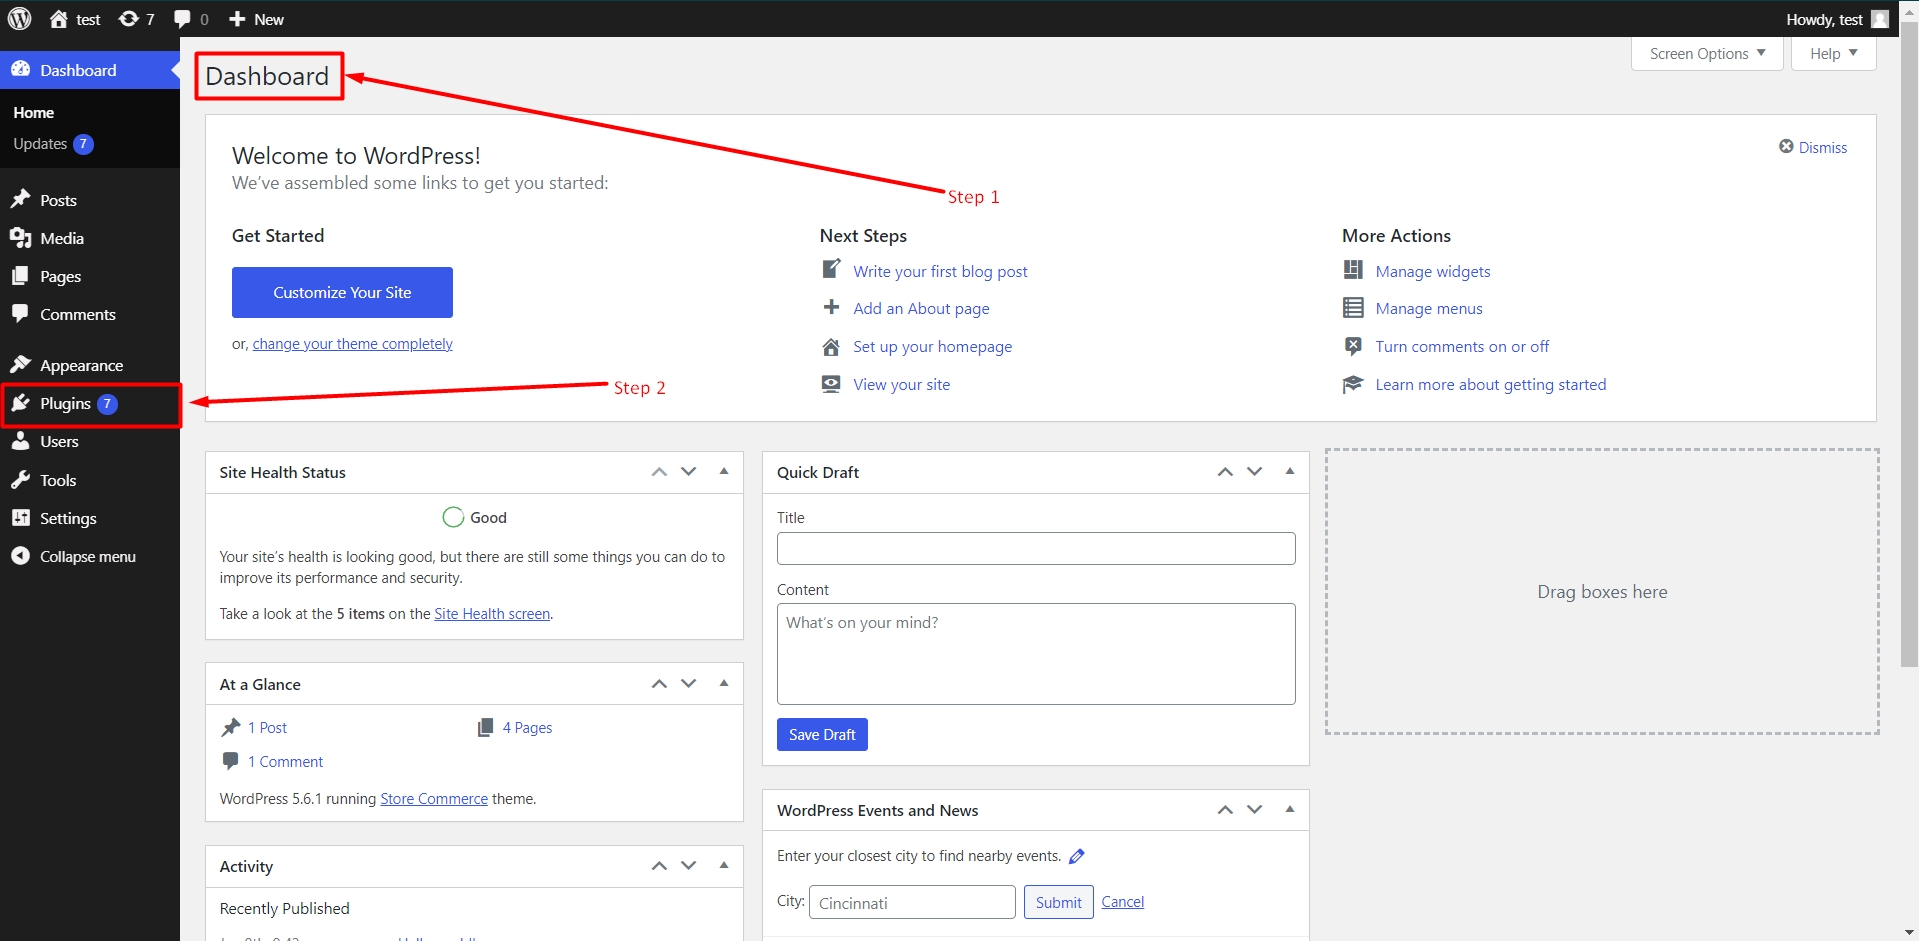
Step 1: Log in to your WordPress administrator area.
You must have administrator access to your website because we are going to install a plugin in our WordPress website.
Step 2: Click on the “Plugins” option from the left sidebar to access the plugin management in WordPress.
You can also jump the next step using “Plugins -> Add New” option.
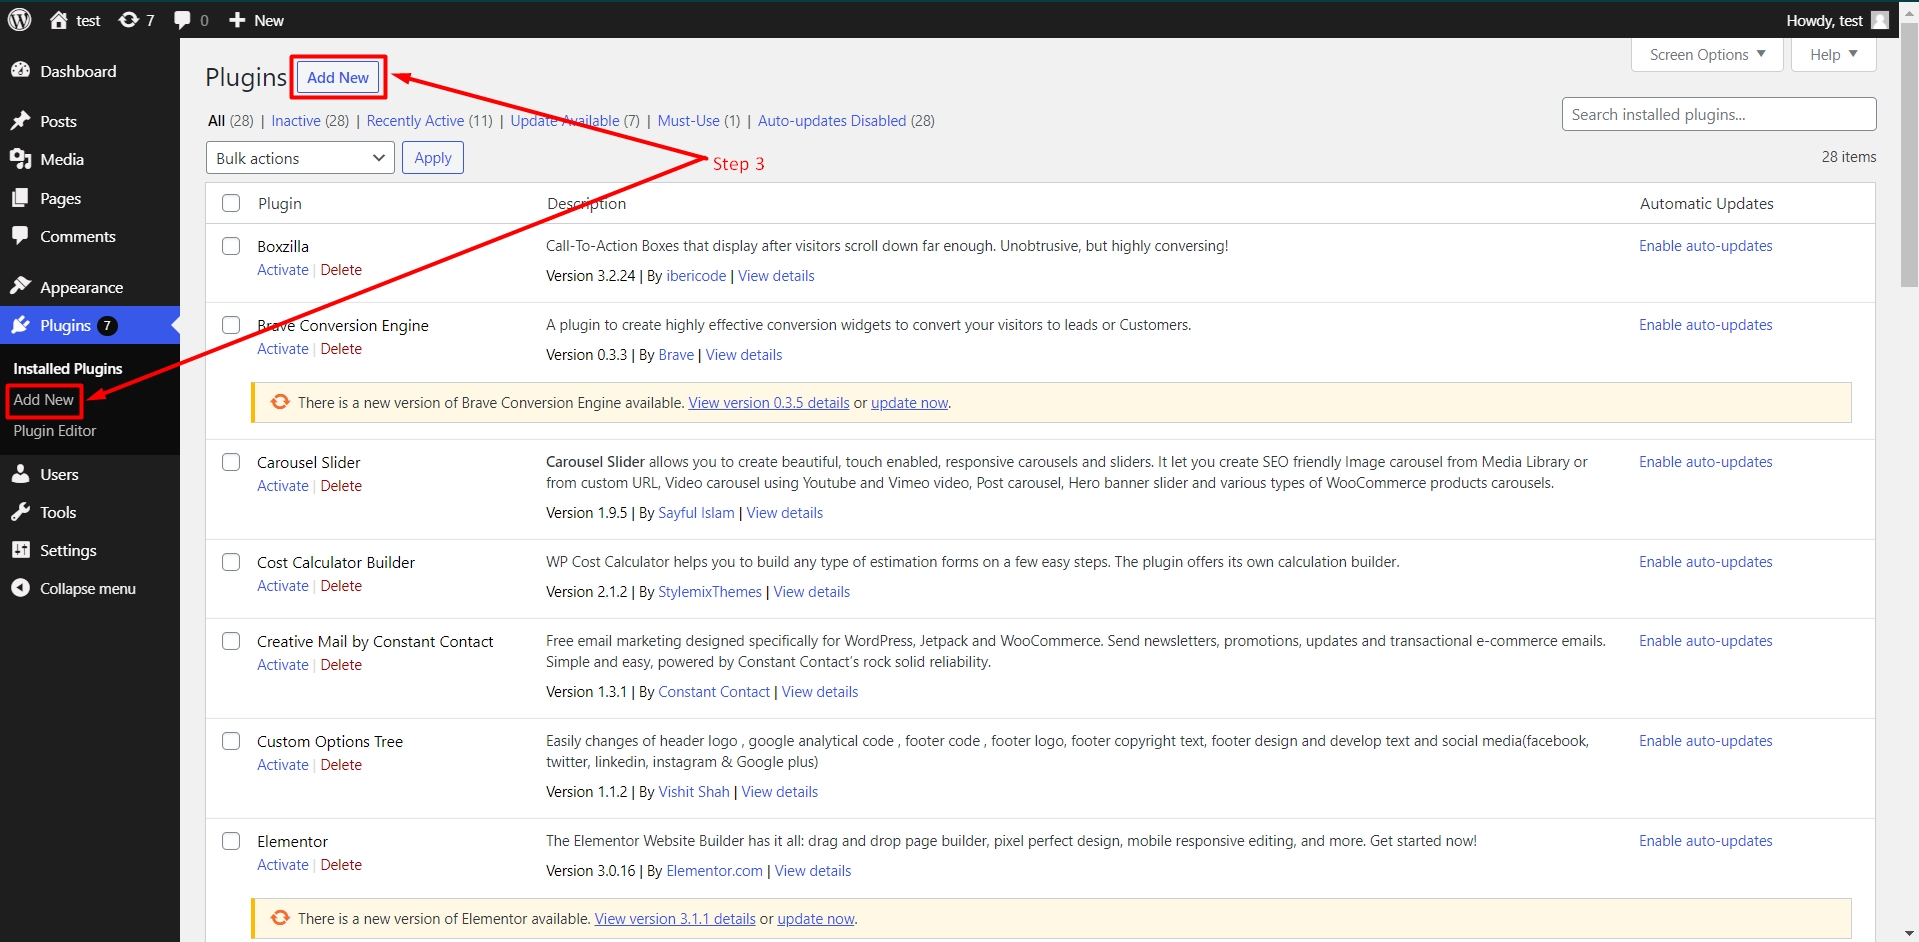
Step 3: Now click on the Add New option from the left sidebar or click on the Add new button beside the title of the page.
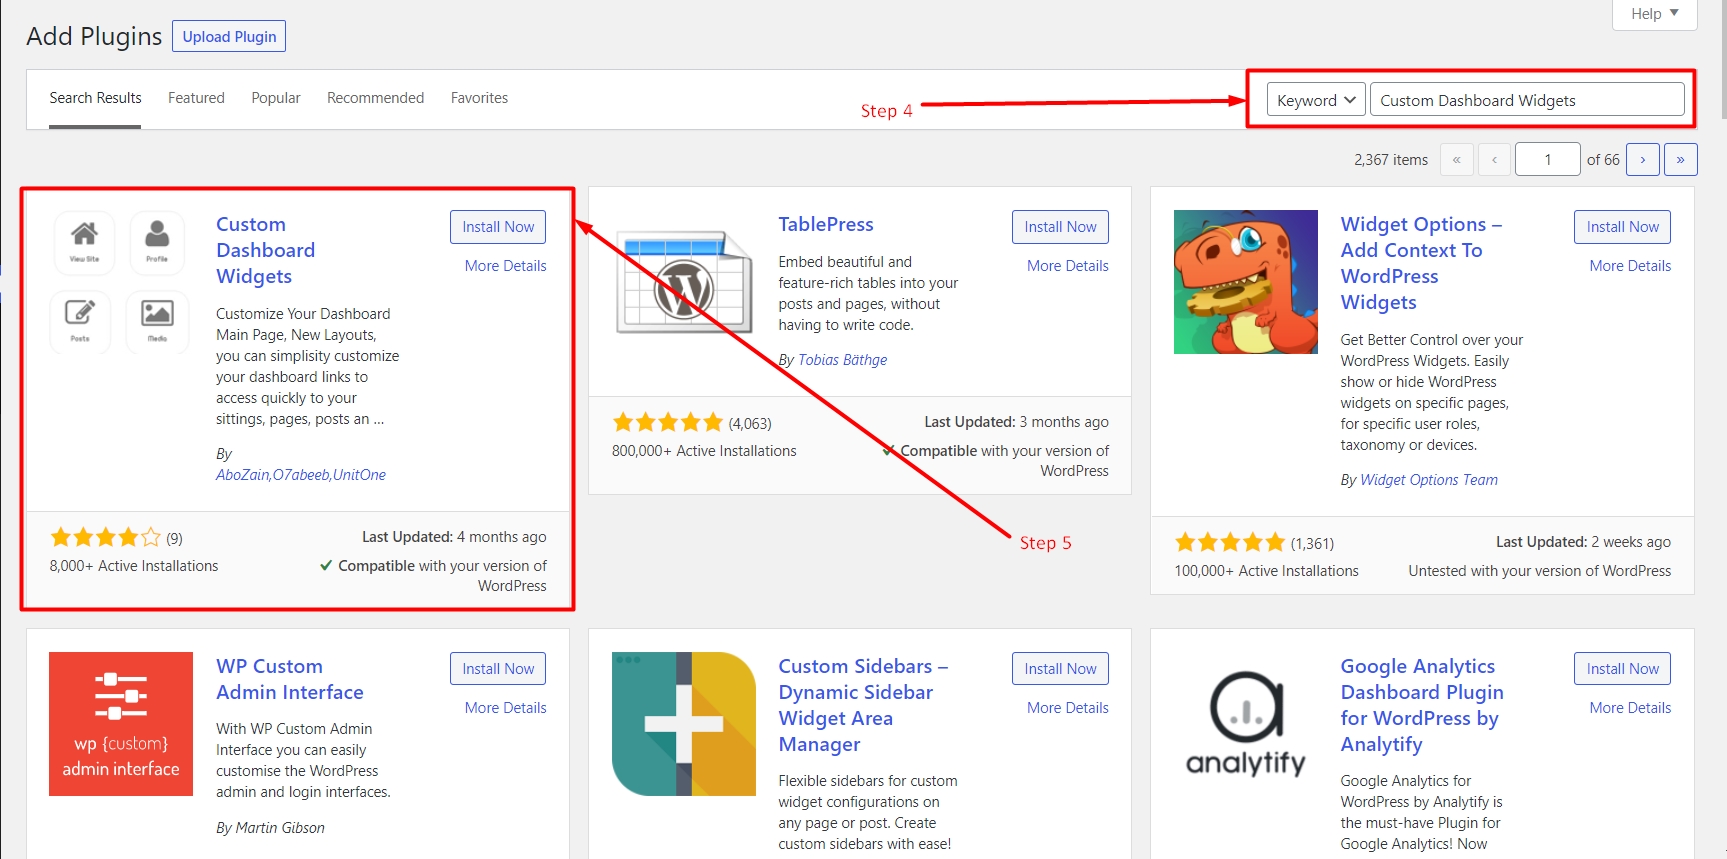
Step 4: A new page will open on your screen called “Add Plugins” page. A search box available on the top corner of this page. Type your plugin name (custom dashboard widgets) on the search box to find your plugin quickly.
You will get a lot of results. You can find the correct plugin with the help of following image.
Step 5: After that, click on your install now button to start your installation process. The install now button will show up on the plugin box as you can see in the below image.
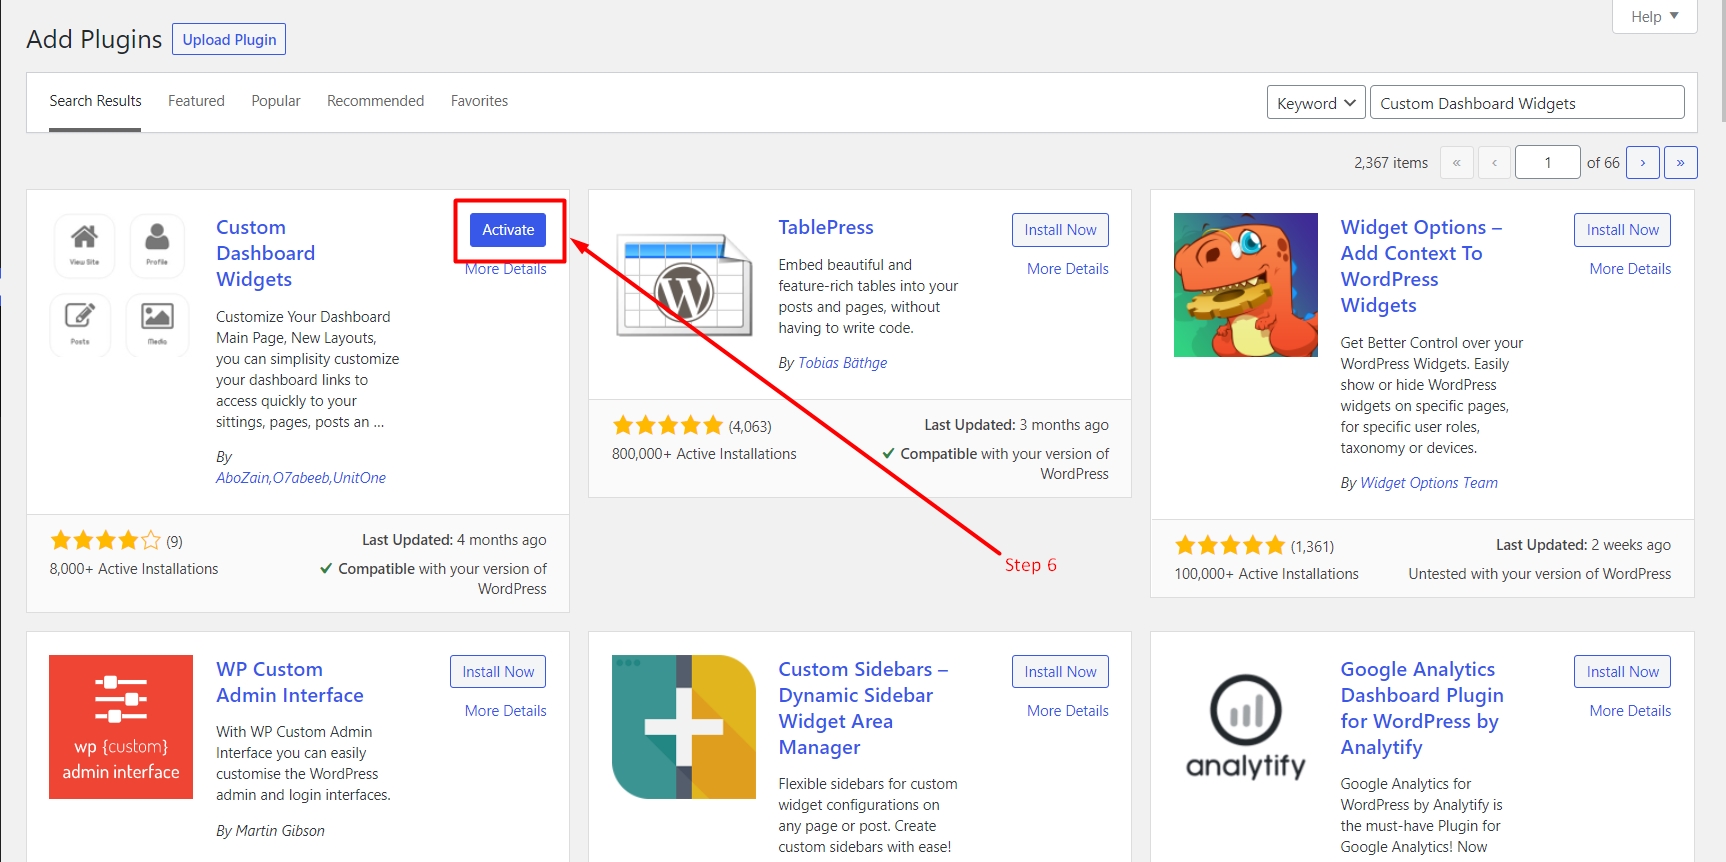
Wait for a couple of seconds or minutes depending on your host’s bandwidth. After the installation process is done successfully, The “Install Now” button will change into the “Activate” button as shown in the below image.
Step 6: Click on the “Activate” button to activate the plugin on your WordPress installation.
Once the plugin is activated, you will see a plugins page with a success message. Once the plugin is successfully activated, we are ready to use it in our WordPress installation. Let’s learn How to use this plugin.
How to manage Custom Dashboard Widgets in WordPress
Step 1: Log in to your WordPress administrator dashboard using admin username and password.
Step 2: Now click on the “Settings” option from the left sidebar.
It will contain many default WordPress options along with a new one called “Dashboard widgets”.
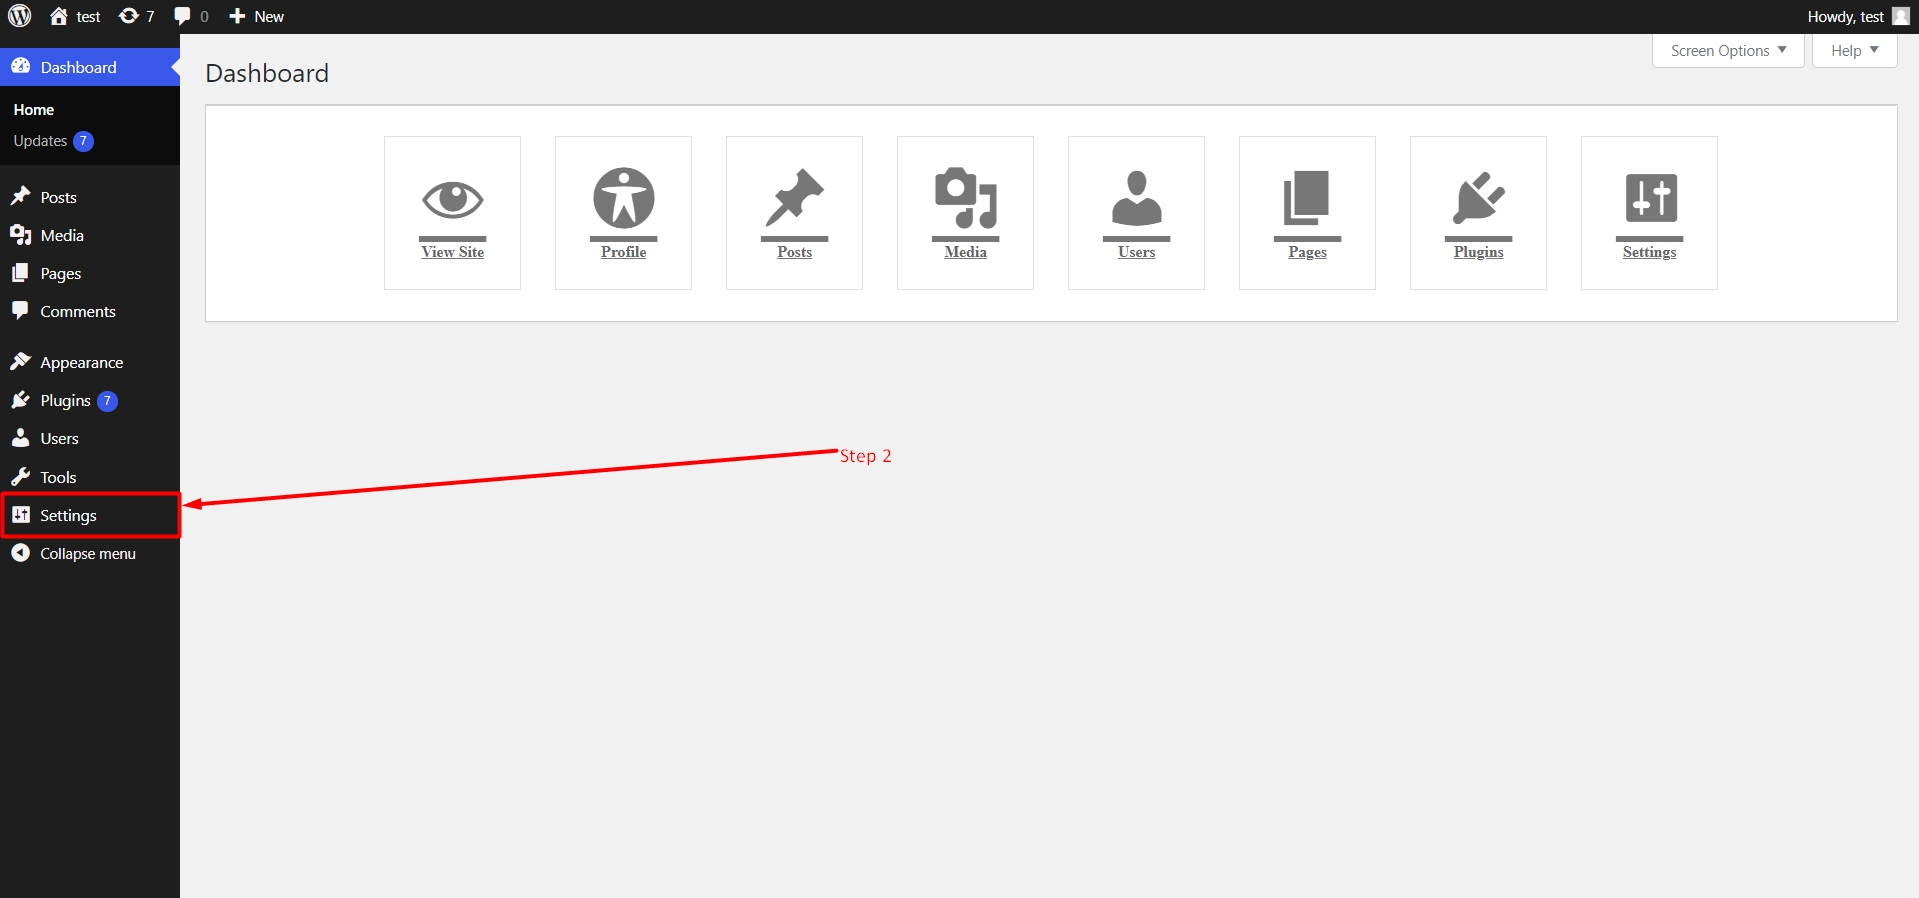
Step 3: When you click on the Settings tab, you will see many sub-options. Click on the Dashboard Widgets to manage widgets on the Dashboard.
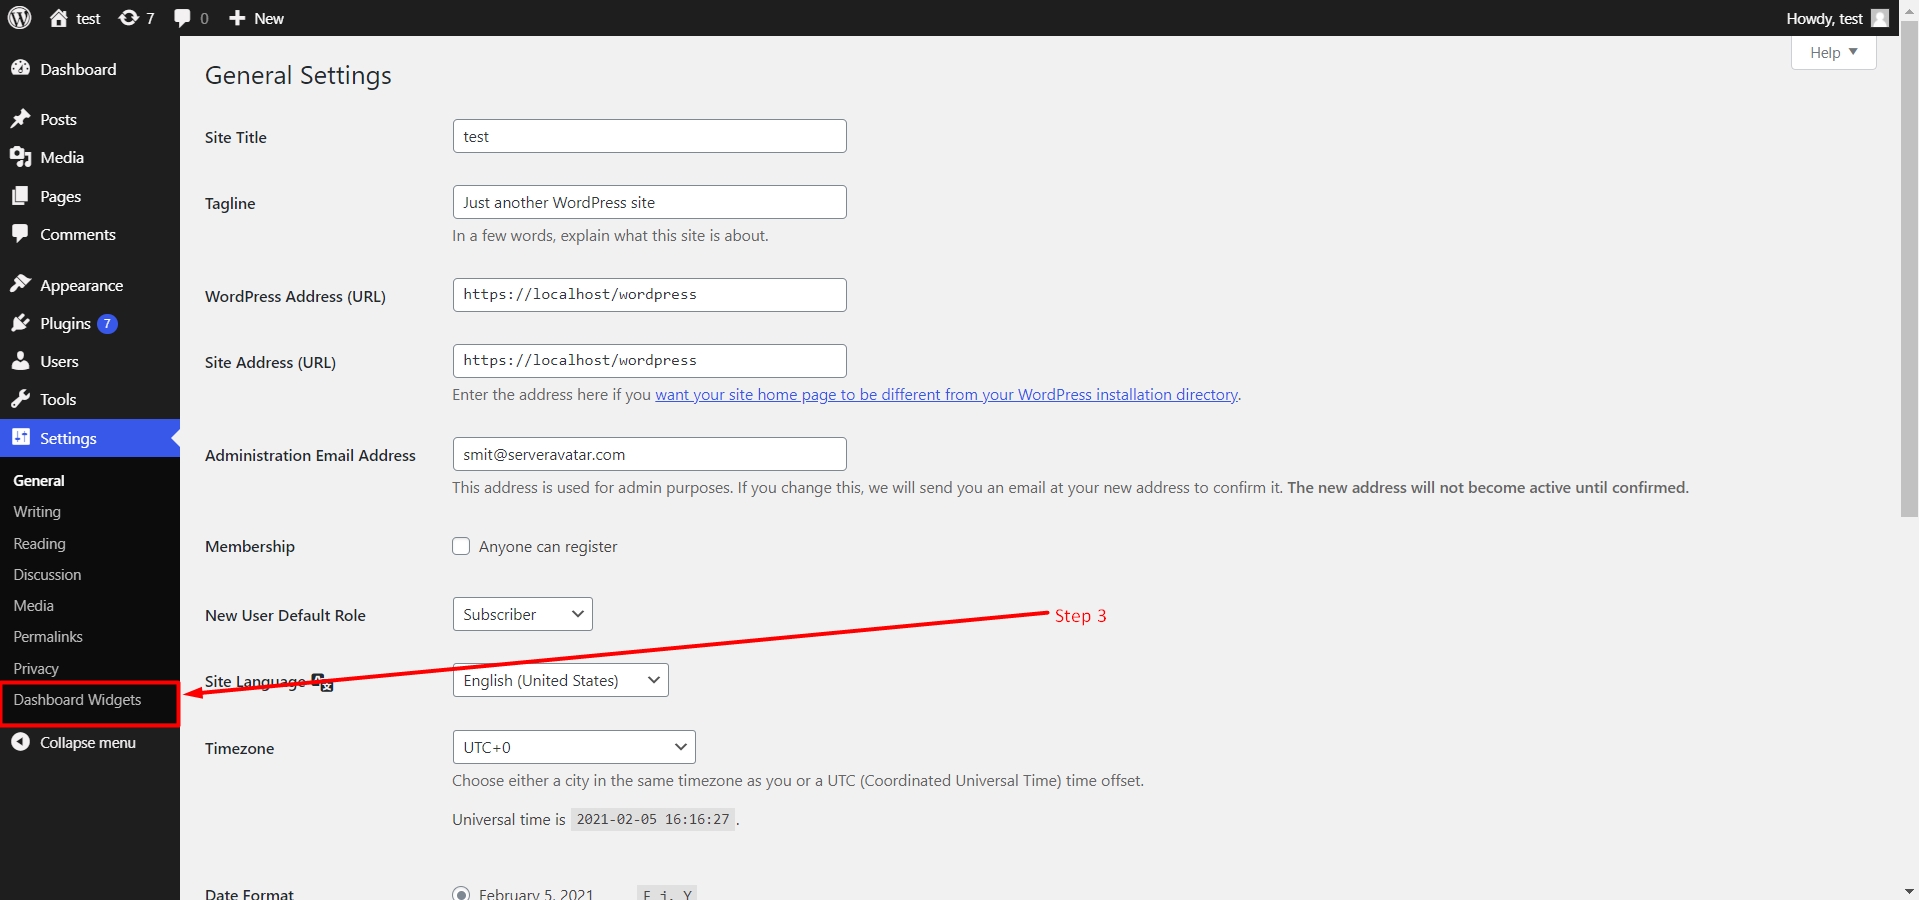
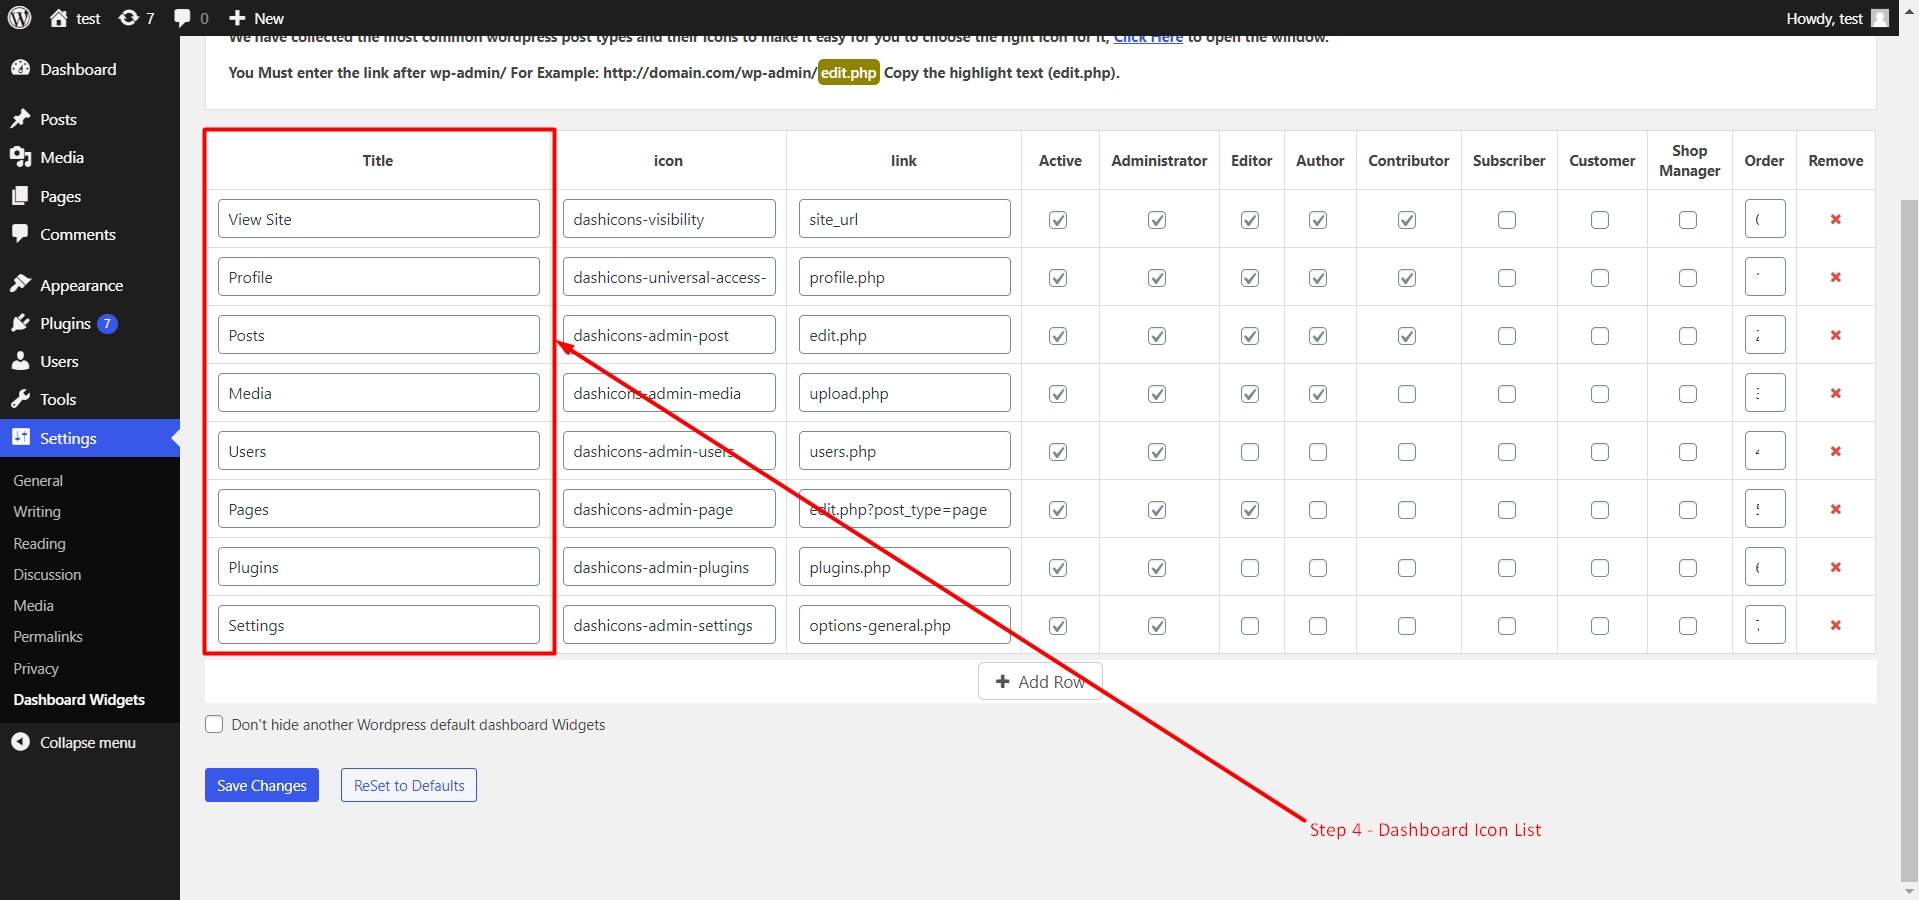
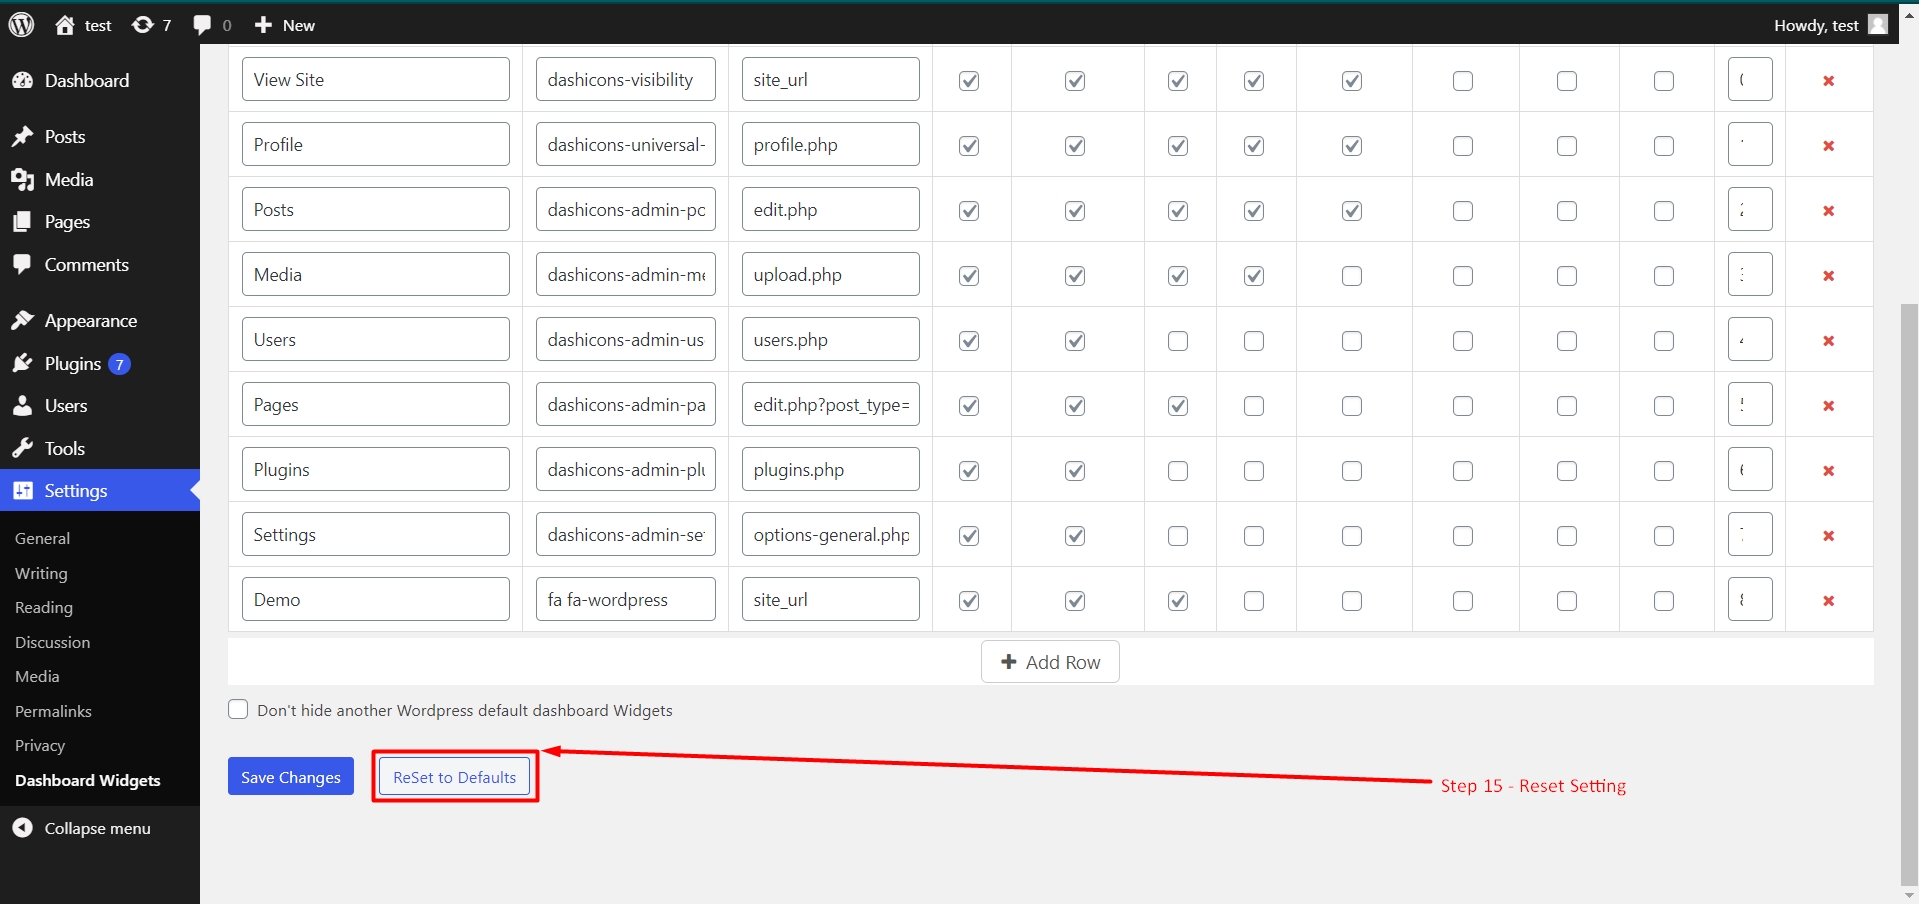
Step 4: Dashboard widgets list -> When you click on the dashboard widgets option, you will see a table containing all the current links placed on the Dashboard of the WordPress site.
In this example, We have View site, Profile, Posts, Media, Users, Pages, Plugins and Settings as you can see in the following image.
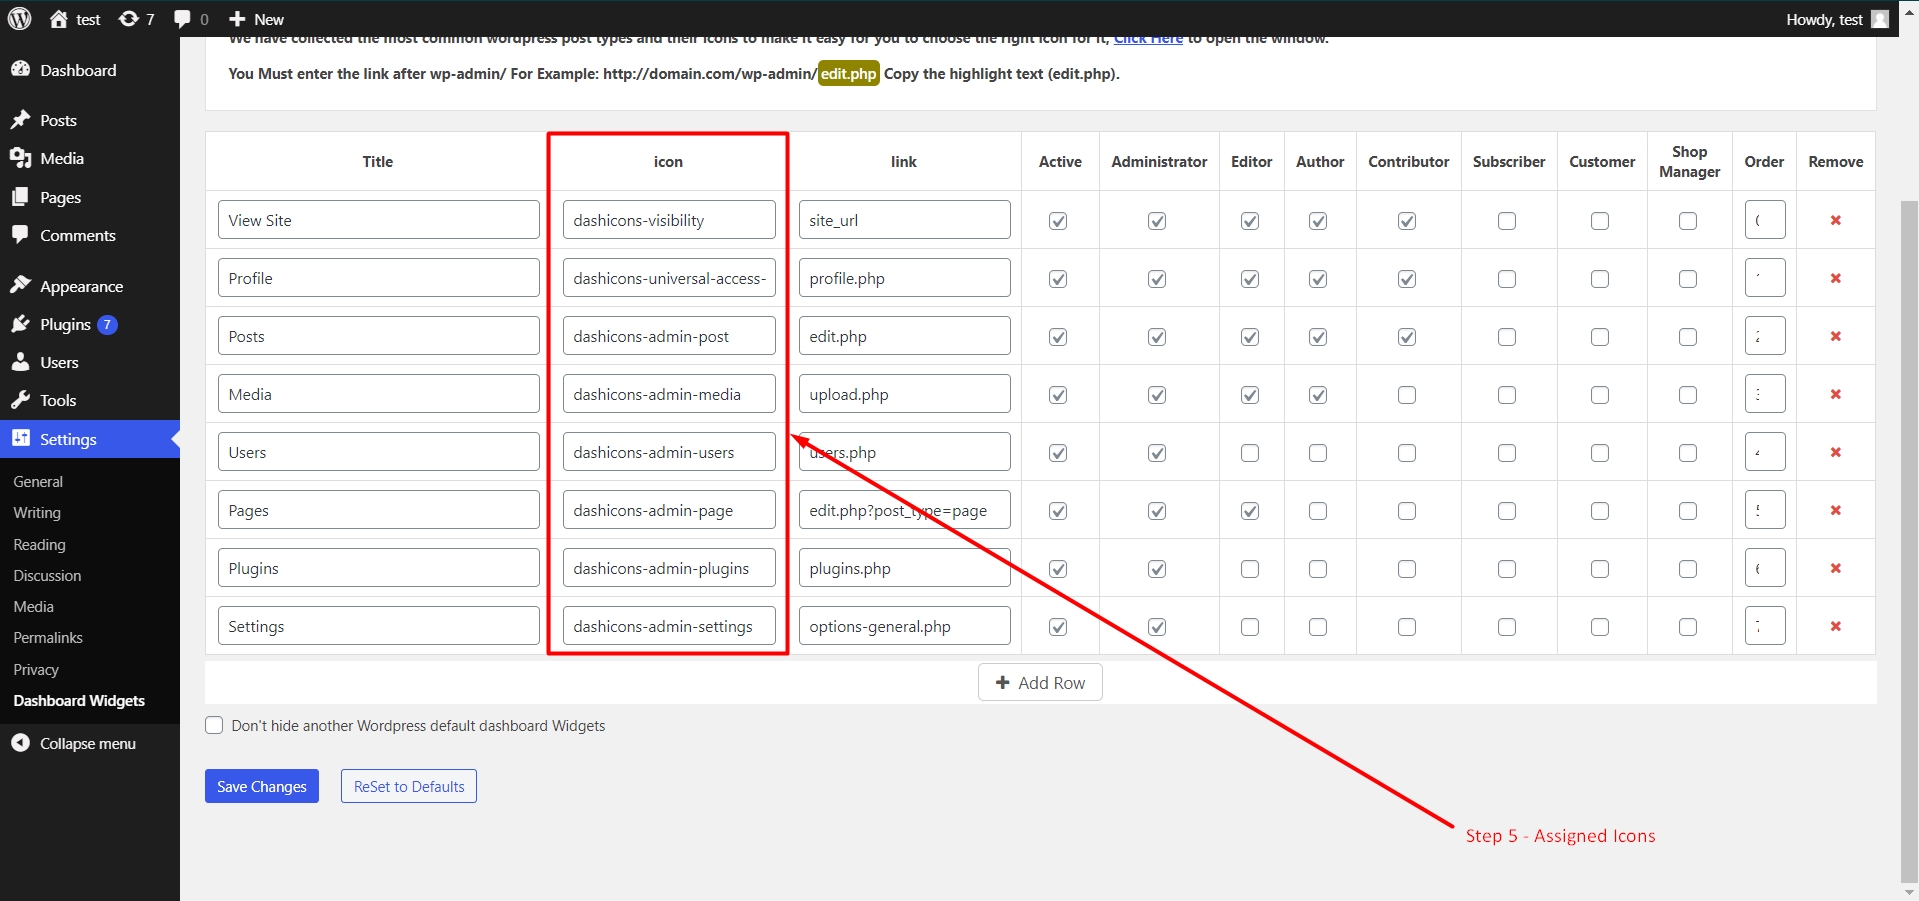
Step 5: In the second column, you can see the associated icons. You can set any icon you want just by clicking on it. There are hundreds of options available for you.
Step 6: Then we have an Associated links column. Here you can set a link to anywhere you want to redirect a user. You can also set links to custom URL.
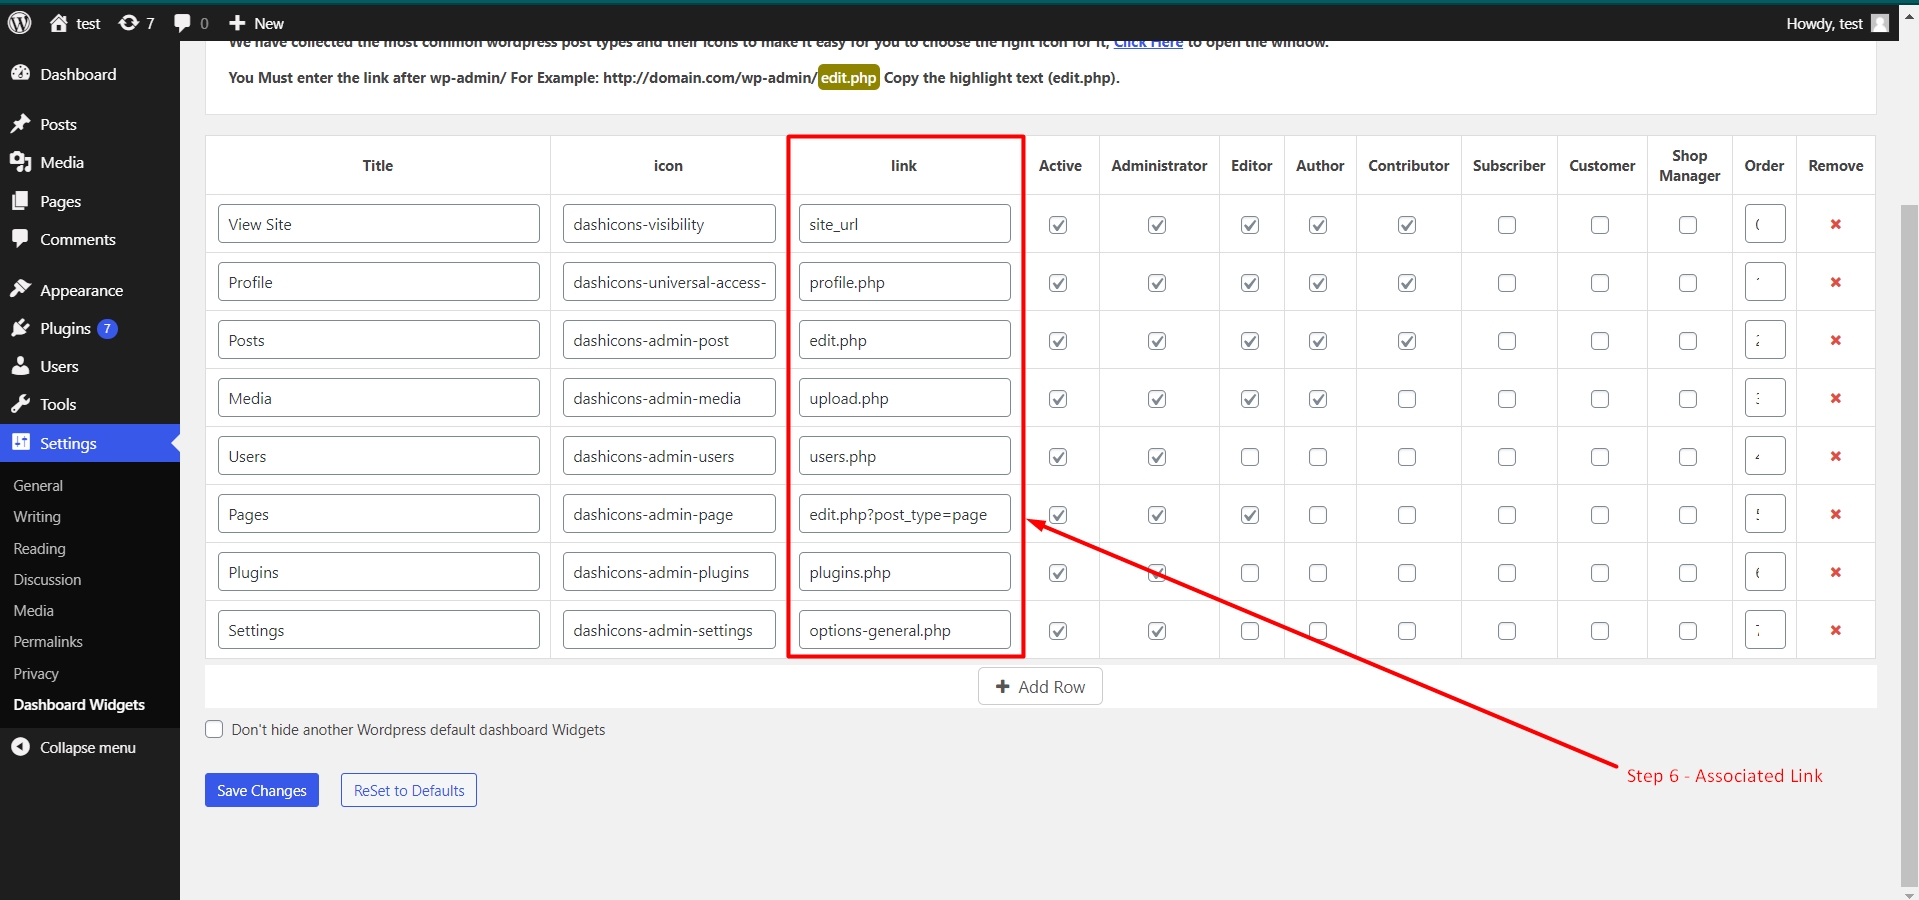
Step 7 – Add More Dashboard Widget: If you want to add more Widget on your Dashboard then click on Add More button to add them. see below image.
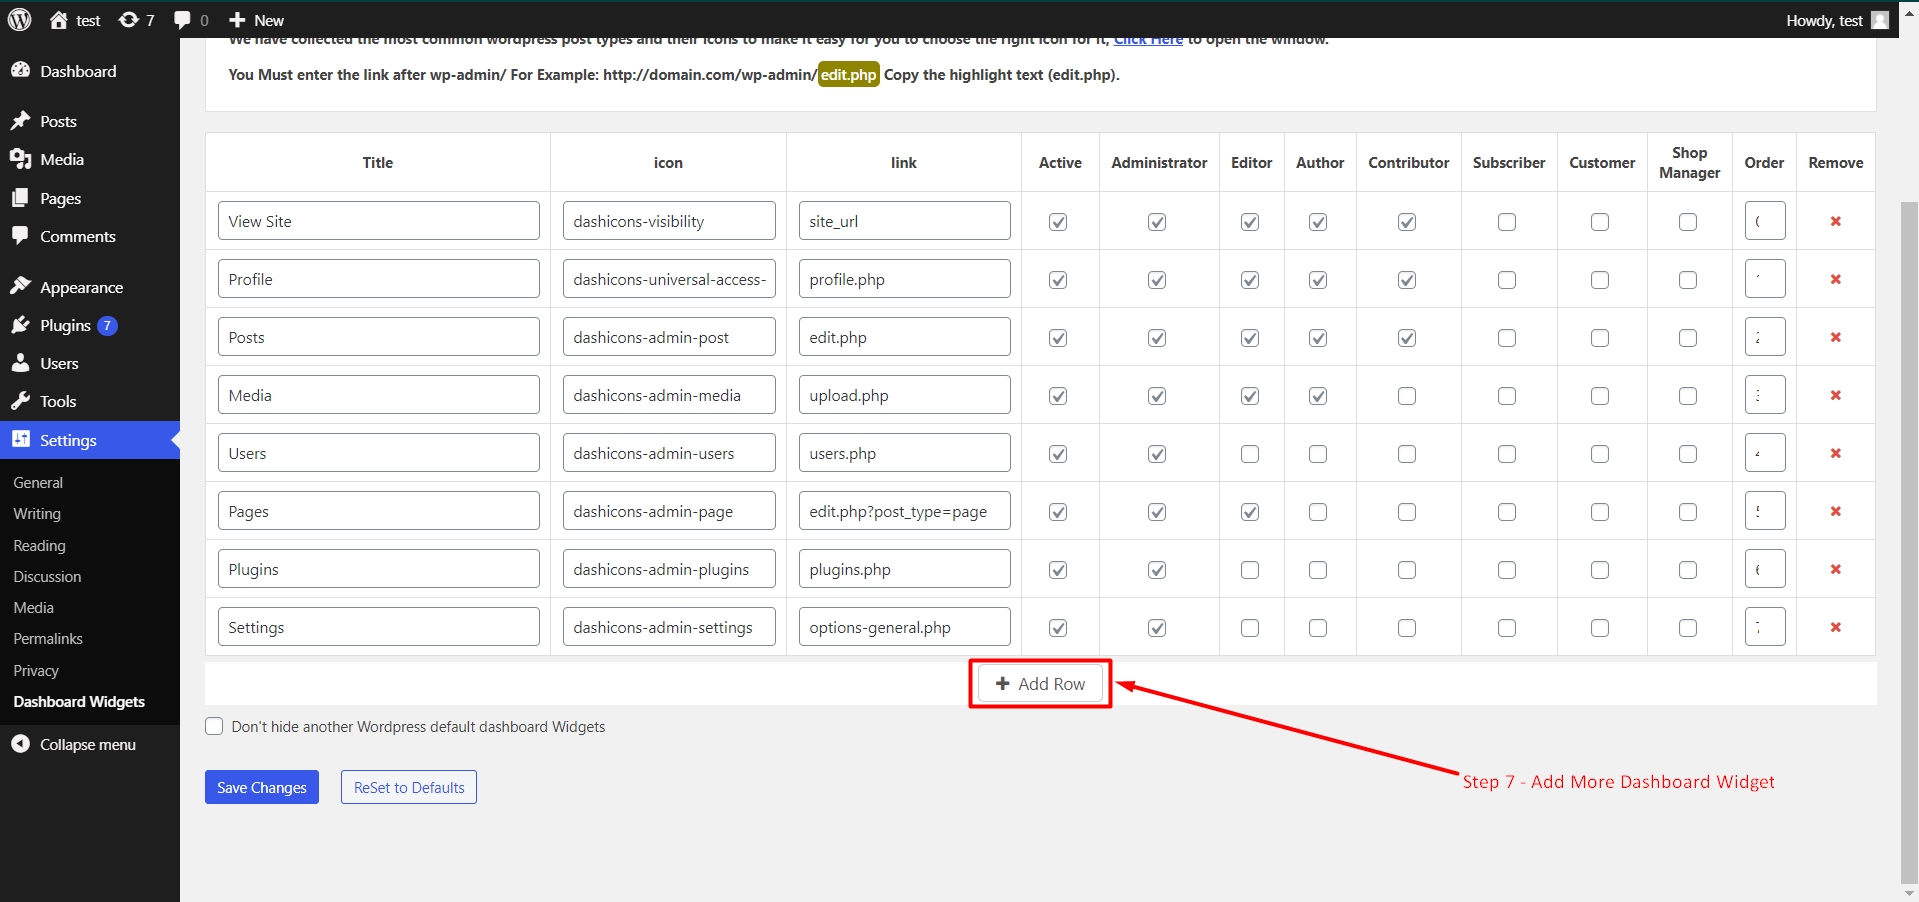
Step 8 – Added row: When you click on the add more button, the new row will add on your dashboard list. Later you can also change the given name on the new row as you can see in the below image.
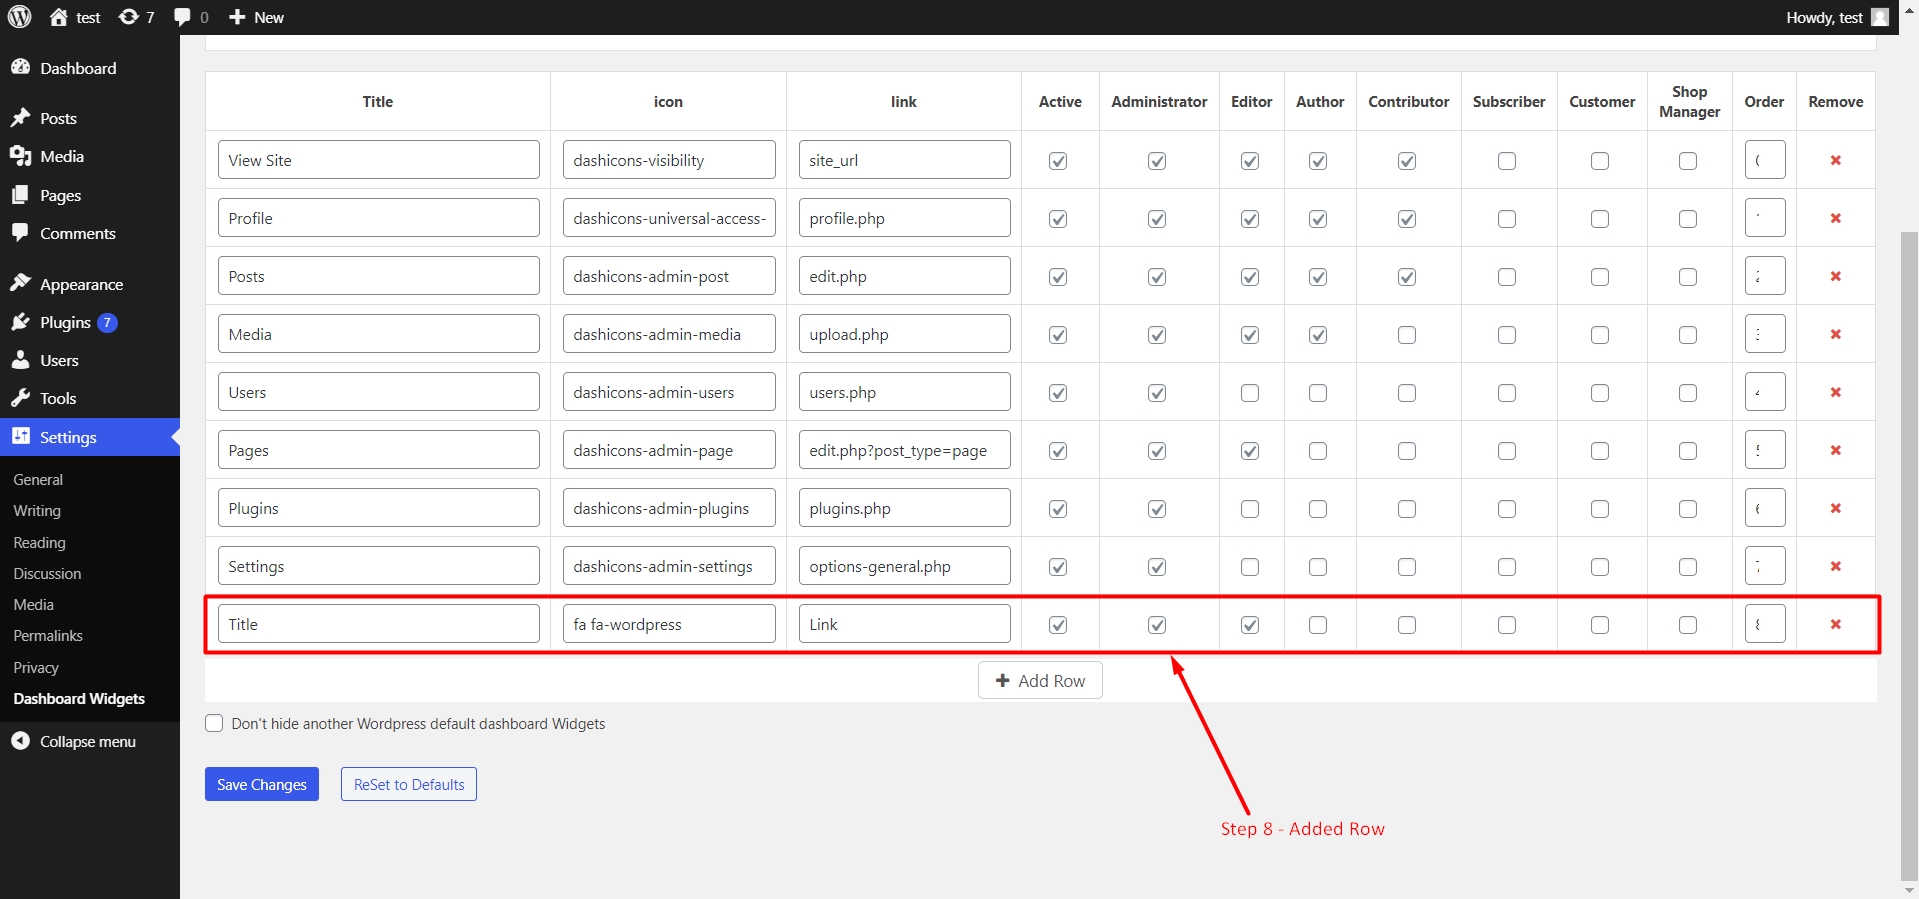
Step 9: Now, if you want to change the name of your added row then click on the title text box of your added row, then change your widget name as given below image.
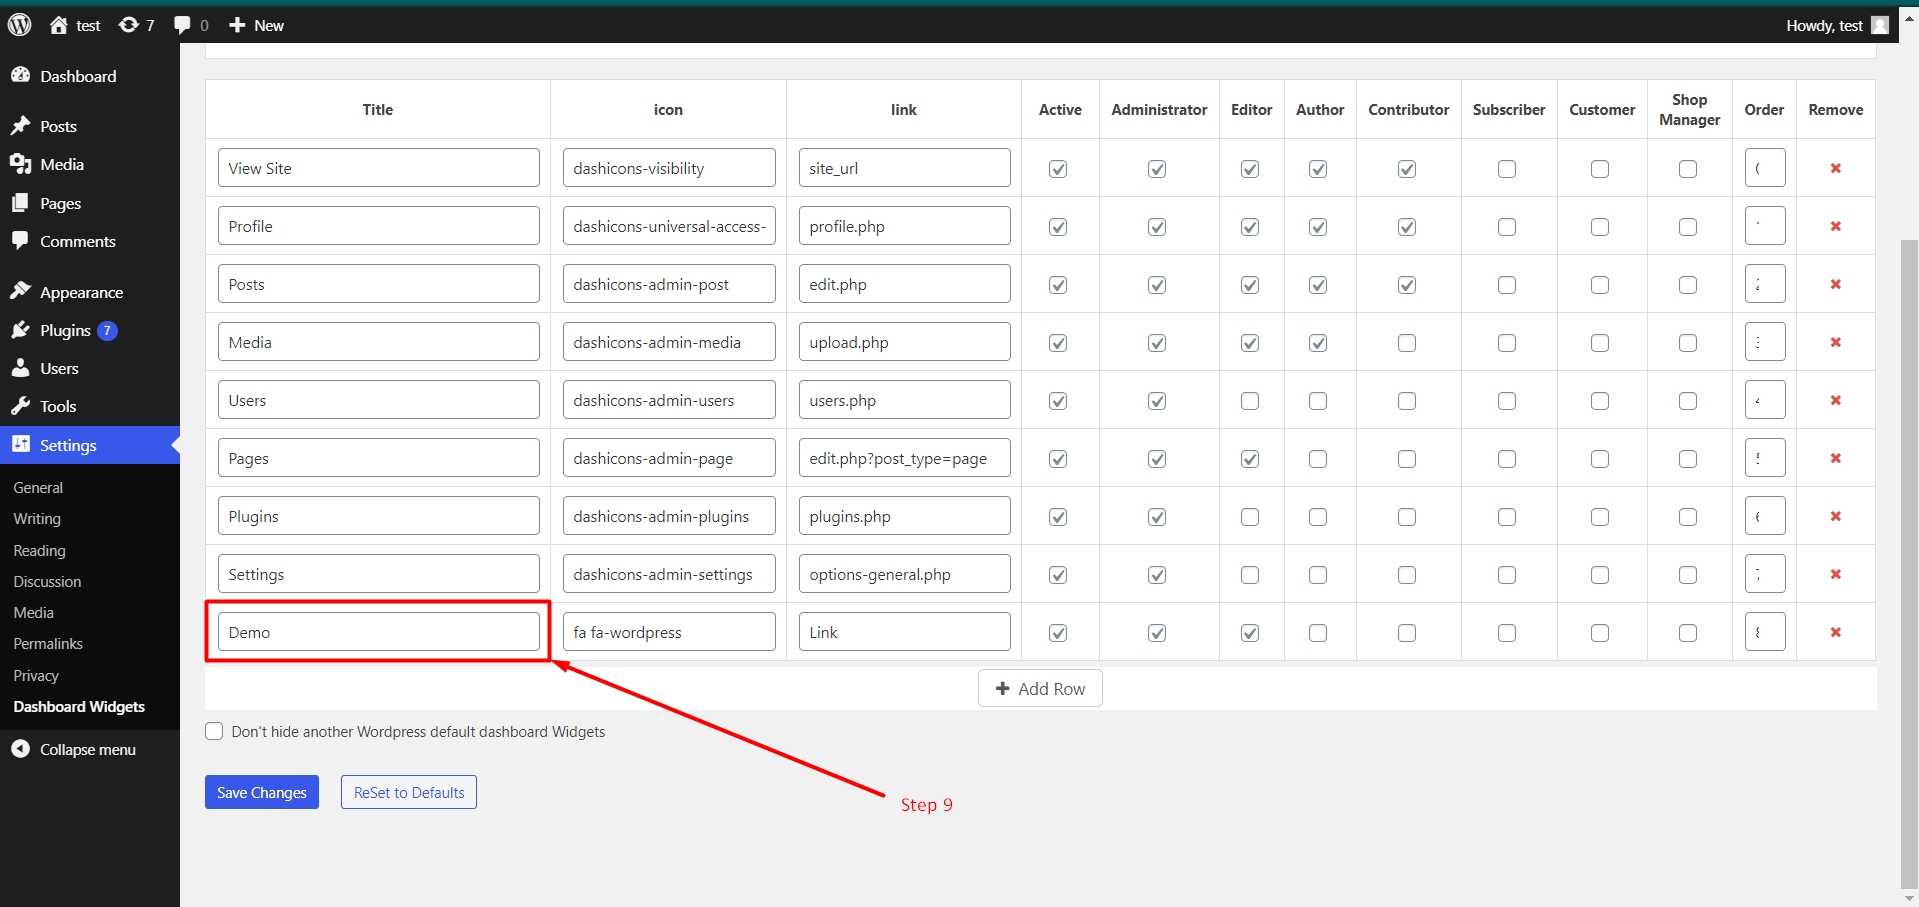
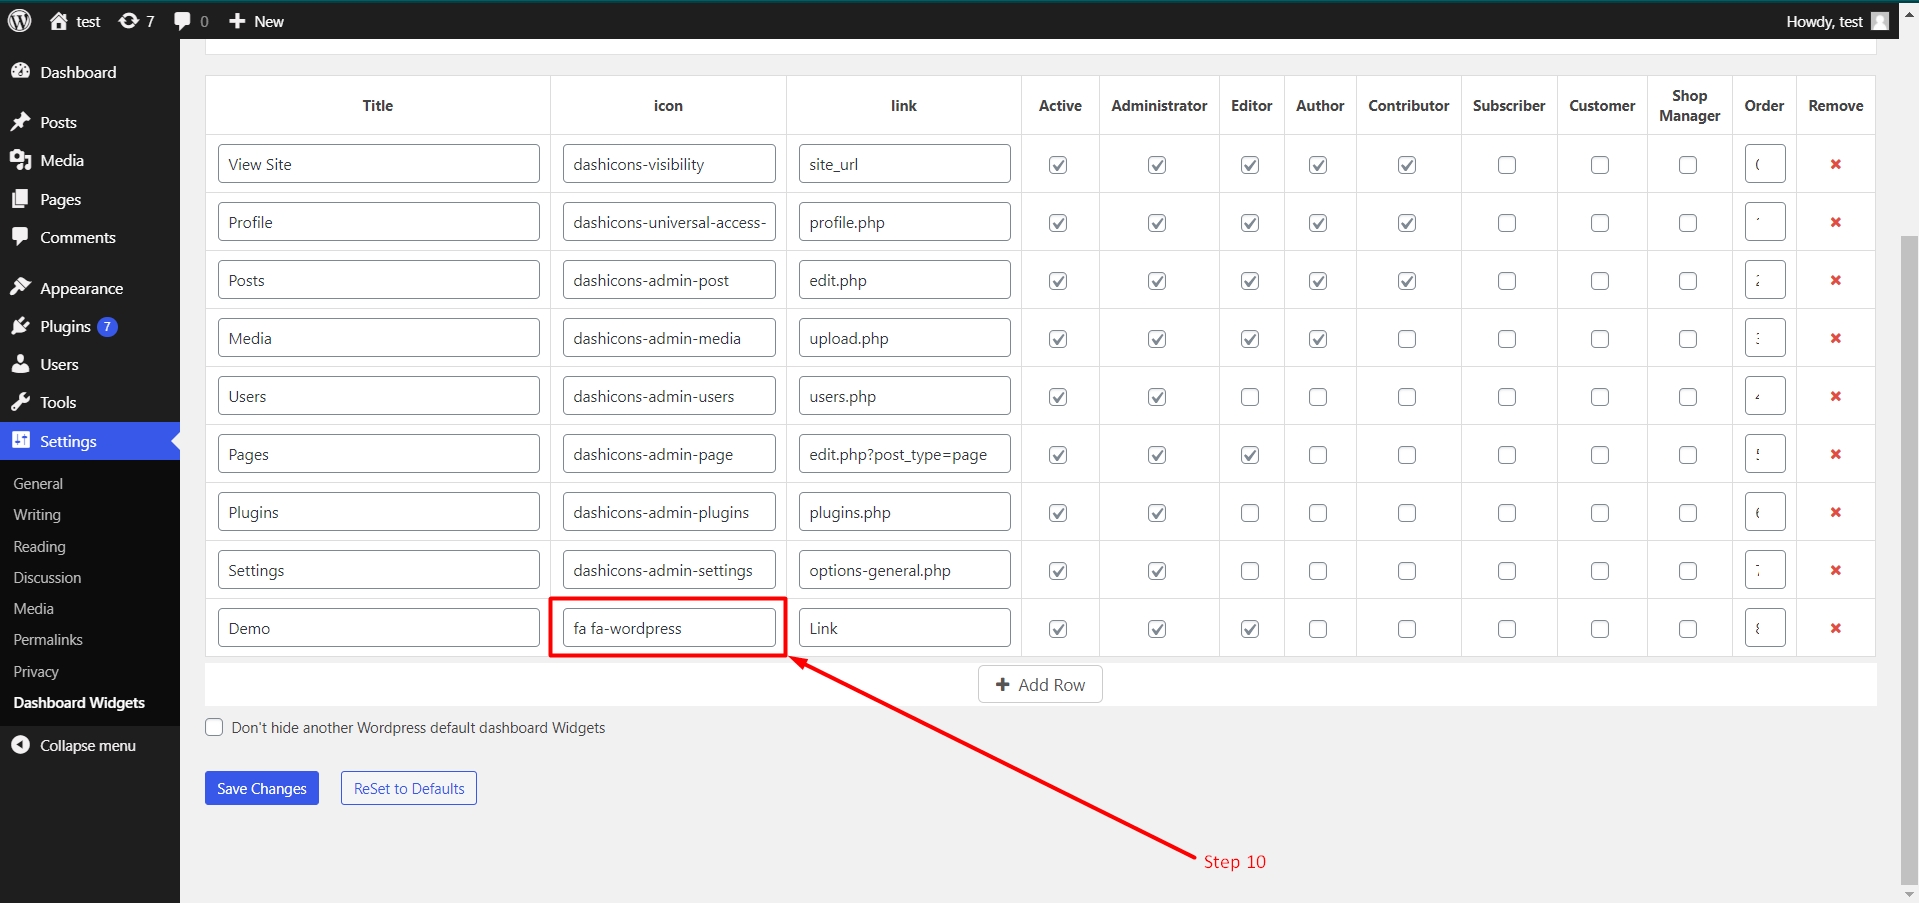
Step 10: If you want to change your Assigned Icons then click on the icons text box of the newly added row as follows below image.
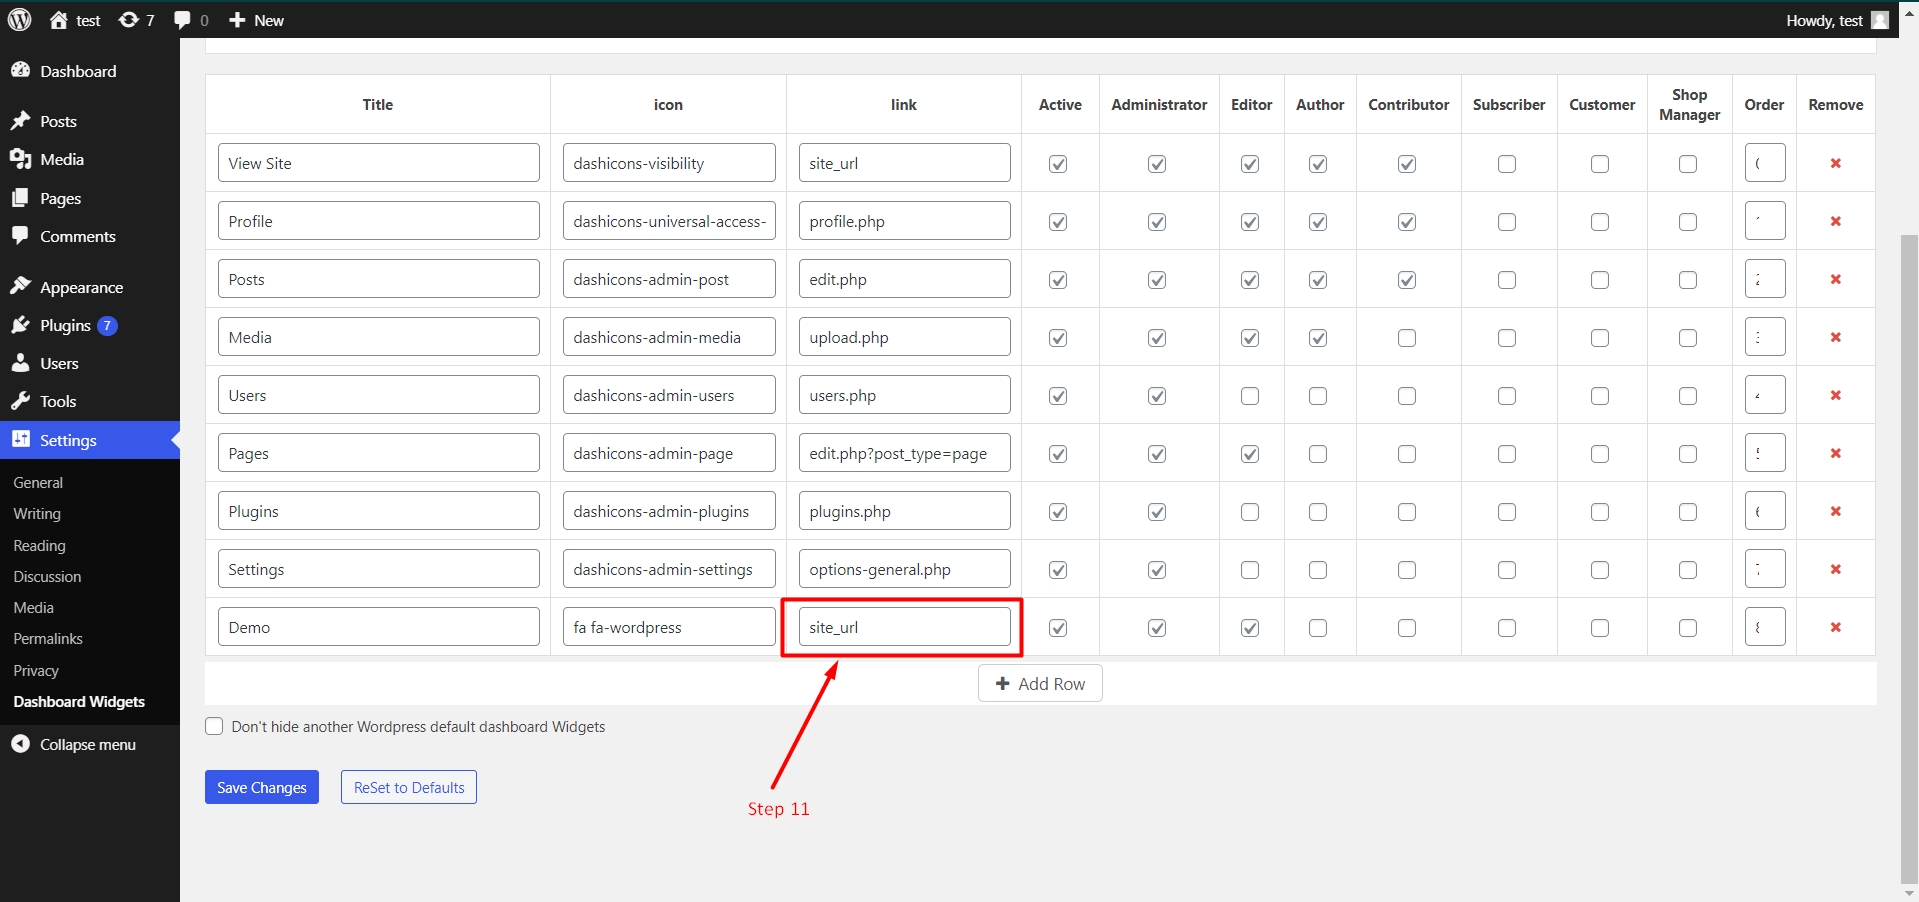
Step 11: In the same way if you want to change the link on the newly added widget then click on the link text box to change it according to image 11.
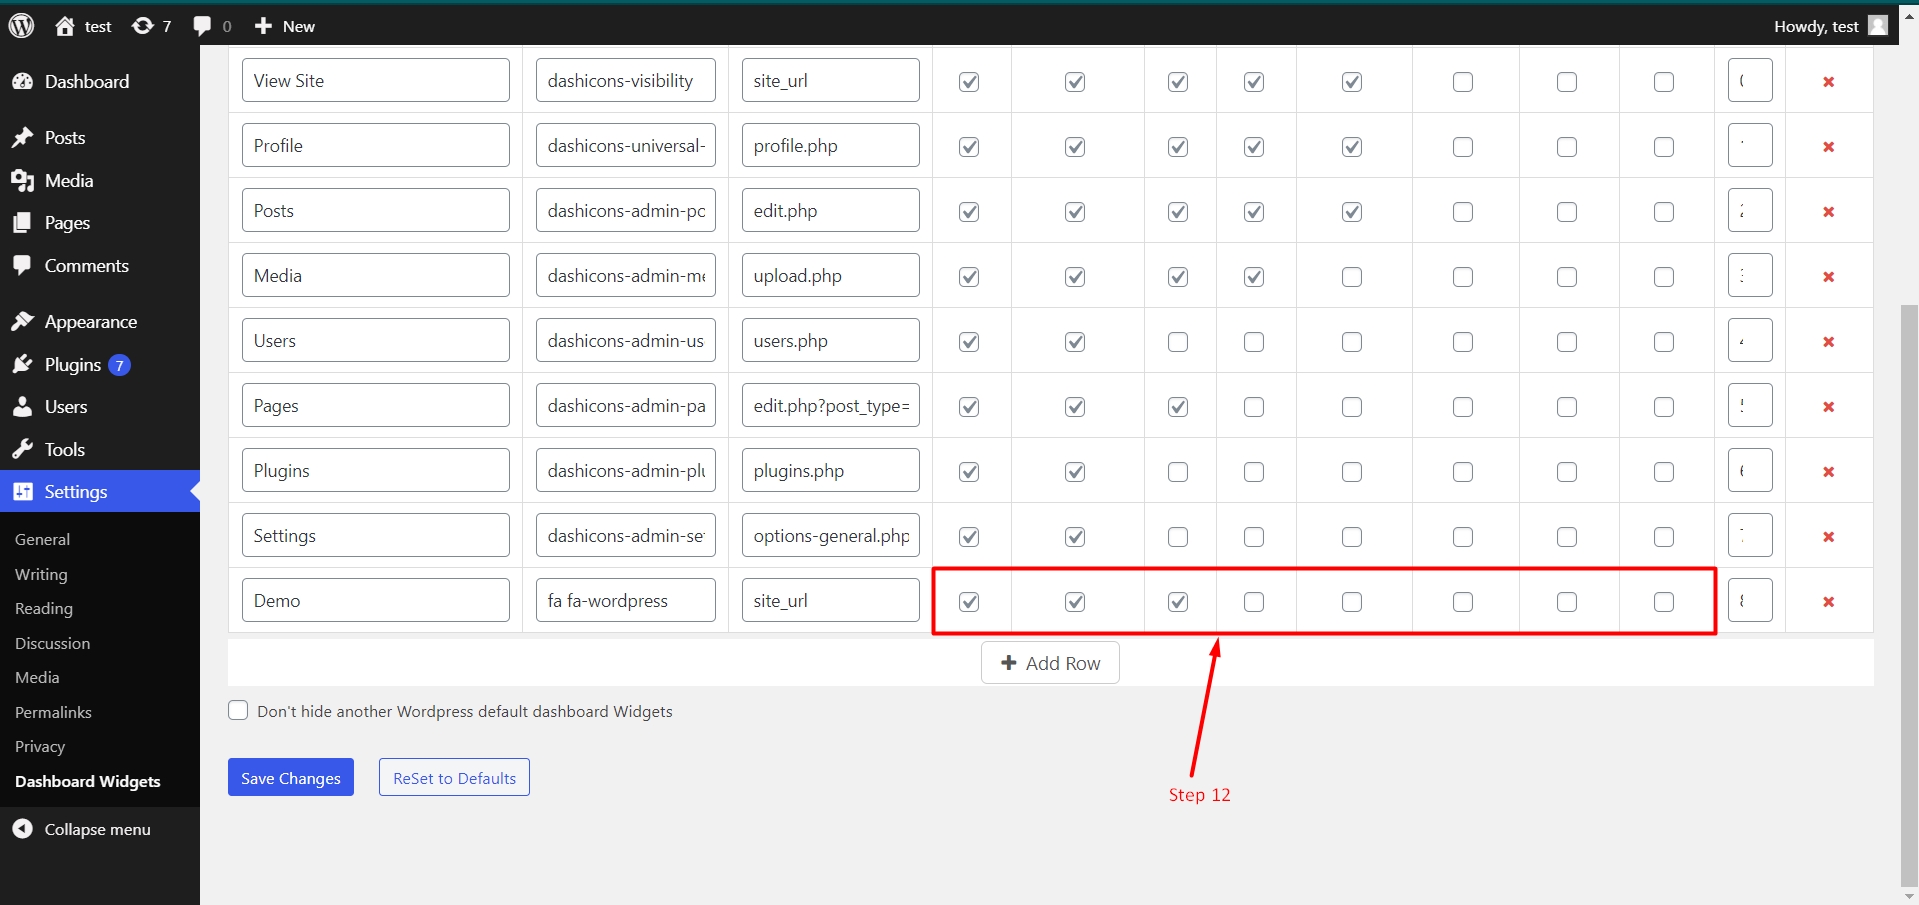
Step 12: Using the checkboxes, you can grant or not grant access to the link to various types of users on your WordPress site.
Step 13 – Delete Row: If you want to delete your newly added row from the list, click on the small red cross in the last column.
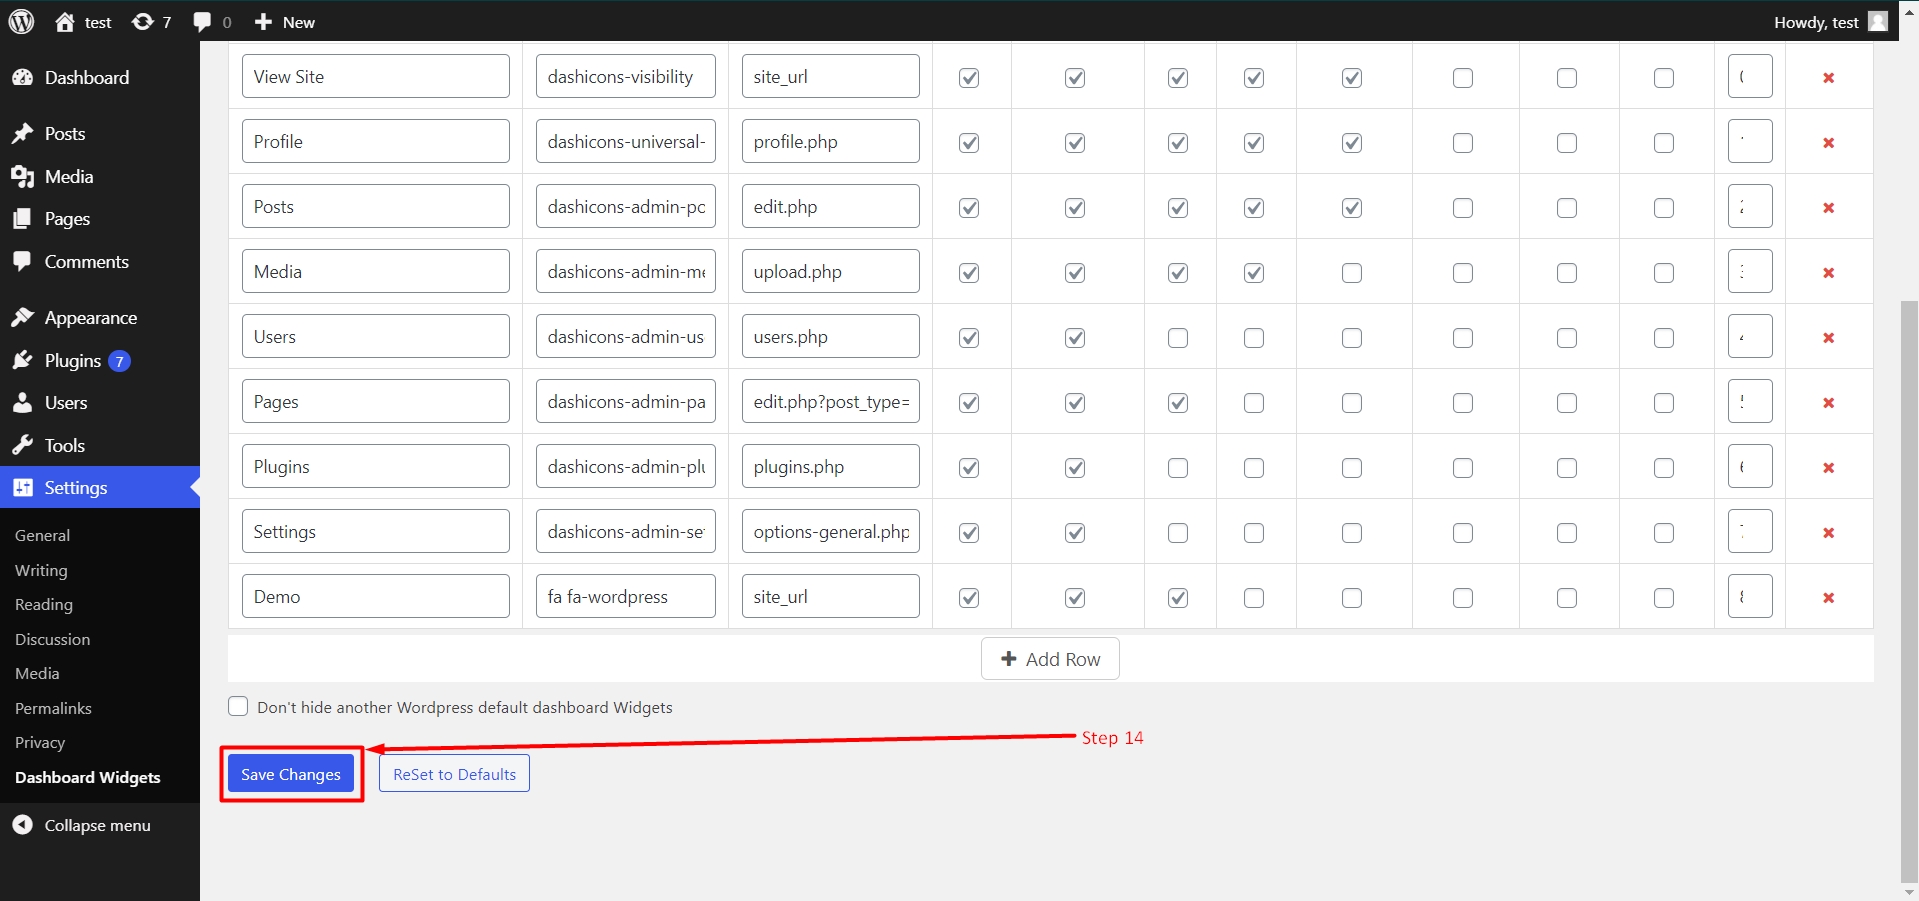
Step 14: Click on the Save Changes or Blue Color button below the list if you want to save the settings.
Step 15 – Reset Setting: If you want to create a new list or reset your settings, then click on the Reset to Defaults button that is available at the end of the page.
One drawback of this plugin is we have to give the name of the icon manually rather than directly selecting the icon. You will see 3 different links to 3 different libraries. You can select your icons from those libraries.
You have to select the icon, copy the icon code and then paste it into the icons column in the table.
Conclusion: So, this is how you can set up a list of custom Dashboard widgets. These are not the advanced widgets that you get on a default WordPress dashboard. Instead, you get links to different parts of the WordPress along with the permission management. This is really good if you are running a small SaaS on your WordPress website.
We hope you learned a lot from this tutorial. If you have any questions regarding this topic, please let us know in the comment section given below. If you are facing any web hosting issue, please contact our 24*7 live support staff for quick help!
Related guides
7 Common Hosting Mistakes Beginners Make (And How to Avoid Them)
7 common hosting mistakes beginners make in 2026: no backups, ignored updates, bad host choice, weak passwords, single point of failure, no staging. With fixes for each.
WordPressWebsite Migration Backup Checklist: What to Save and How to Test
Prepare a website migration backup: inventory files, databases, email and DNS, check archive integrity, test recovery and plan a safe final synchronization.
WordPressCore Web Vitals in 2026: A Practical Fix Guide for Site Owners
Core Web Vitals 2026: practical fixes for LCP, INP, and CLS. Real root causes, what to measure, common misconceptions, and a priority order of fixes for site owners.
WordPressFixing the WordPress “Death Loop”: When Missing Files slow down your site
You’ve just launched your new WordPress site or pushed a big update. In your staging environment, everything ran perfectly.