
GICT knowledge base
How To Create Popups in WordPress with Brave Popup Plugin
Published
Brave Builder is one of the robust solutions for customizing popup elements and creative content. Using this plugin, you can easily create and customize popups, sidebars, and sticky bars in just a few clicks. The plugin provides intuitive drag and drops features that will help you to create effective popups. It is free to use the popup builder. The brave plugin is available in the WordPress plugin library for free. The free version provides nine elements to customize popups. It includes text, buttons, images, form, and more. Also, the plugin has a drag and drop builder. Using these elements, you can modify the popups and customize themes in any way you want.
Moreover, you can easily create newsletter opt-in popups, contact form popups, sticky bars, sidebars, announcements, Modals, Lightboxes, EU cookie notices, slide-ins, & more. It comes with Woocommerce integration that will help you increase your Woocommerce Store Revenue with Up-sell, Cross-sell, Related Products Pop-up. Also, the Brave popup builder allows you to set the targeting as well. You can also track the popups using this plugin. You will have a custom goal option in popups. It will let you set the popup goal by setting what action will complete its purpose and get an instant notification. You can also customize the display frequency to avoid annoying users by showing the same popup repeatedly.
For Mobile devices, you can display the autoscaled version of the popup. Also, you can create a mobile version of the popup. The free version comes with 15 free presets that you can import and customize to build pop ups in a few seconds. So, let’s discuss the basic features of this plugin in brief,
Features
- The plugin has a straightforward and easy-to-use interface.
- It provides a Drag and Drop popup builder. It helps you to customize the popups effectively easily.
- The plugin provides a free version and a premium version as well. You can install the free version from the WordPress plugin directory.
- The free version of the plugin includes nine elements – text, button, image, form, and more.
- You can easily create newsletter opt-in popups, contact form popups, sticky bars, sidebars. Also, it will allow you to make announcements, Modals, Lightboxes, EU cookie notices, slide-ins, & more.
- The brave popup plugin has multiple integrations: Woocommerce, Mailchimp, Hubspot, and other newsletter services.
- Moreover, you can also track the popups. You will be able to find out which popups are bringing in the most conversions.
- The Brave builder plugin tracks how many times a Popup is viewed and how many times the popup is clicked or submitted.
- Also, you can set the goals for popups. It allows you to track the views of the popups.
- Moreover, the plugin has a drag and drop popup builder. So, you have to drag the fields you want in your popup. The popup fields include image, text, sticker, video, timer, and many more. However, only a few fields are available in the free version. If you want to unlock the other popup fields like video and timer, you will have to upgrade to the premium version.
Pricing Details
Brave popup plugin is free to use the popup builder for WordPress sites. You can easily install it from the WordPress plugin library. The plugin also provides a premium version. It offers three paid plans- Brave pro, Brave Mega and Brave Ultimate. Also, the Brave Pro plan costs $59 per year and provides a license for a single site. The Brave Megaplan retails at $99 per year. It includes 200+ conversion widgets, drag, and drop builder and comes with the license for ten sites. The Brave Ultimate plan costs $199 per year and consists of many advanced features. This plan provides licenses for up to 100 sites. Also, the premium plans include form features, lead generation, quiz features, sales and woo commerce, and many more.
How to Install and Activate Brave Popup Plugin
The installation process is Straightforward. You can follow the simple steps mentioned below to install and activate the plugin.
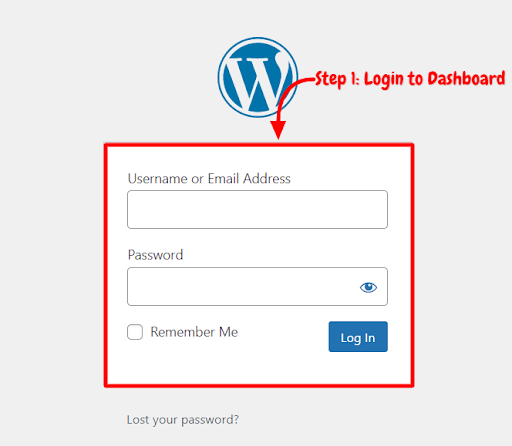
Step 1: First, you need to log in to the WordPress admin dashboard.
Step 2: Now, you will see the option “Plugins” on the left-hand side panel of the WordPress dashboard. Click on “Plugins,” then select “Add New.”
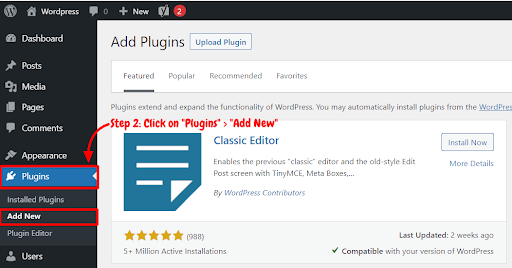
Step 3: You will see a search bar on the top right-hand side corner of the dashboard. Now, Search “Brave Popup Plugin”.
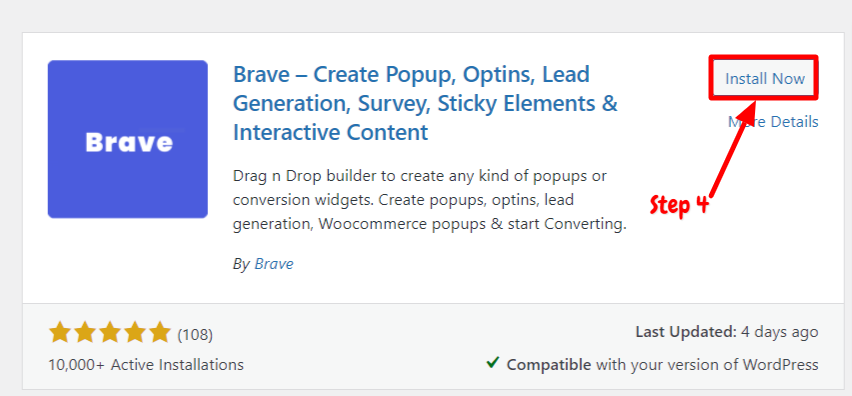
Step 4: After that, you need to click on “Install Now.”
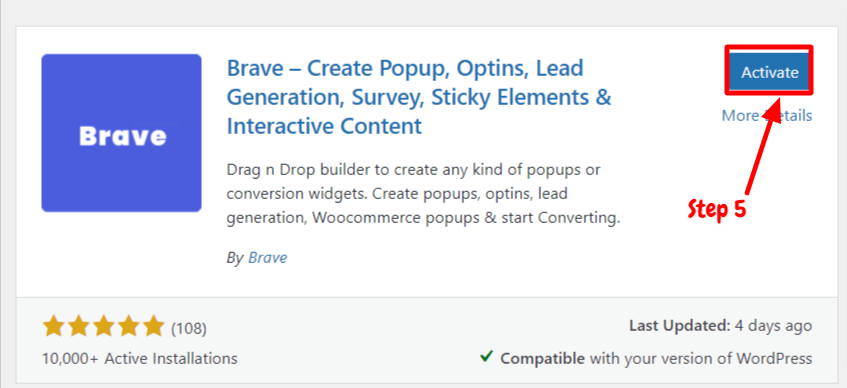
Step 5: After installation, you will need to activate the Brave Popup Plugin in order to use it on your site. Now, click on “Activate.”
Now you have successfully installed and activated the plugin. You can easily create and customize the popups.
How to Use Brave Popup Plugin
After activating the plugin on your site, you can start using this plugin on your site. You can set up the plugin easily with just a few clicks. We have explained step by step guide below on how to use Brave Popup Plugin,
Step 1: First of all, go to the “Brave” option on the left-hand side panel of the WordPress dashboard. Then select “All Campaigns” options. You will see the “+” sign in the top right corner.
Step 2: Now, the popup editor will open up. You can select any available template for free. You Will have newsletter templates, promo & sales popup templates. If you want to unlock the other template options, then you can upgrade to the premium version. Or you can also click on the “Start with Blank” option at the bottom to start from scratch without templates.
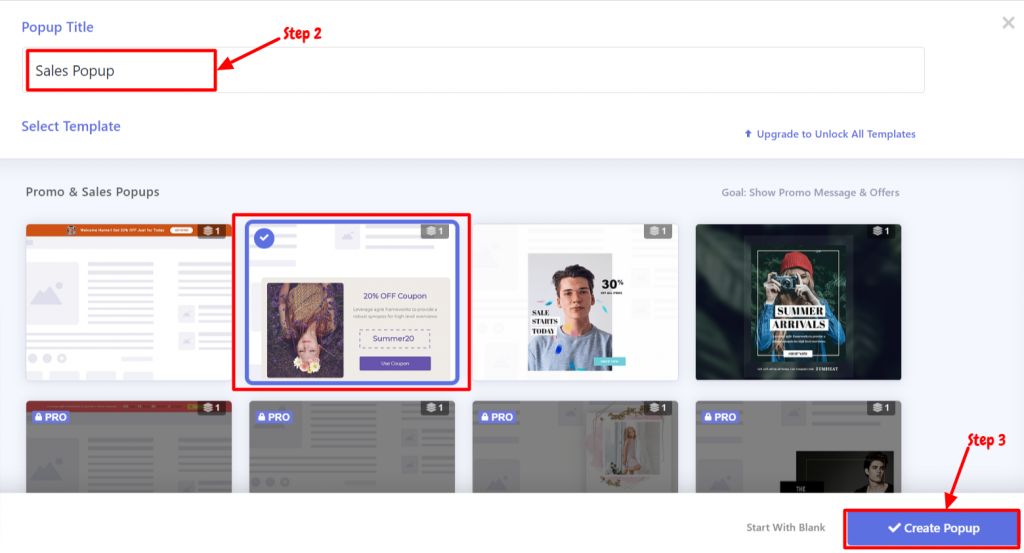
Step 3: First, enter the title of the popup. Once you choose the popup template, you can click on “Create Popup.”
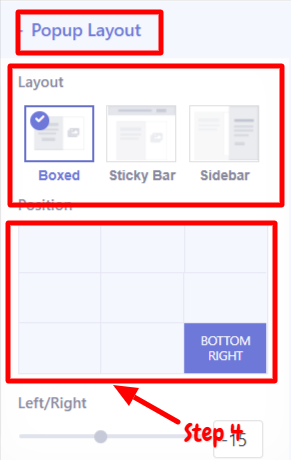
Step 4: You will see the three sections – Design, goals, and settings. For general settings, you can go to the “settings” tab. To customize the popup, click on the “Design” tab. After that, the Popup customizer will show up. You can create and customize the popup with many tools and options. First, you need to select the popup layout. You can also adjust the popup position from top left to bottom right. It also allows you to set the left or right width of the popup. You can also enable the option “Show the scroll bar.”
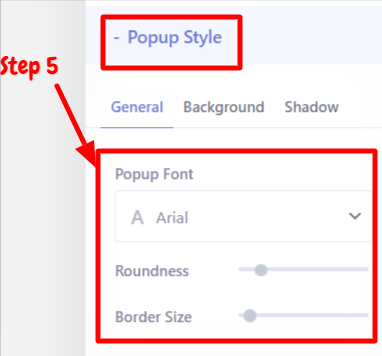
Step 5: After that, go to the “Popup style” section; you can change the popup fonts and background color, and image.
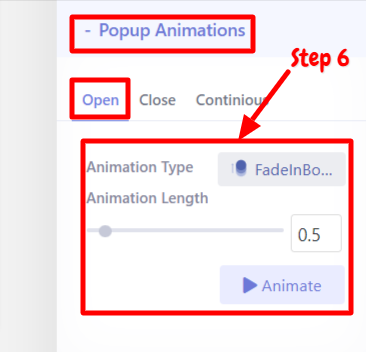
Step 6: Now, the popup animation section allows you to select the animation style. You can also adjust the popup length. It also gives you the option to close the popup animations if you don’t want an effect in the popup.
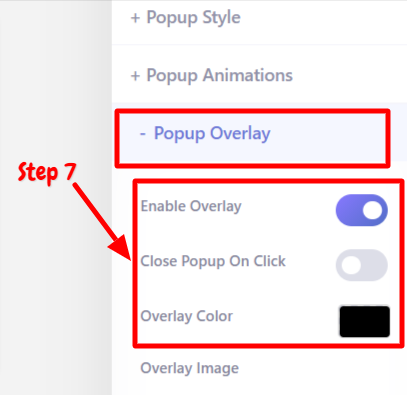
Step 7: The popup overlay option lets you overlay the popup on the background layout. Moreover, you can change the color and image of the overlay. Also, it gives an option “Close the popup on the click’.
Step 8: The plugin has a Drag and Drop popup builder. So, if you want to customize any fields in the ready-made templates, you can drag the field into the popup and edit it. The field options are available on the left-hand side panel. You will have text, image, button, shape, posts, and products options in the free version. Other options like timer, sticker, video, login, and search fields will be available in the premium version. So, you can upgrade to the premium version of the plugin to unlock these field options.
Step 9: Once you are done with the settings, you can click on the “Preview popup” button in the top right corner. Now, click on “Save” to save the design of the popup. This way, you can easily customize any popup on your site using the templates and advanced options.
Conclusion
The brave popup is one of the effective popup builder plugins for WordPress sites. You will have many customizable options to create an effective popup for your site. The plugin comes with many templates for different categories such as newsletter, sales, and promotion. However, the free version provides only a few templates for popups. You can also start from scratch to customize your popup. To unlock the other templates, you will need to purchase the pro version of the plugin.
Brave Popup plugin provides the Drag and Drop popup builder. Thus, you can easily drag the fields you want in your popup. In the free version, you can customize the popup layout, size, style, and overlay. The premium version comes with many premium features like timer, video, login, and sticker options. The plugin has a user-friendly interface. You can also set the goals for the popup. Also, it allows you to track the view of the popups. You can easily set up the popups.
The installation and the setup process are very straightforward. You can follow the steps mentioned below to install and activate the plugin. Also, we have explained step by step guide on how to set up this plugin. We hope this article will help you create and customize the popups on your site using the Brave Popup Plugin.
Related guides
7 Common Hosting Mistakes Beginners Make (And How to Avoid Them)
7 common hosting mistakes beginners make in 2026: no backups, ignored updates, bad host choice, weak passwords, single point of failure, no staging. With fixes for each.
WordPressWebsite Migration Backup Checklist: What to Save and How to Test
Prepare a website migration backup: inventory files, databases, email and DNS, check archive integrity, test recovery and plan a safe final synchronization.
WordPressCore Web Vitals in 2026: A Practical Fix Guide for Site Owners
Core Web Vitals 2026: practical fixes for LCP, INP, and CLS. Real root causes, what to measure, common misconceptions, and a priority order of fixes for site owners.
WordPressFixing the WordPress “Death Loop”: When Missing Files slow down your site
You’ve just launched your new WordPress site or pushed a big update. In your staging environment, everything ran perfectly.