
GICT knowledge base
How To Add Tables On Your WordPress Site Using TablePress Plugin
Published
TablePress is one of the effective table editor plugins for WordPress sites. It allows you to add and customize any table on your site. You will have many advanced options to customize your tables. The plugin also provides shortcodes to embed the tables anywhere on your site. You need to paste the shortcode, and the table will be displayed at the front end of your site. The plugin has a user-friendly and straightforward interface as well. You can install the plugin from the WordPress plugin directory for free.
Using this plugin, you can embed the tables into posts, pages, or text widgets with a simple Shortcode. Table data can be edited in a spreadsheet interface. Thus, you don’t require coding for that. Moreover, Tables contain any data, formulas which will be evaluated. The plugin also offers a JavaScript library. An additional JavaScript library adds features like sorting, pagination, filtering, and more for site visitors. Tables can be imported and exported from or to the Excel, CSV, HTML, and JSON files.
The plugin also provides additional features and useful enhancements. However, you will need to purchase the TablePress Extensions separately to use those features. Each table has a unique ID that needs to be adjusted in that shortcode. Moreover, the plugin also allows you to customize the styling of the tables. You can make changes in styling by entering CSS commands into the “Custom CSS” text area on the “Plugin Options” screen.
Additionally, you will have various features such as sorting, pagination, filtering, alternating row colors, row highlighting, print name, and description. The plugin doesn’t offer any premium version. Thus, you can easily utilize all features of this plugin for free. The plugin also comes with many extensions such as responsive tables, Row filtering, Table Row order, and more. So, let’s discuss the basic elements of this plugin in brief,
Features
- The TablePress plugin allows you to add and customize the tables the way you want.
- Also, you will have a shortcode to embed the tables anywhere on your sites, like pages or posts or text widgets.
- The plugin has a straightforward setup process. You will have full control over the customizations. Also, you can have all controls from the WordPress dashboard.
- Moreover, Table data can be edited in a spreadsheet-like interface. Thus, you can easily add table content in the sheet format. It doesn’t require any coding.
- Also, Tables can contain any data, formulas that will be evaluated.
- Moreover, it provides a JavaScript library. An additional JavaScript library adds features like sorting, pagination, filtering, and more for site visitors.
- It allows you to import and export the tables from or to Excel, CSV, HTML, and JSON files.
- For more customization in styling, you will have custom CSS. You can enter CSS commands into the “Custom CSS” text area on the “Plugin Options” screen.
- The plugin also includes various advanced options such as search or filtering, pagination, sorting, row highlighting, alternating row colors, and many more.
- It allows you to add as many rows and columns as you want to the table. Also, you can combine the cells of rows and columns.
- The plugin is completely free software. It is available in the WordPress plugin library. However, the plugin offers additional features as well. For that, you will have to install the TablePress Extension separately.
- TablePress Extension adds custom features to TablePress Plugin. So, it is made possible by using several “Plugin Actions” and “Plugin Filter Hooks,” which are integrated into the code. That allows other plugins to extend and modify TablePress behavior.
- All the extensions provided by this plugin are downloaded for free. Also, you don’t even need to pay for a premium extension. It means all premium features extensions are available for free.
- The TablePress plugin also comes with many extensions such as responsive tables, Row filtering, Table Row order, and more.
Pricing Details
Tablepress is completely free to use table editor plugins for WordPress. You can install it from the WordPress plugin library for free. The plugin doesn’t have any premium version. However, it comes with additional features and updated enhancements. To use that, you will have to install “TablePress Extension” separately. TablePress Extension has various advanced options. Also, you can unlock the advanced feature and options by installing the TablePress Extension. This plugin contains custom features for TablePress. It is made possible by using several “Plugin Actions” and “Plugin Filter Hooks” integrated into the code. These allow other plugins to extend and modify TablePress behavior. Moreover, all the extensions are available for free.
How to Install and Activate TablePress Plugin
The installation process is Straightforward. You can follow the simple steps mentioned below to install and activate the plugin.
Step 1: First, you need to log in to the WordPress admin dashboard.
Step 2: Now, you will see the option “Plugins” on the left-hand side panel of the WordPress dashboard. Click on “Plugins,” then select “Add New.”
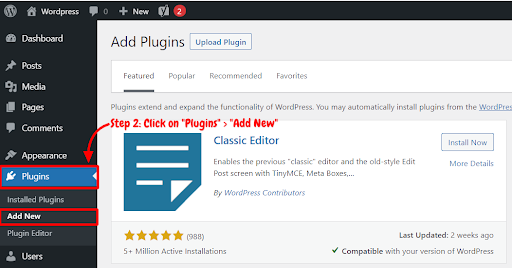
Step 3: You will see a search bar on the top right-hand side corner of the dashboard. Now, Search “TablePress Plugin“.
Step 4: After that, you need to click on “Install Now.”
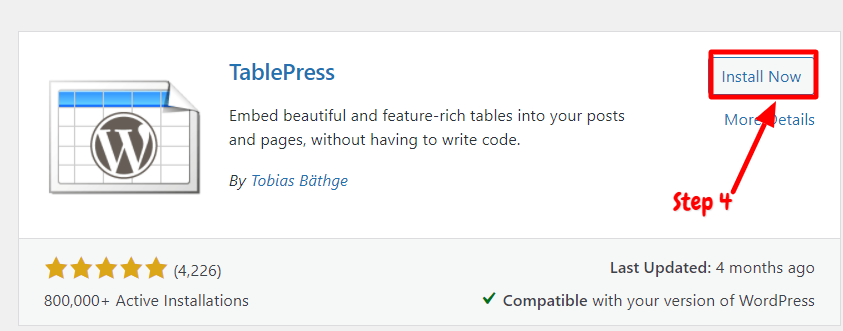
Step 5: After installation, you will need to activate the TablePress Plugin to use it on your site. Now, click on “Activate.”
Now you have successfully installed and activated the plugin. You can easily add and customize the tables on the front end of your site using this plugin.
How to Add Tables on Your Site Using TablePress Plugin
After activating the plugin on your site, you can start using this plugin on your site. You can set up the plugin easily with just a few clicks. We have explained step by step guide below on how to use TablePress Plugin,
Step 1: First, go to the “TablePress” option on the left-hand side panel of the dashboard. Then select the “Add New Table” option.
Step 2: After that, enter the name of the table and description. However, description is completely optional. You can add it if you want. Also, you can set the no of rows and columns in the table.
Step 3: You will see the table editor. In this editor, you can table information like table ID, name, and description. After that, add table content.
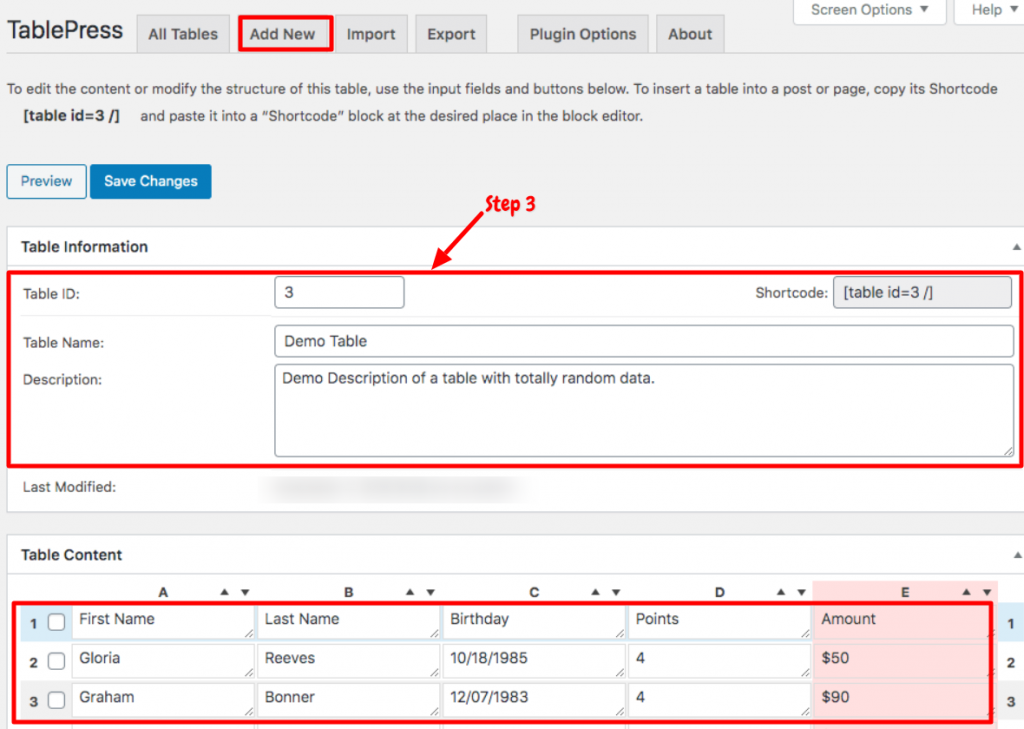
Step 4: Now, scroll down to the “Table Manipulation” option. You can insert the link, image, and other advanced settings. You can hide the selected rows and columns. Also, it allows you to combine the cells. It will enable you to add as many rows and columns as you want.
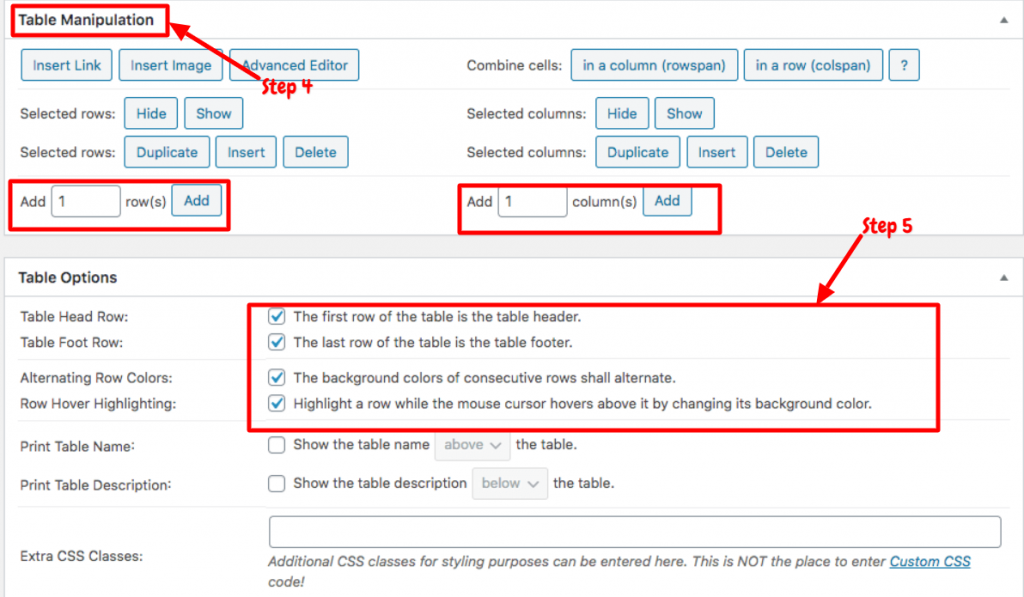
Step 5: After that, go to the “table options” section. You have to enable some options. You can make the first row of the table as a header and the last row as a footer. Moreover, you can enable options like alternating row colors and row to hover highlighting options. For more customization options, you will have CSS classes as well. You can customize the table as you want.
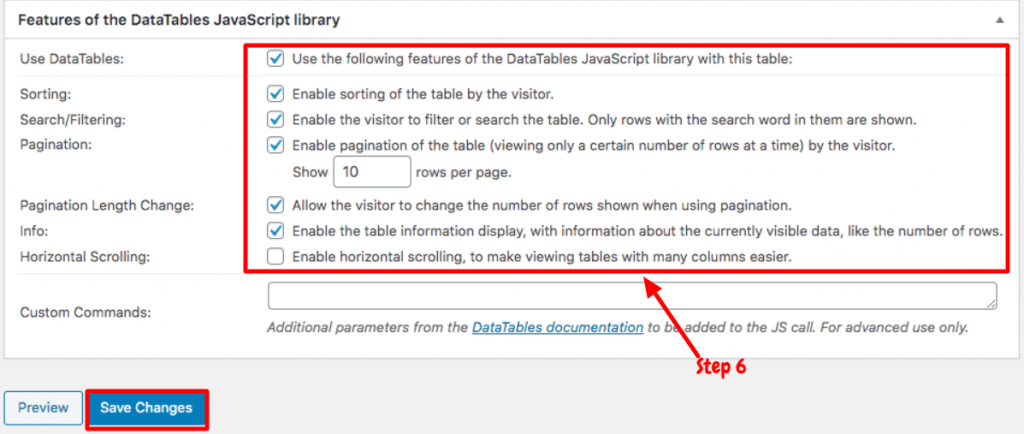
Step 6: Now, go to the section “features of data table javascript library.” In this section, you will enable some advanced options like sorting, pagination, search or filtering, and many more. Once you are done with editing, click on “Save Changes” and check the preview if the table is displayed properly or not.
This way, you can easily add and customize the tables as you want using the TablePress plugin. The plugin also provides shortcodes to embed the tables anywhere on your site. The shortcode is available at the top of the table editor.
How to display Tables on Your Site Using Shortcodes
For displaying tables in the page or post or widget area, the plugin provides shortcodes. The shortcode is available in the table editor. You can follow the below-mentioned steps to display tables on your site.
Step 1: After creating the table, make sure to click on “Save Changes.” Once you have saved the changes, you will see the shortcode of the table. Copy the shortcode.
Step 2: Now, you will need to create a page or post to embed the tables. Go to the block editor and click on the “+” sign. Then search for the “shortcode” block. Paste the copied shortcode.
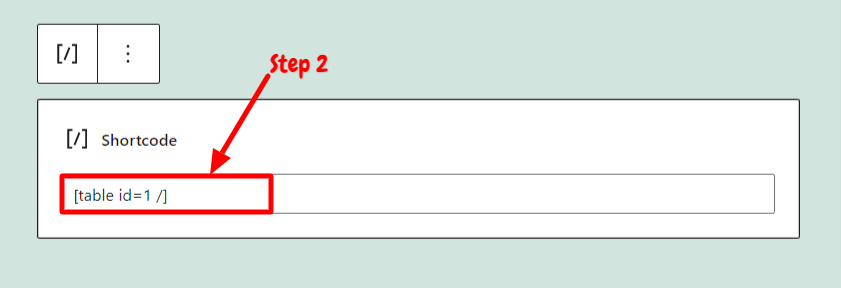
Then you can publish or update the post or page. Check whether the table is displayed properly or not. This way, you can easily embed the tables anywhere on your site.
Conclusion
TablePress is an effective table editor plugin for WordPress sites. You can easily add and display the tables on your site using this plugin. The plugin also provides shortcodes to display the tables anywhere on your site. The TablePress plugin is entirely free software. It is available in the WordPress plugin directory for free. It also offers TablePress Extensions along with enhancements and advanced options. However, you will have to install the extension separately to use the additional features of this plugin. All the extensions by this plugin are completely free to use.
The installation and the setup process are very straightforward. You can follow the steps mentioned below to install and activate the plugin. Also, we have explained step by step guide on how to set up this plugin. We hope this article will help you to create and customize the tables on your site using the TablePress Plugin.
Related guides
7 Common Hosting Mistakes Beginners Make (And How to Avoid Them)
7 common hosting mistakes beginners make in 2026: no backups, ignored updates, bad host choice, weak passwords, single point of failure, no staging. With fixes for each.
WordPressWebsite Migration Backup Checklist: What to Save and How to Test
Prepare a website migration backup: inventory files, databases, email and DNS, check archive integrity, test recovery and plan a safe final synchronization.
WordPressCore Web Vitals in 2026: A Practical Fix Guide for Site Owners
Core Web Vitals 2026: practical fixes for LCP, INP, and CLS. Real root causes, what to measure, common misconceptions, and a priority order of fixes for site owners.
WordPressFixing the WordPress “Death Loop”: When Missing Files slow down your site
You’ve just launched your new WordPress site or pushed a big update. In your staging environment, everything ran perfectly.