
GICT knowledge base
An Ultimate guide on Elementor Website builder for WordPress
Published
WordPress is an open-source CMS(Content Management System) and is popular worldwide for its features and extra plugins. We can create any type of web content website like Blog, Business Website, Portfolio Website, E-Commerce Website, Event Website, E-Learning Website. But why WordPress? It is because WordPress is very simple, scalable, open-source, and flexible. It has many external plugins which are very useful for content creation.
Many plugins allow WordPress users to create a website without any technical knowledge. Let’s talk about one of the powerful plugins called Elementor Website Builder. This plugin allows you to create a fully customised WordPress website with utmost simplicity. Just drag and drop the elements and give them functionality. You just need to install the plugin in your WordPress and you can start using it.
Let’s see how we can install Elementor website builder in a WordPress website. You will need administrator access to the WordPress.
How to install Elementor Website Builder
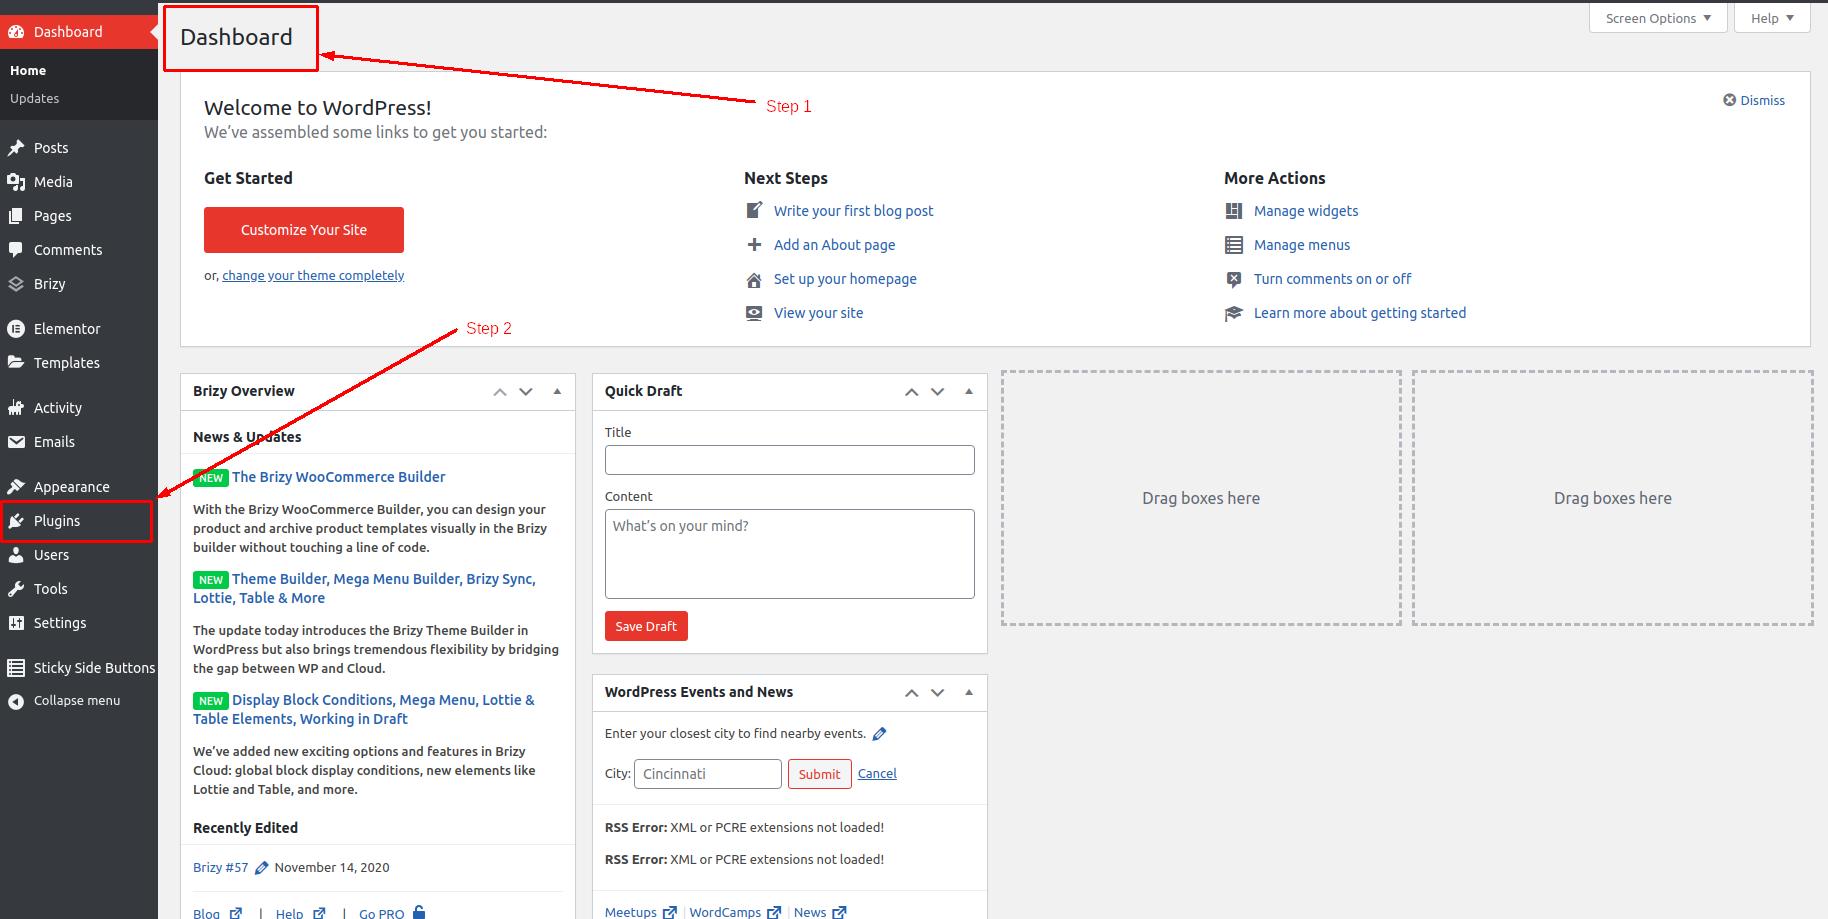
Step 1: Log in to your WordPress dashboard with your username and password.
Step 2: You can see the Tab Section on the Left-Side of your Display. Click on Plugins to install the Elementor website builder Plugin.
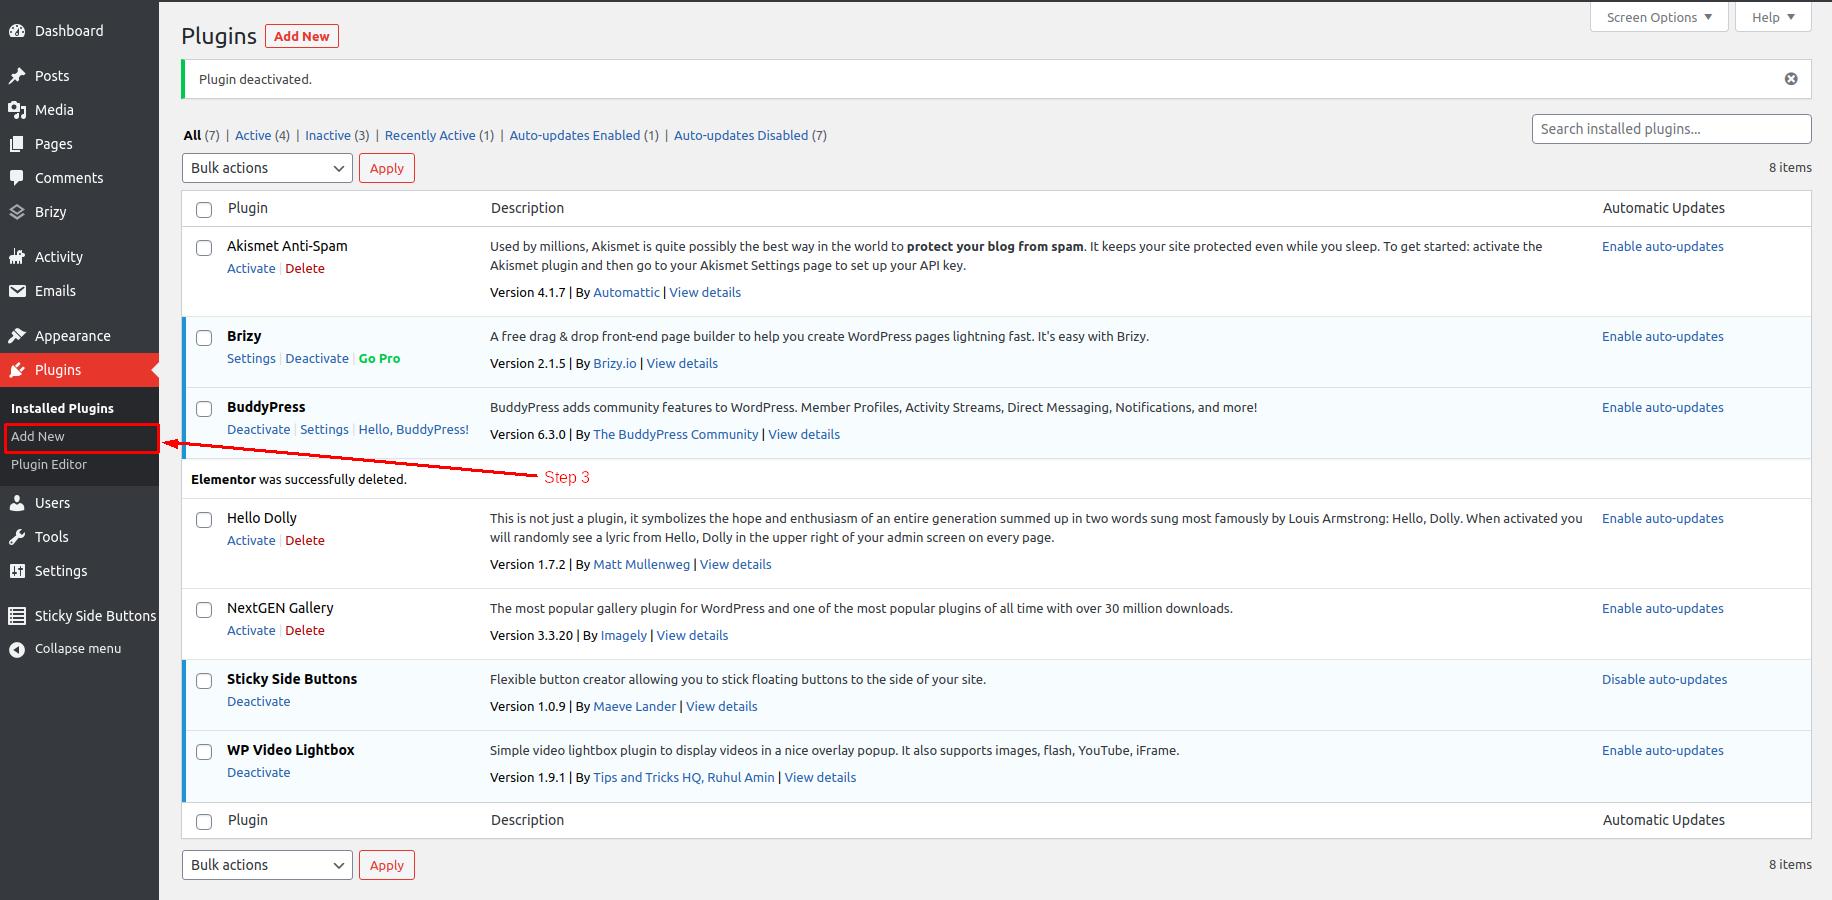
Step 3: Now click on Add New button to search and install a new plugin.
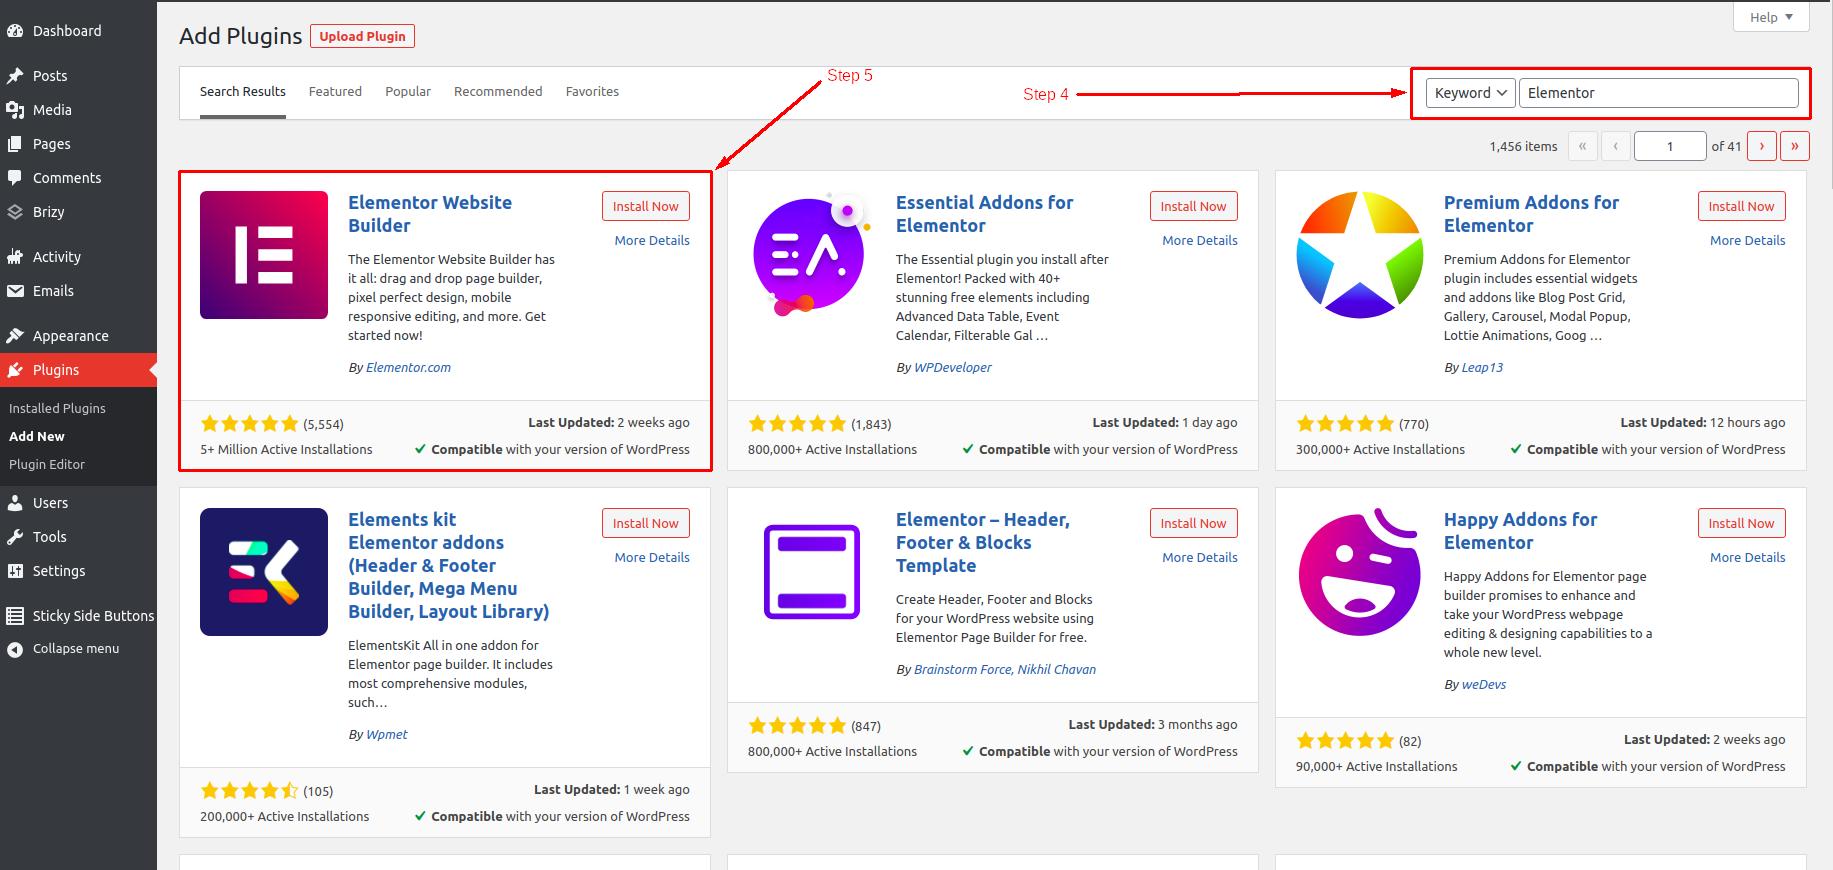
Step 4: Find a search box and type “Elementor”.
Step 5: Look for “Elementor Website Builder” that has 1+ million active installations, see the following screenshot for reference.
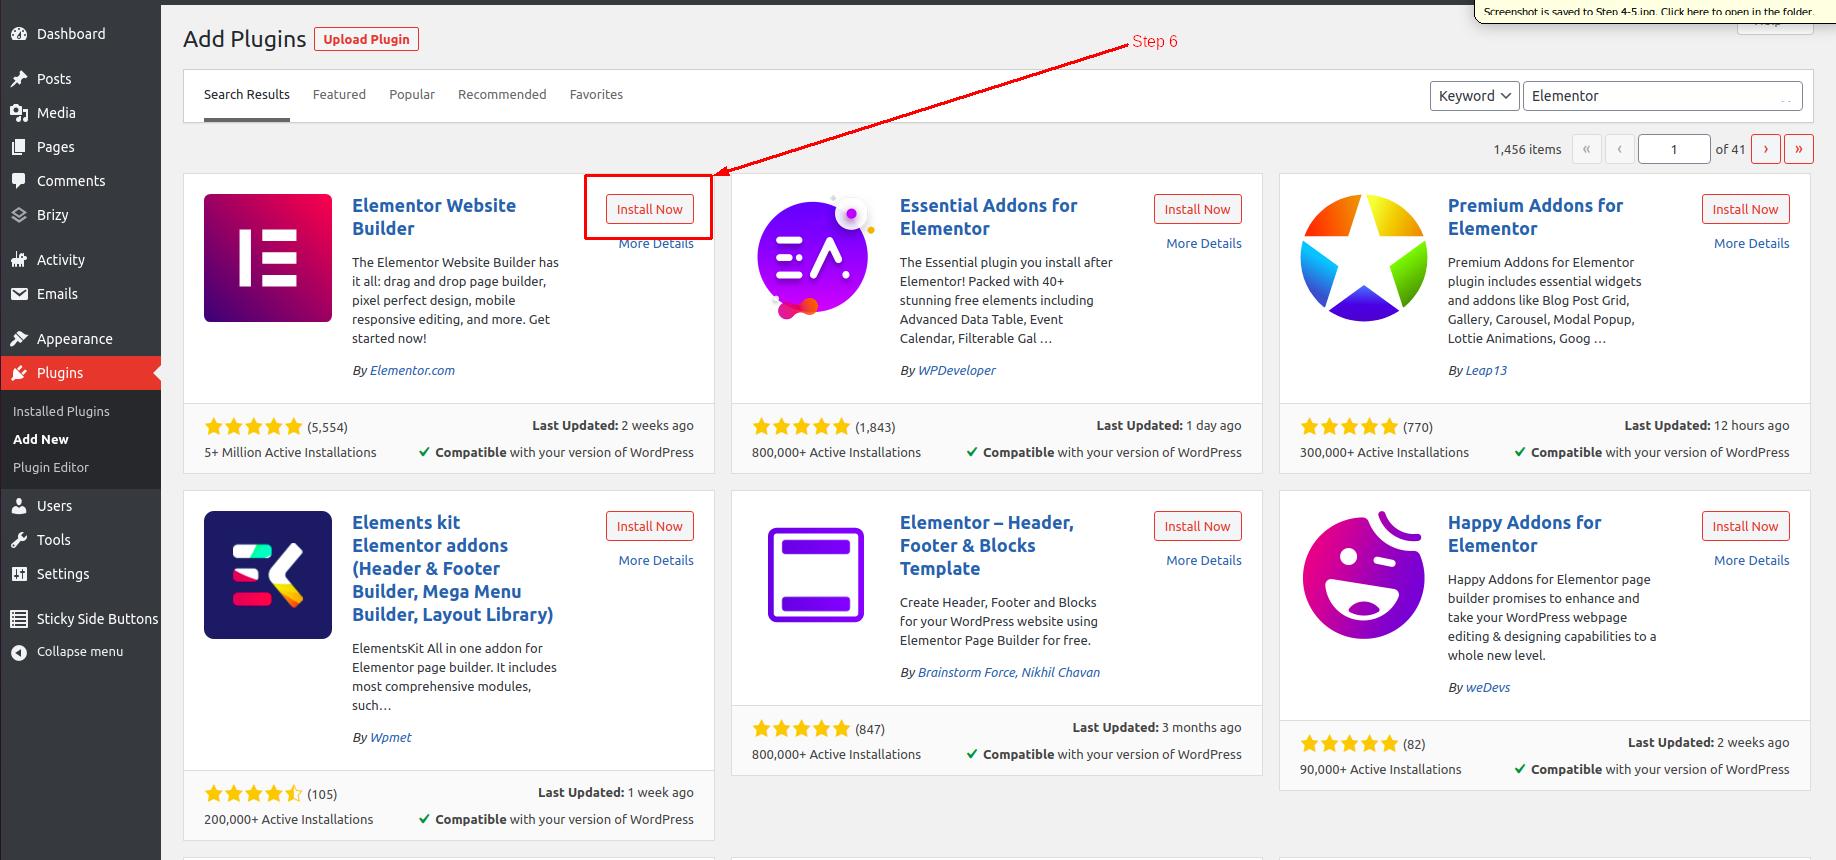
Step 6: click on “Install Now” button and wait till the plugin is installed. Usually, it takes 10-15 seconds to install a plugin.
Step 7: After the successful installation, Install Now button will be replaced by the Activate button. Click on the Activate button to activate it.
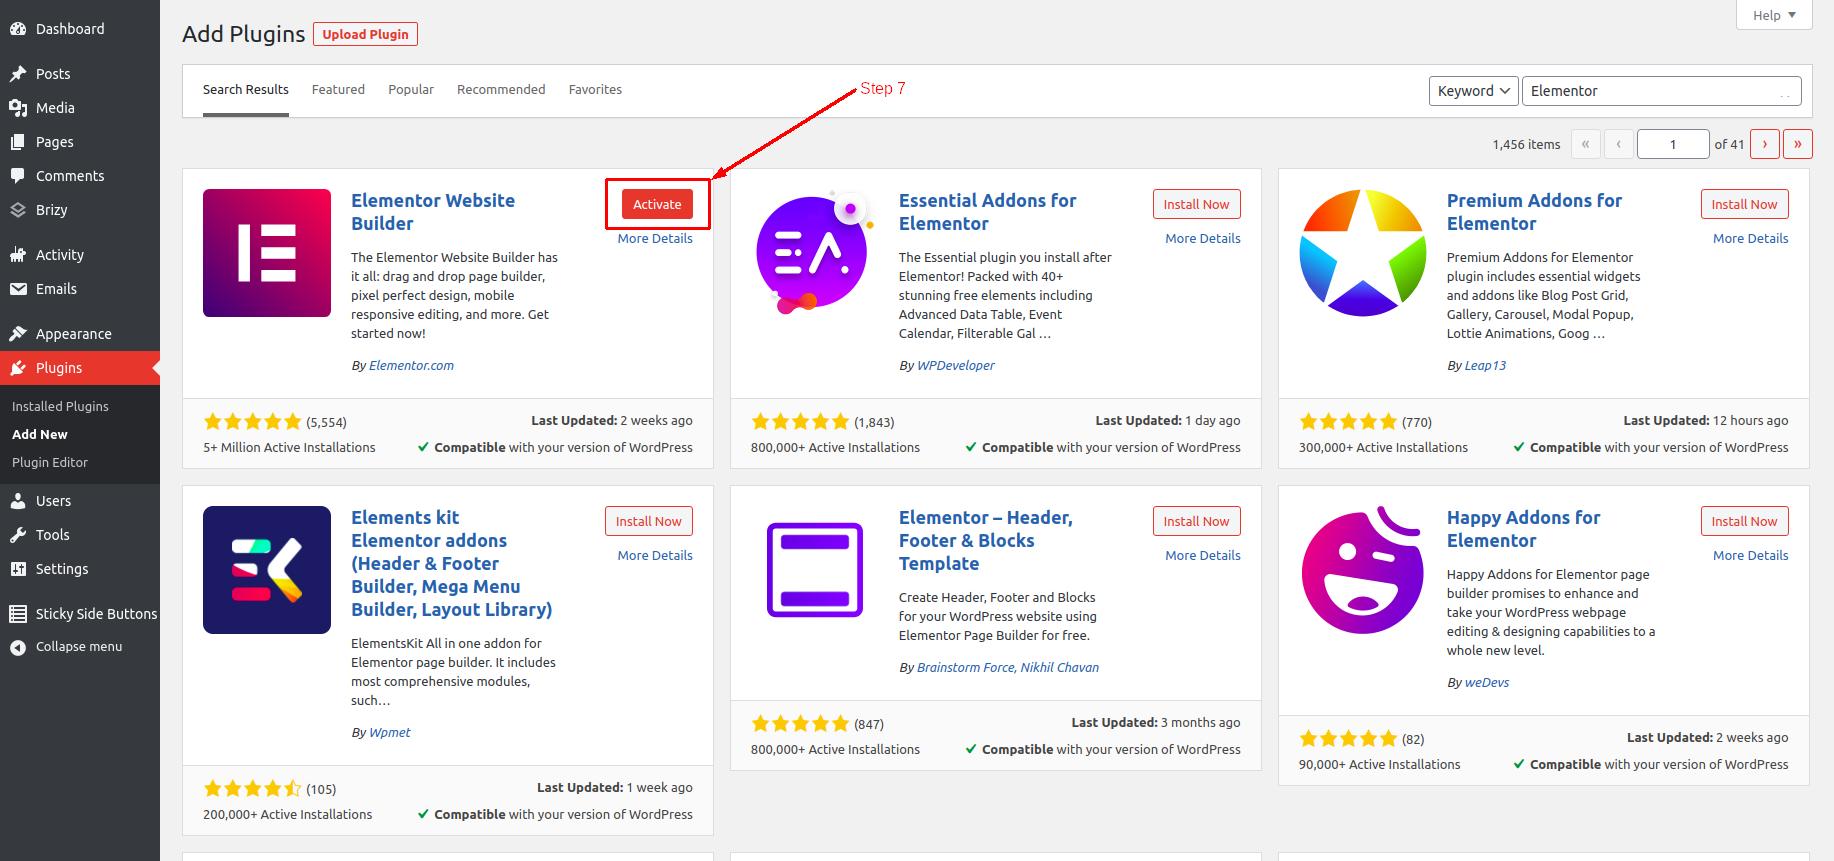
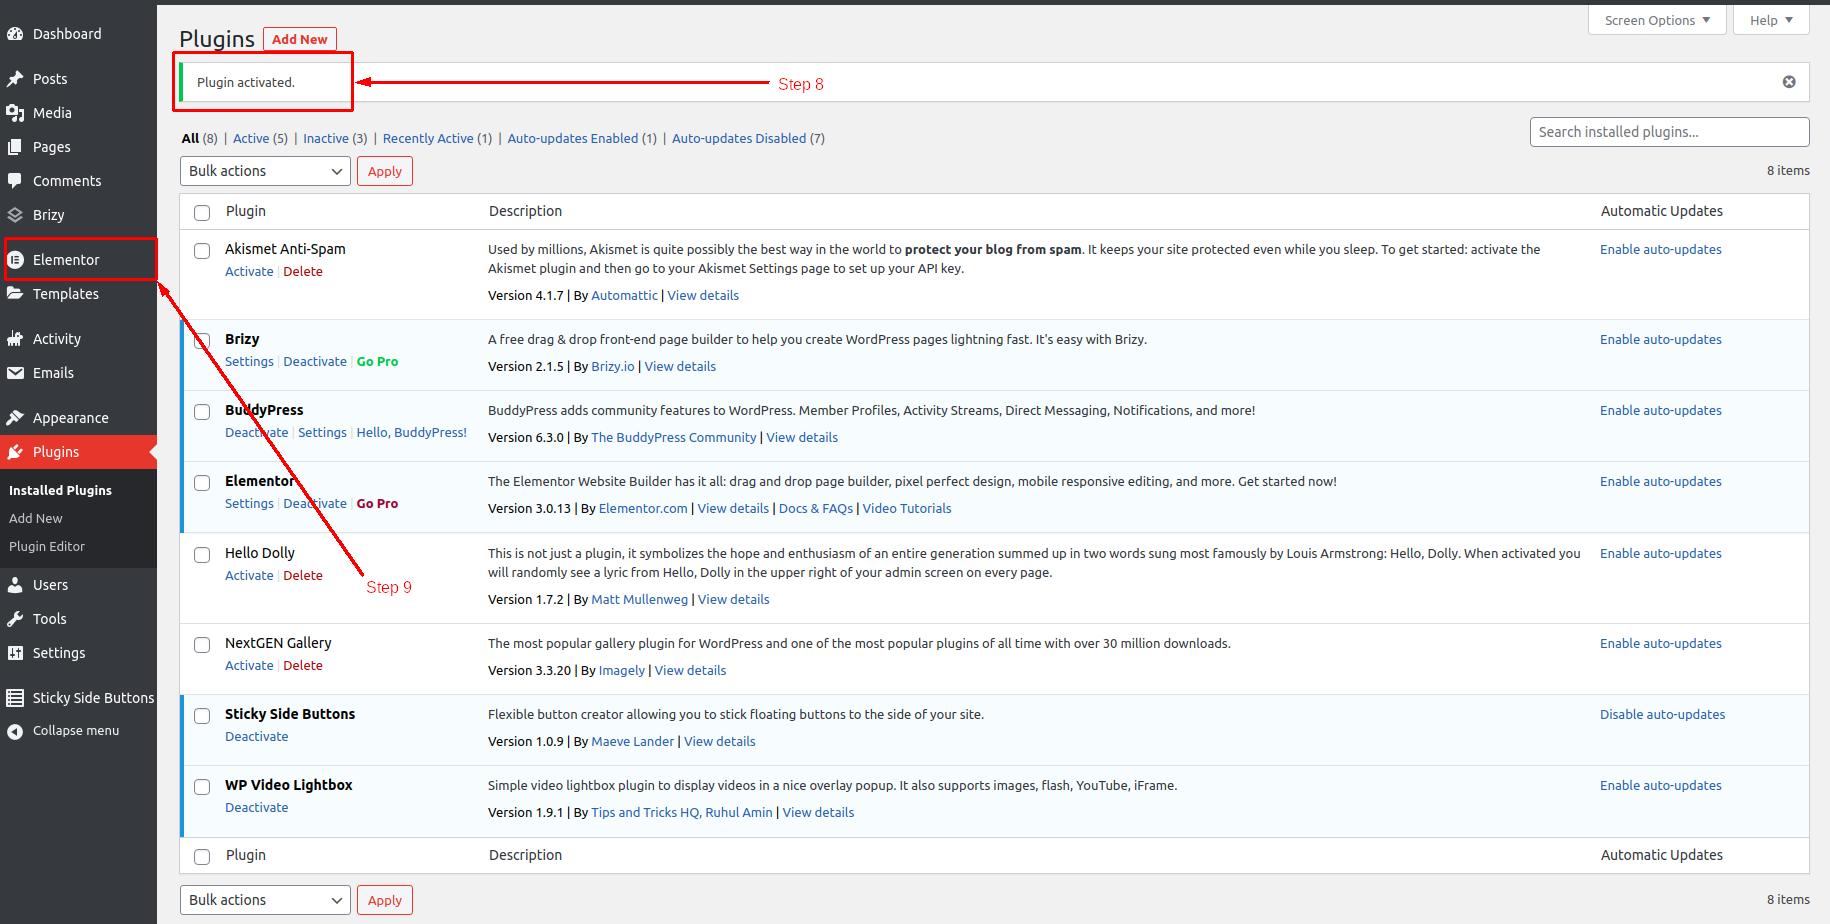
Step 8: When you click on the Activate button, The page will reload itself and take you to the installed plugins page with a Notification as you can see in the image below.
Step 9: Now go to the left sidebar and find Elementor as you can see in the below image.
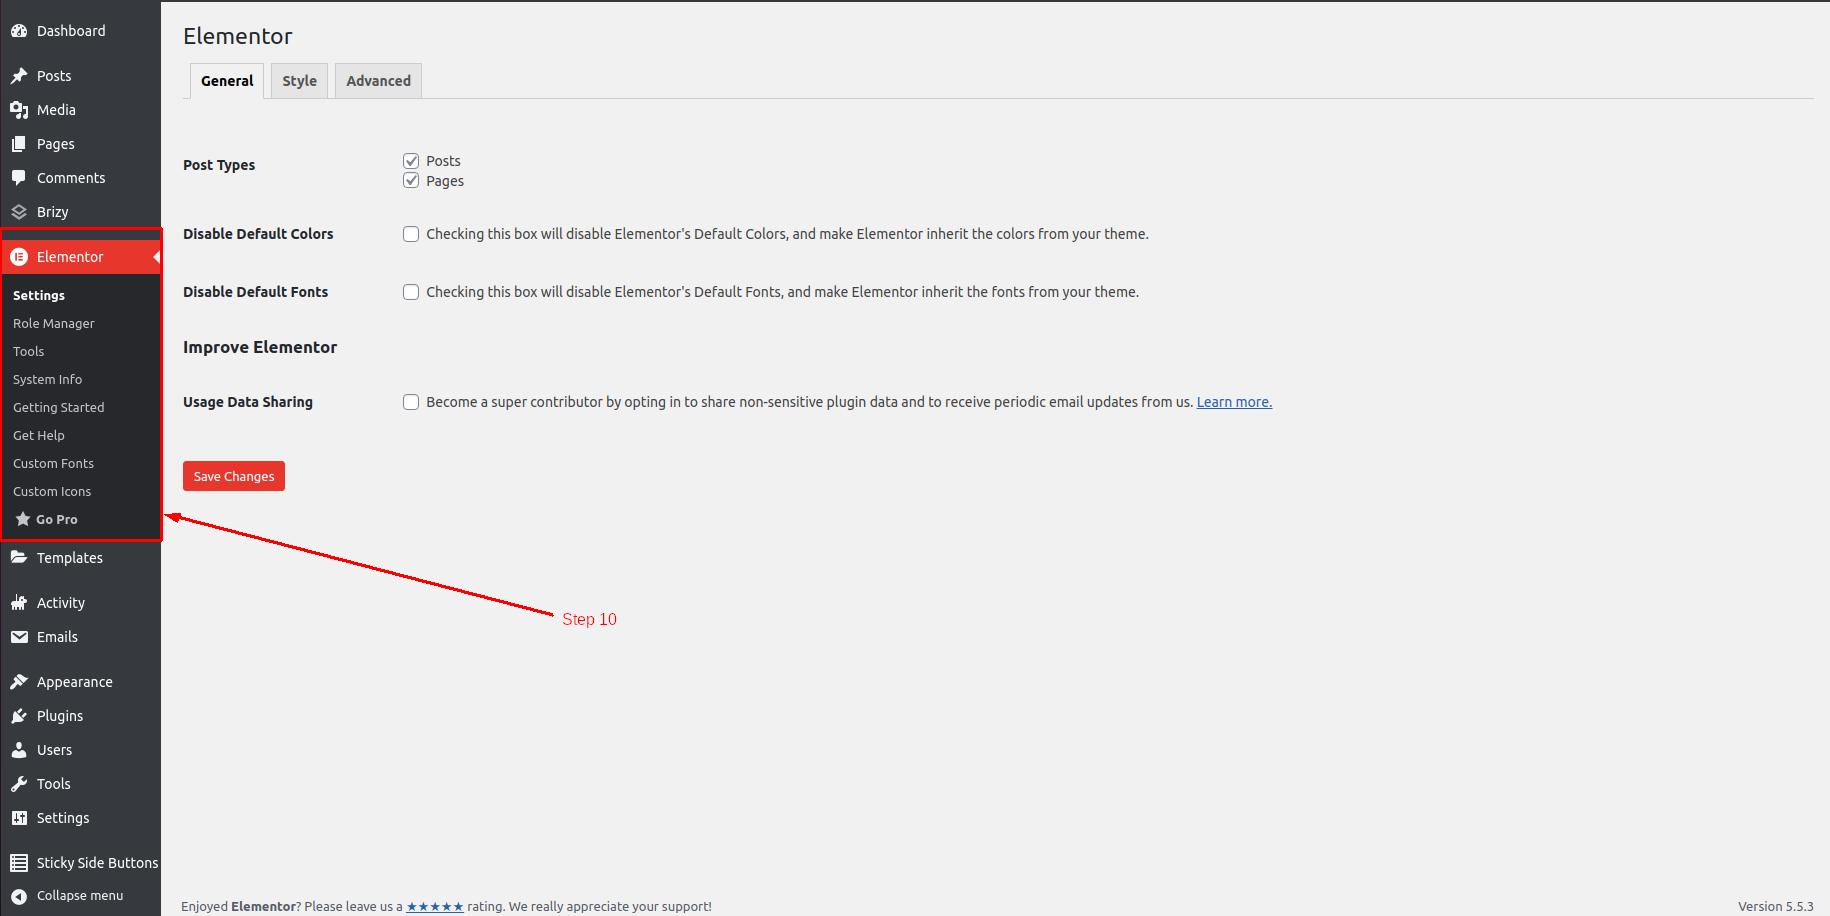
Step 10: Now Click on Elementor tab. Your Elementor plugin is Successfully installed and ready to use if you see a screen just like the following image.
Now let us see how to use Elementor to create a website you always wanted!
How to use the Elementor Plugin
Step 1: To use the Elementor website builder, log in to your WordPress and click on the Elementor tab which is available in the left sidebar. This click will expand the Elementor tab.
Step 2: Now click on the “Getting Started” button.
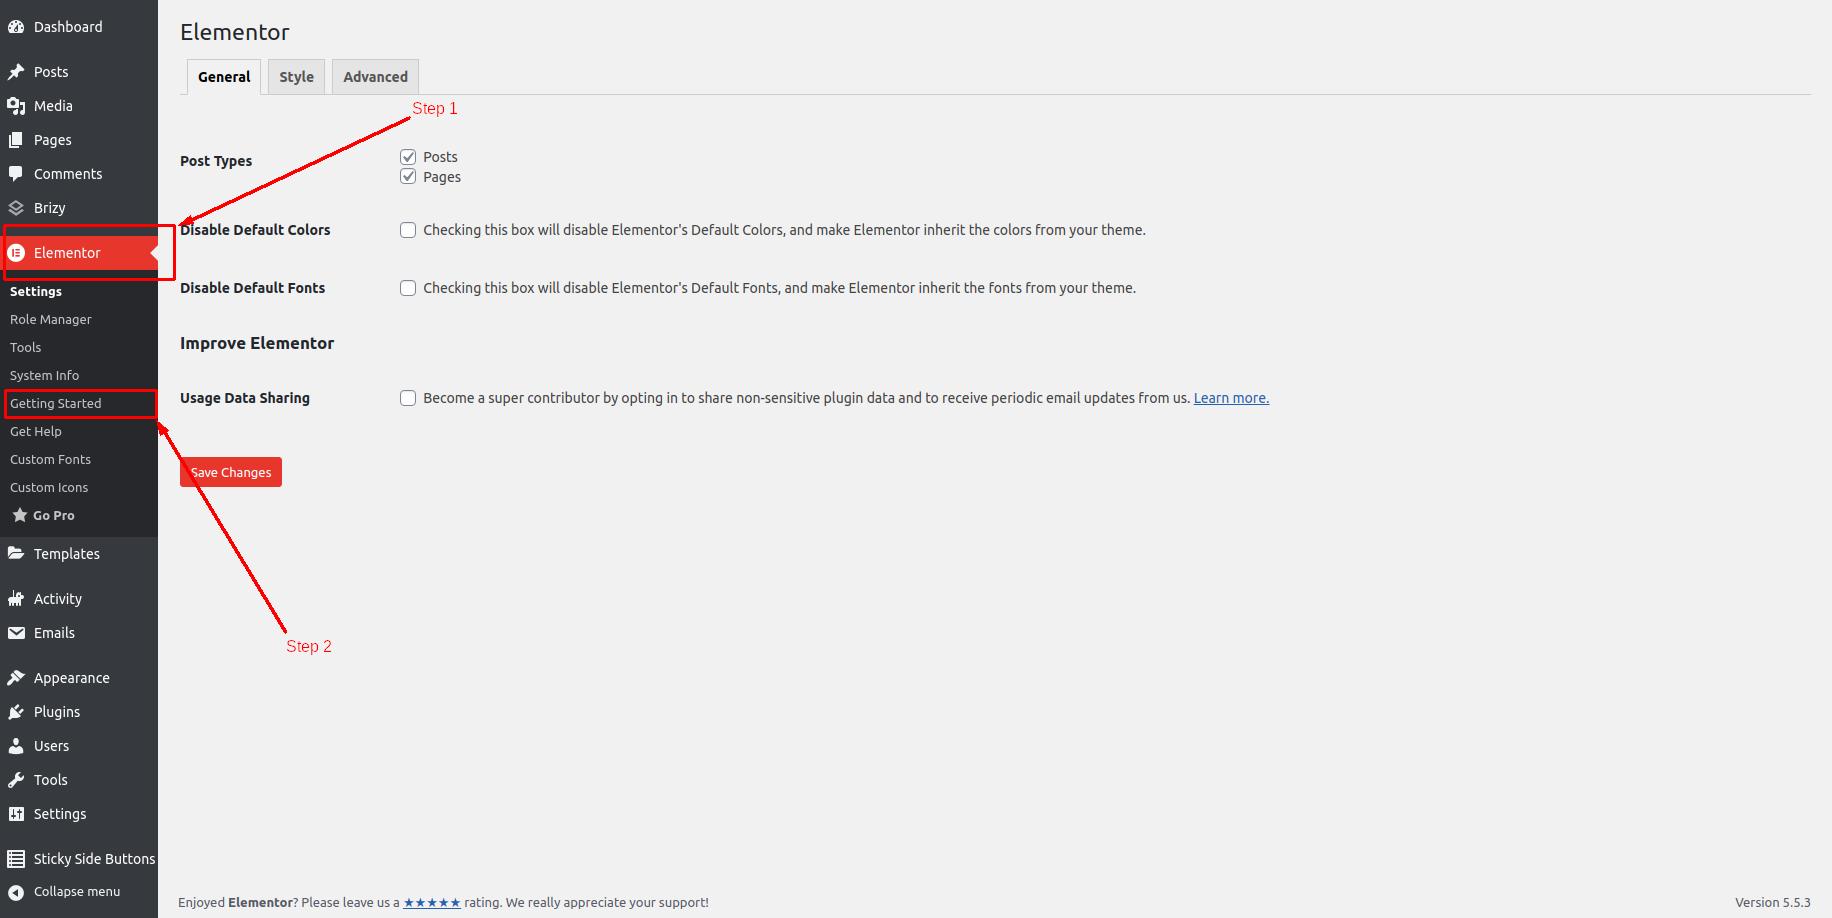
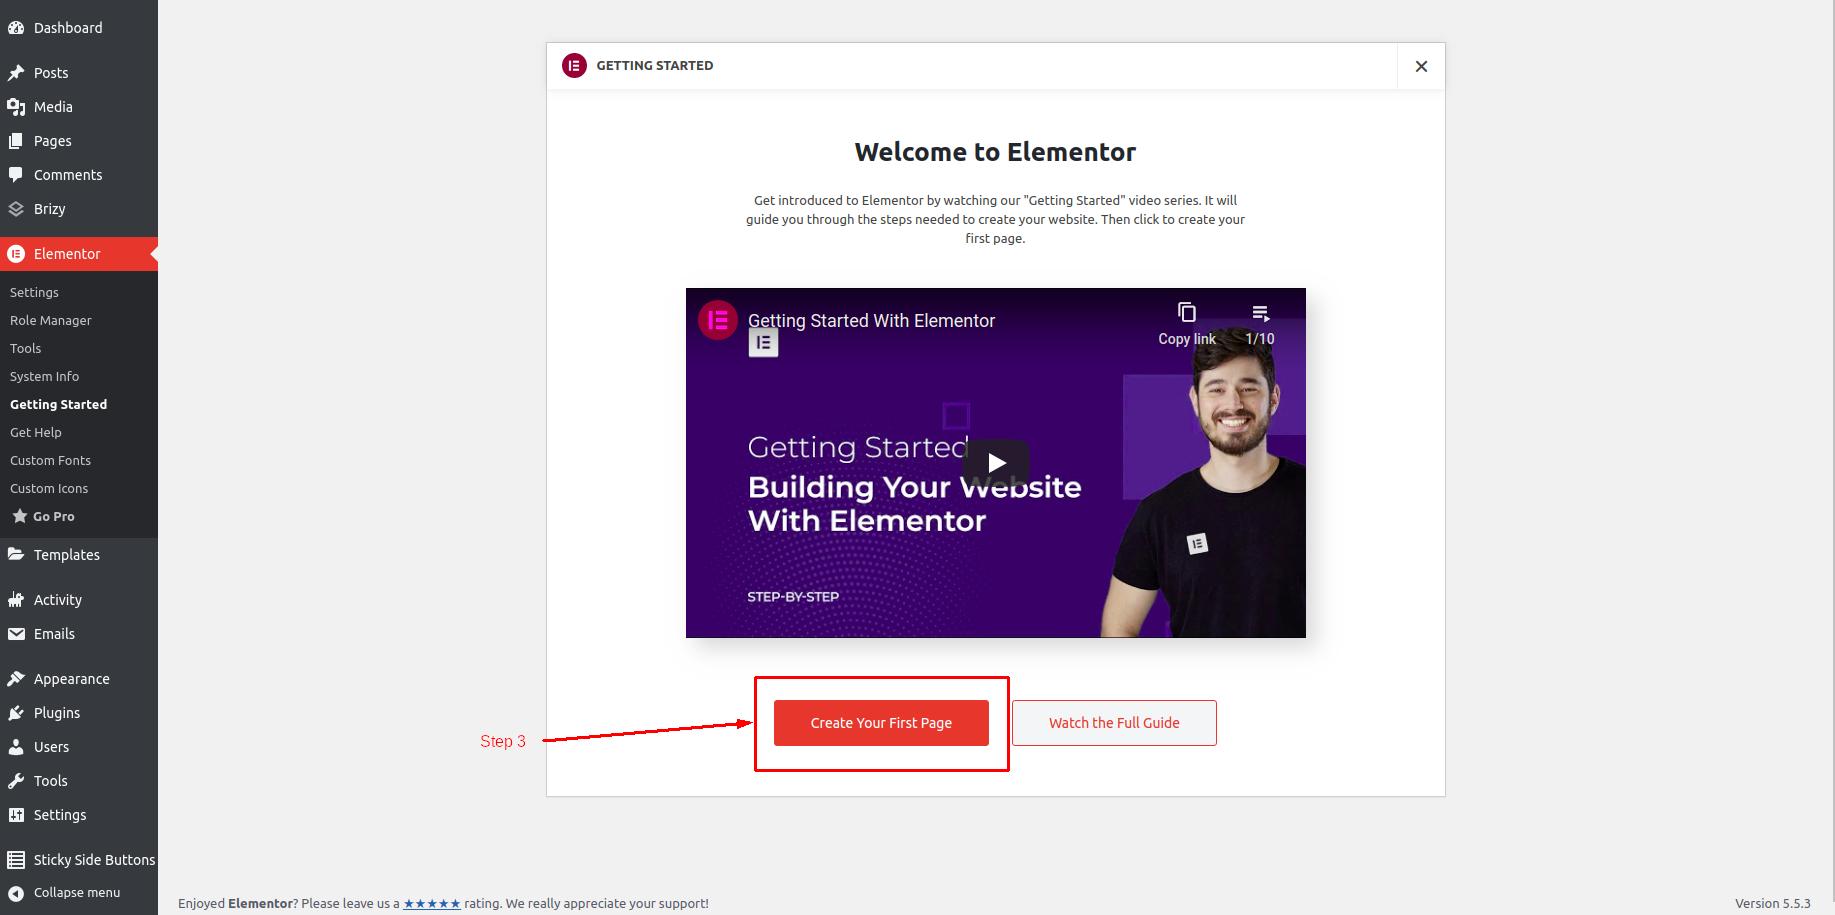
Step 3: You will see a new page just like the the following image. Click on the “Create your first page” button.
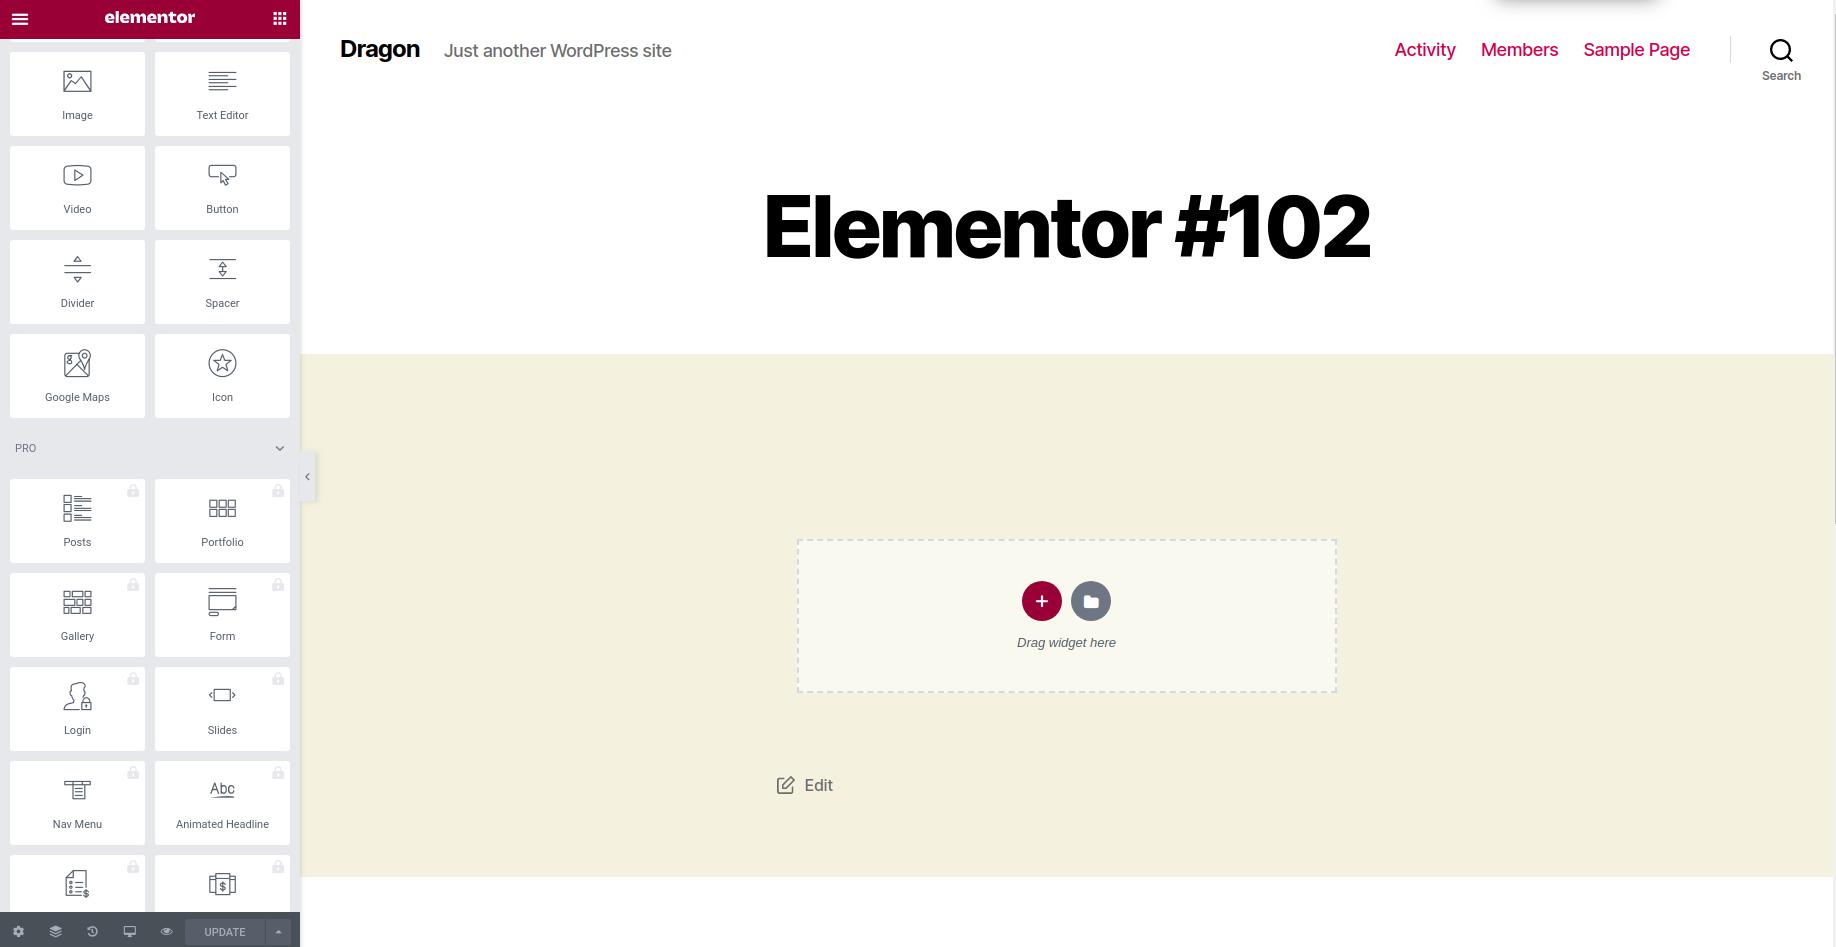
The Elementor page builder is ready. The following image is a base page that you will start editing. You can also select the “Elementor Canvas” option to start the development of a page from scratch.
Let’s understand the website builder in brief. The following image shows different sections you will have while using the Elementor website builder.
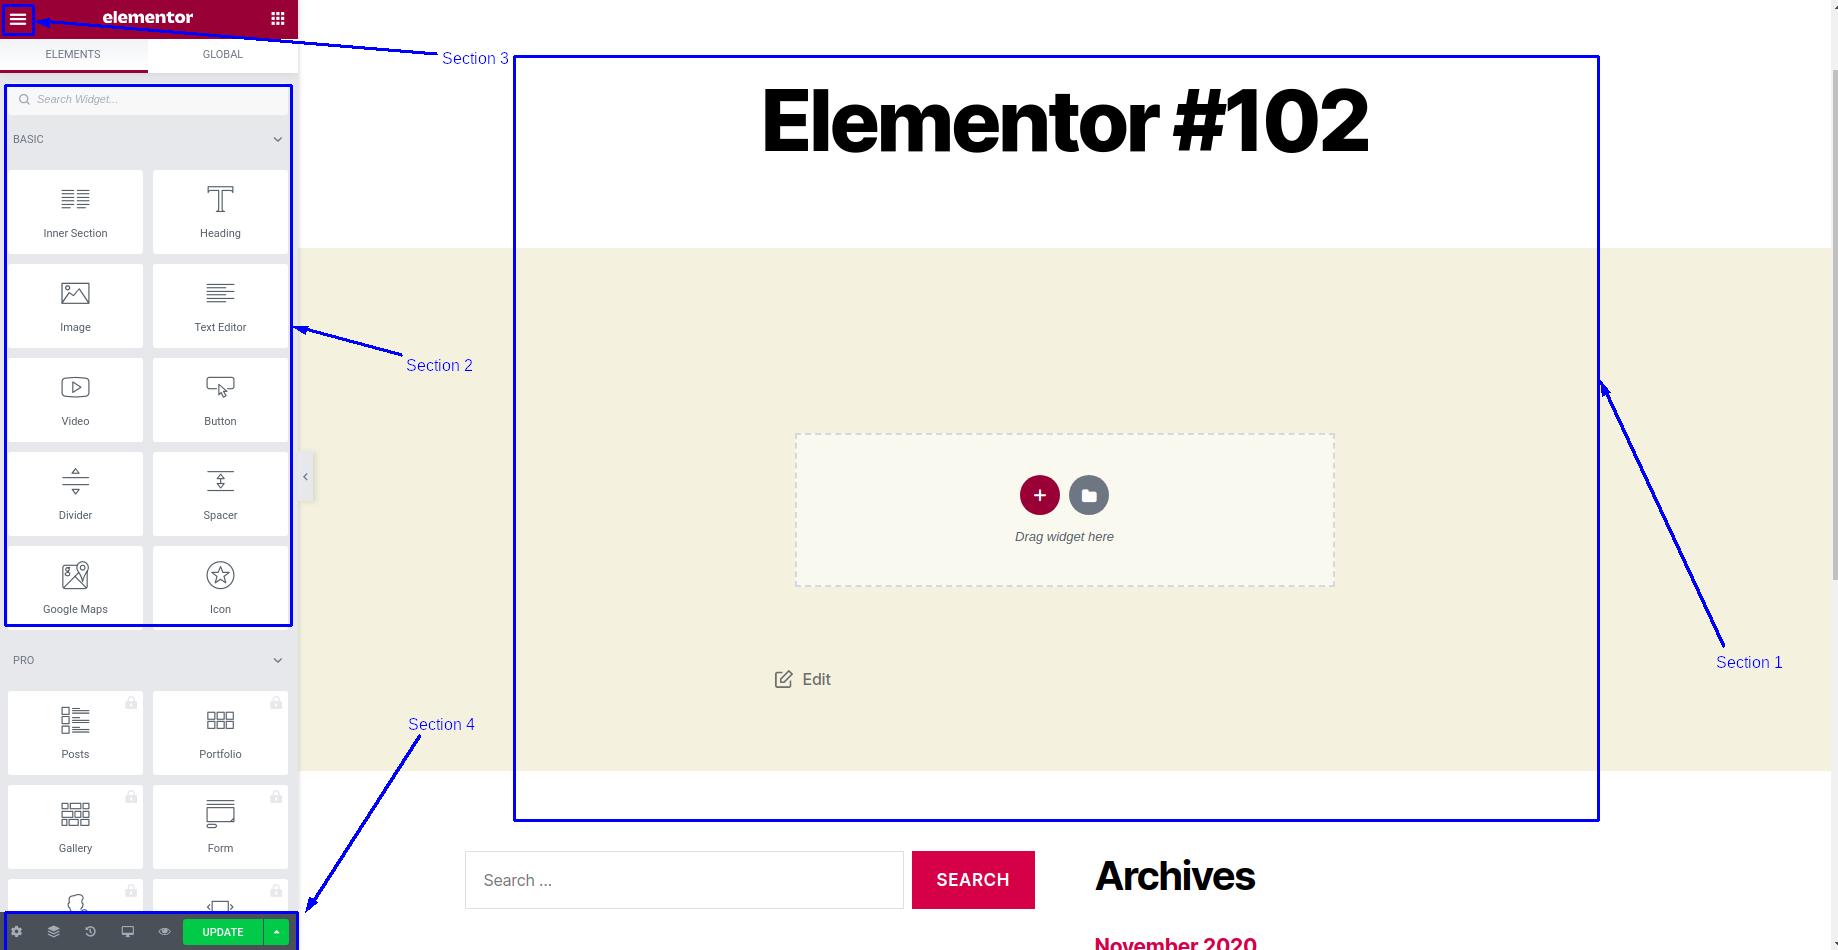
We will understand each and every section in detail, one by one. Let’s get start with the Preview and Edit section where you will work most of the time.
Section 1: Preview and Edit
This section shows you the preview of your website and it also allows you to edit the elements on your page. You can see some elements are already available on this page, You can change the text or the elements as you want.
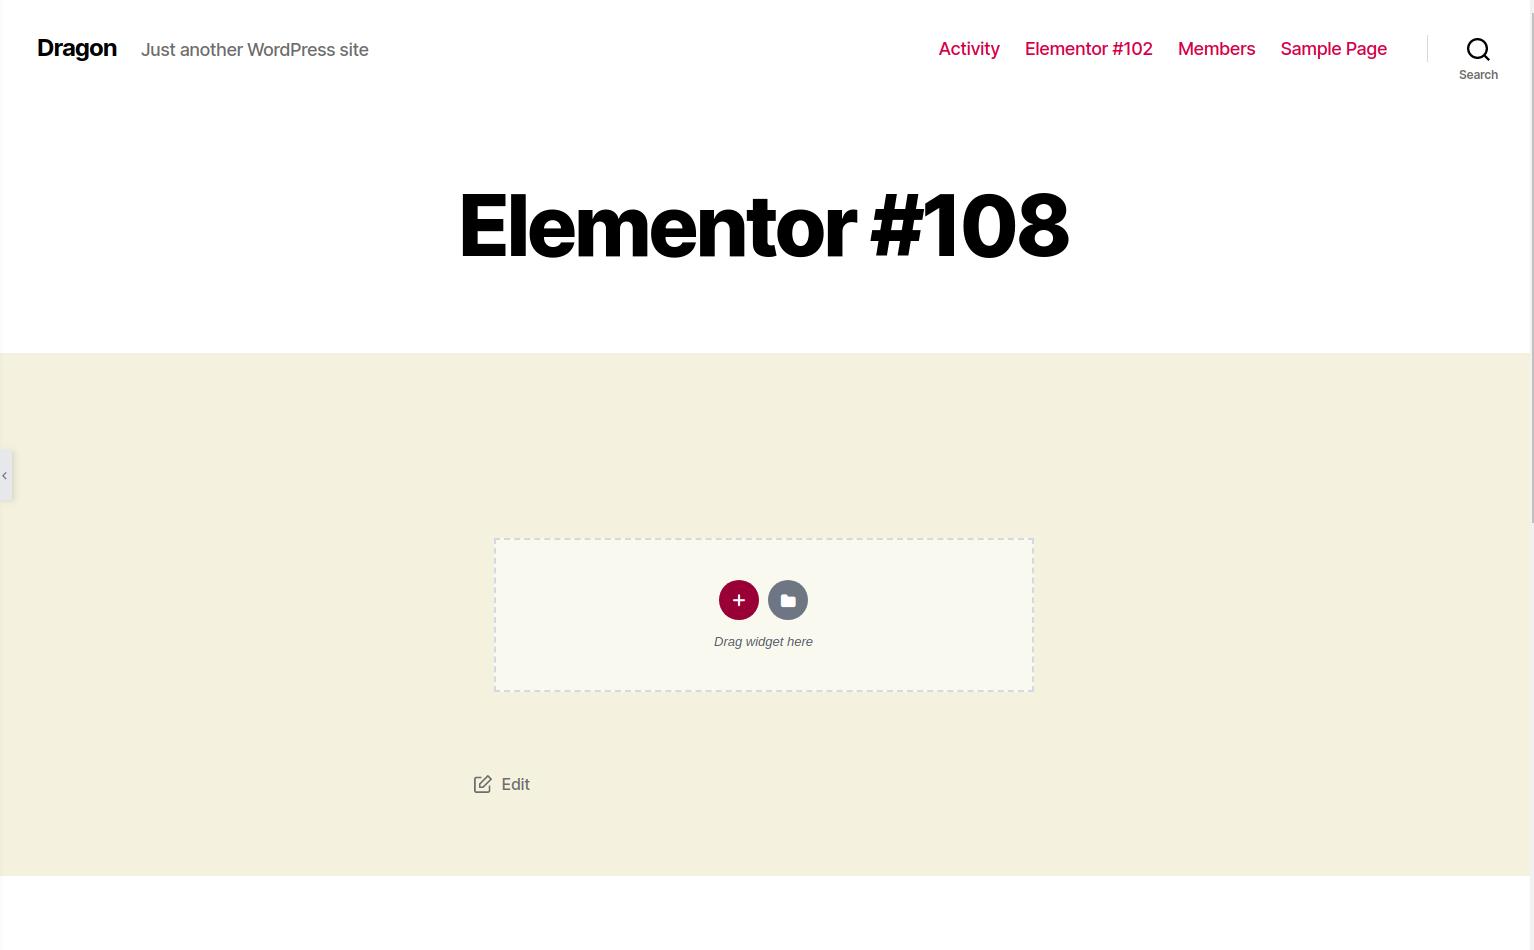
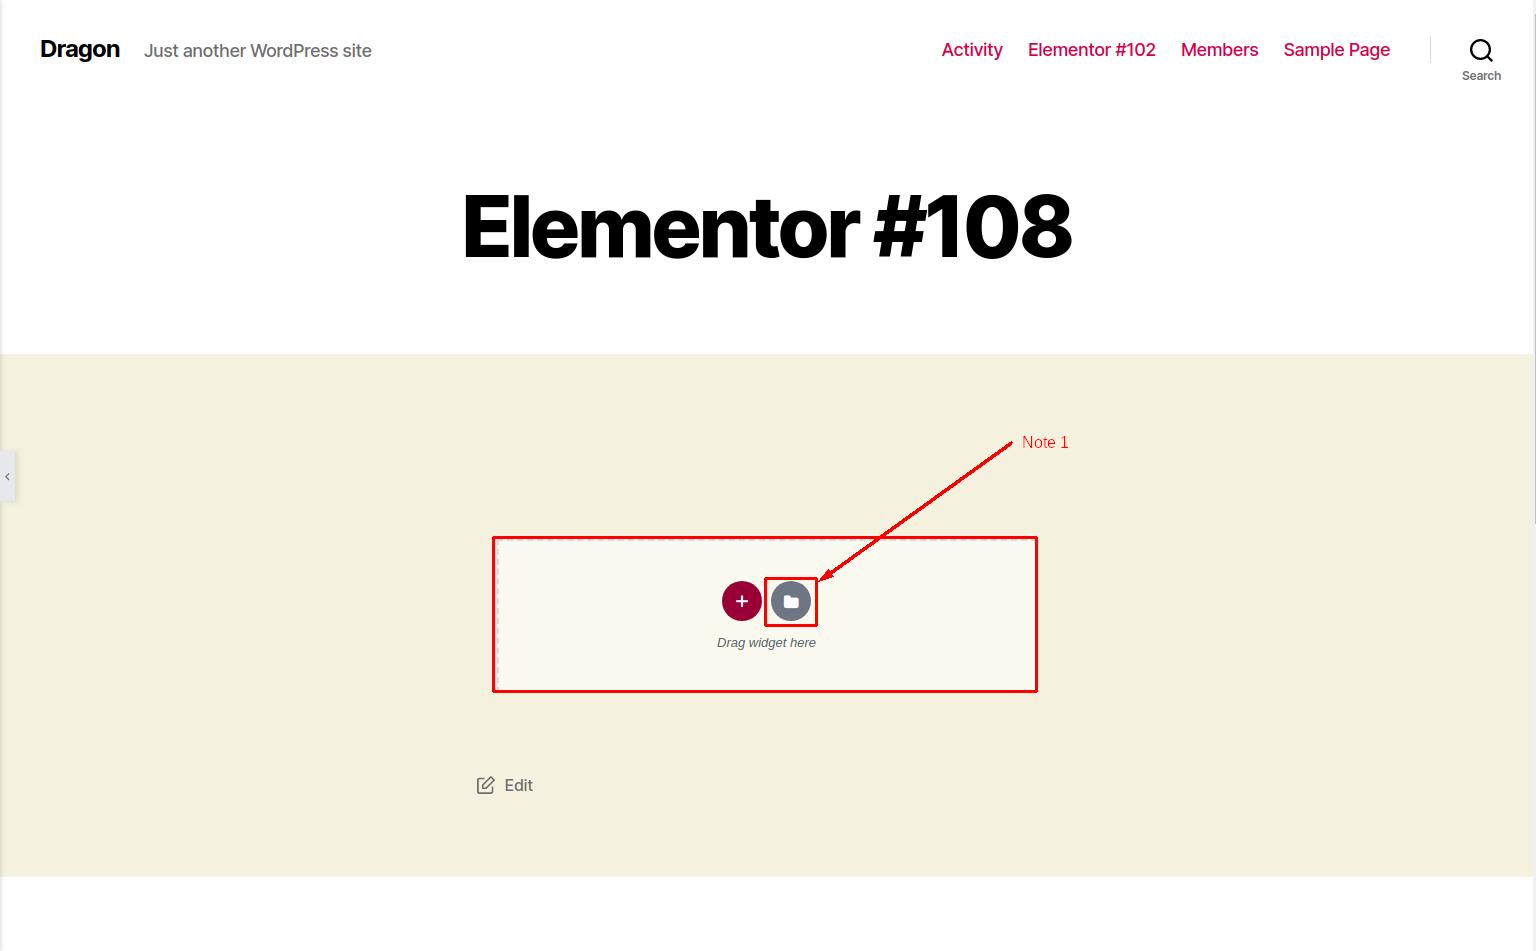
You can use the ready-made templates from Elementor Repository. To add a new template, just click on the Folder icon just as you can see in the image below.
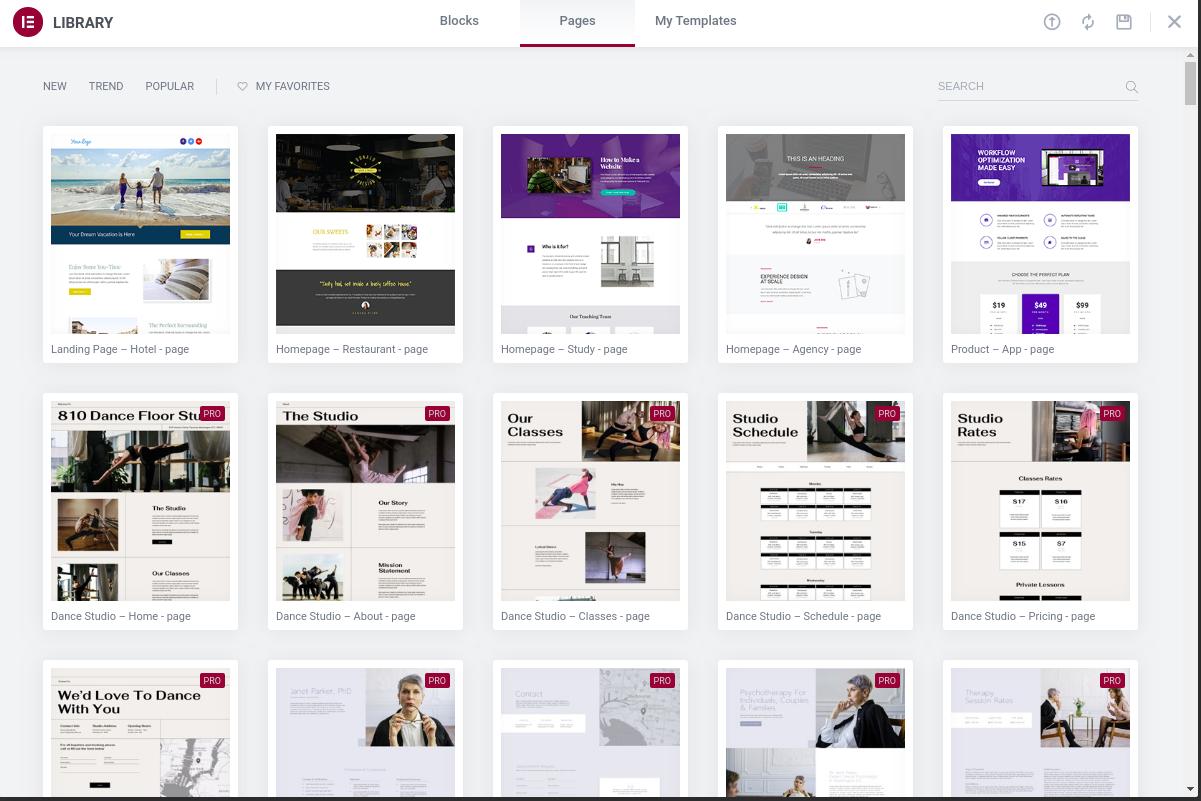
One huge dialog box will pop up and it will look like the below image. You can see some templates, Choose a template according to your requirements and it will be applied on your webpage.
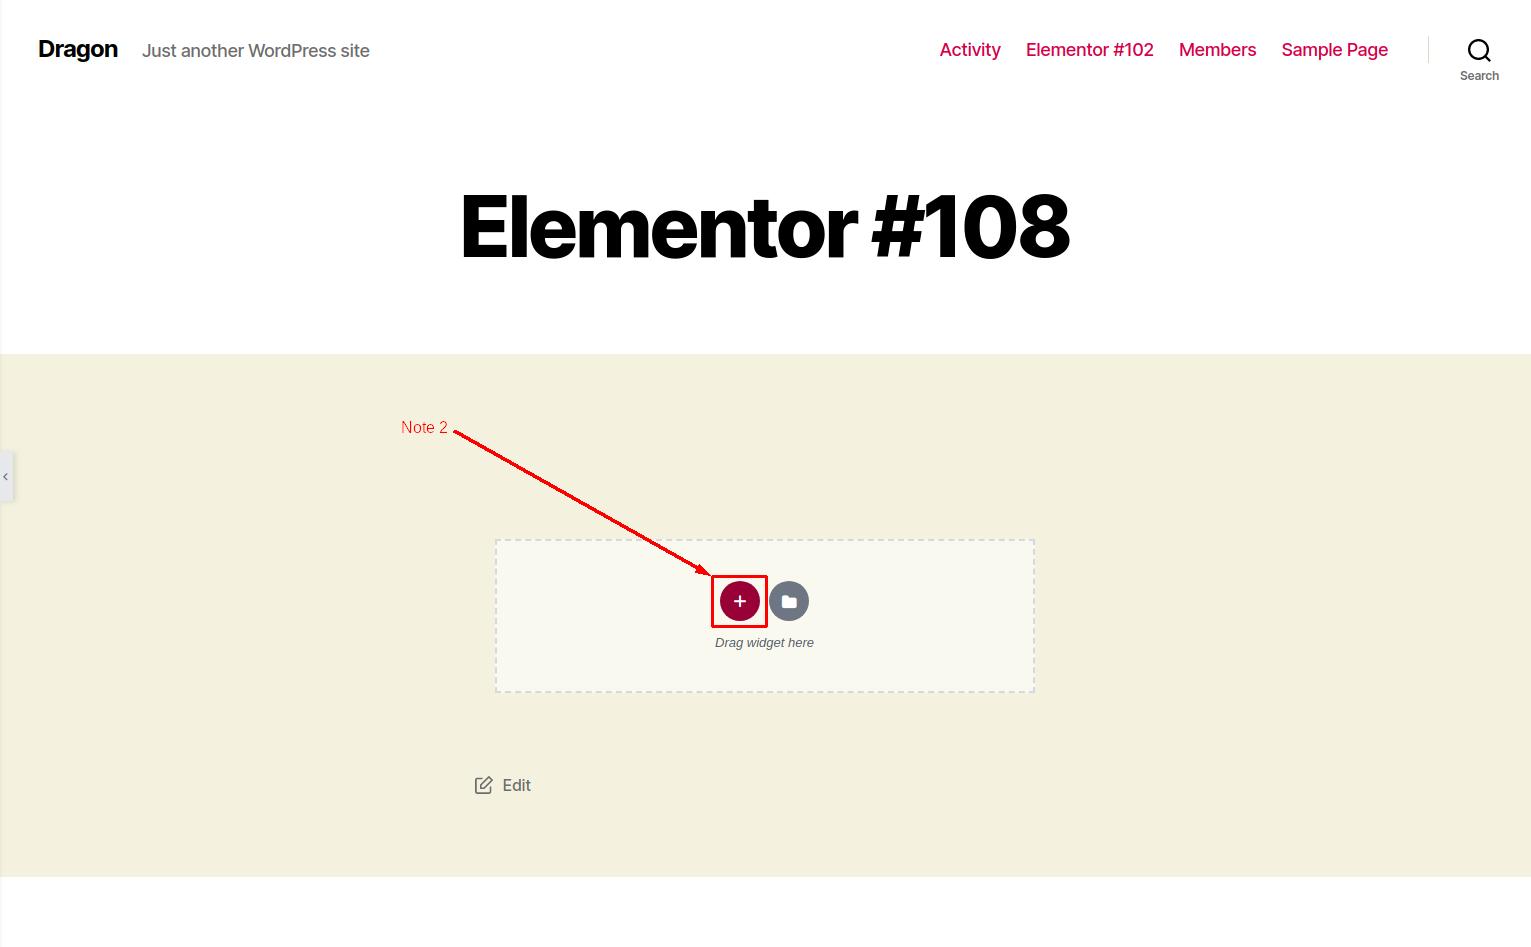
Find the Round + Icon. That icon will help you to create new sections on your website. You can create as many content blocks as you want. Just drag and drop elements on the page like Image, Text, Video, etc.
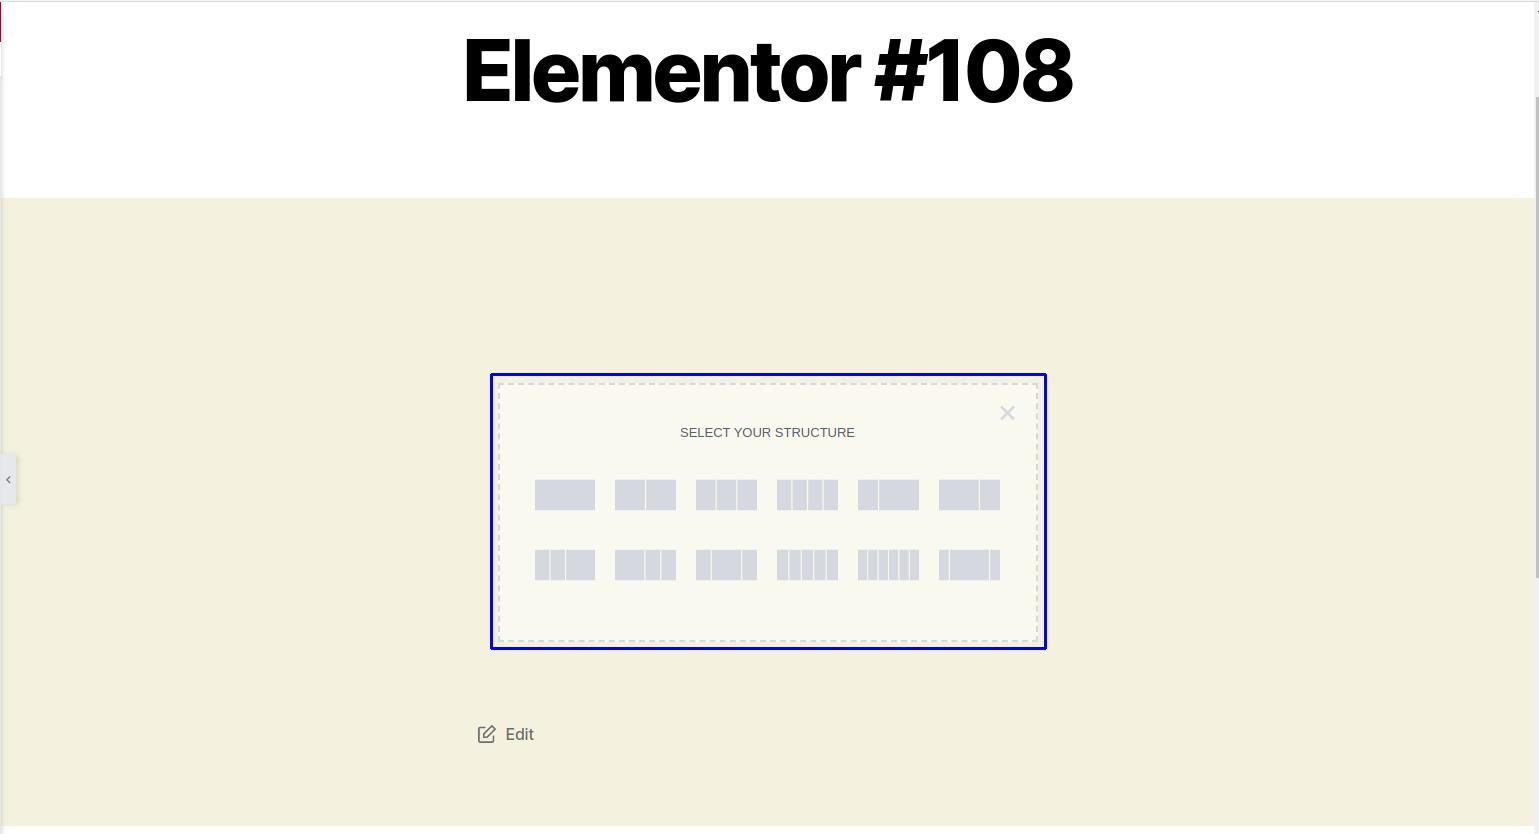
When you click on the button, it will show you the different structures of the row. You can have a full width single column, or two columns, or three. You can also add or remove the columns from the structure. You can also change the width of the columns as per your requirements. See the following screenshot for reference.
In this section, This is all you will do most of the time when it comes to the overall structure. Other than creating new structures and columns, You will also use this columns to edit, add or remove text.
Now, Let’s see the “Elements” section that contains all the elements you can add or modify in Elementor.
Section 2: Elements
This section contains a lots of elements which are very important to create a website. These elements are ready to use, you don’t need any technical knowledge or you don’t need to do programming/coding work. Just select the element according to your need, Drag it to the section, or block and drop it to apply it. Let’s see an example of how it works.
There are many elements available in this section like Text, Image, Heading, Video, Google maps, Icons, and many as you can see in the below image.
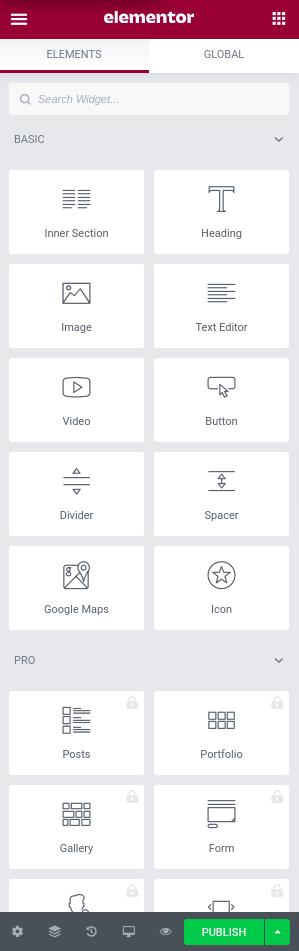
Let’s see how we can add Elements to the webpage with different sections and blocks.
Step 1: First create blocks on your page as we just learned on Section 1. Just click on the + Round icon and choose the structure as per your requirements.
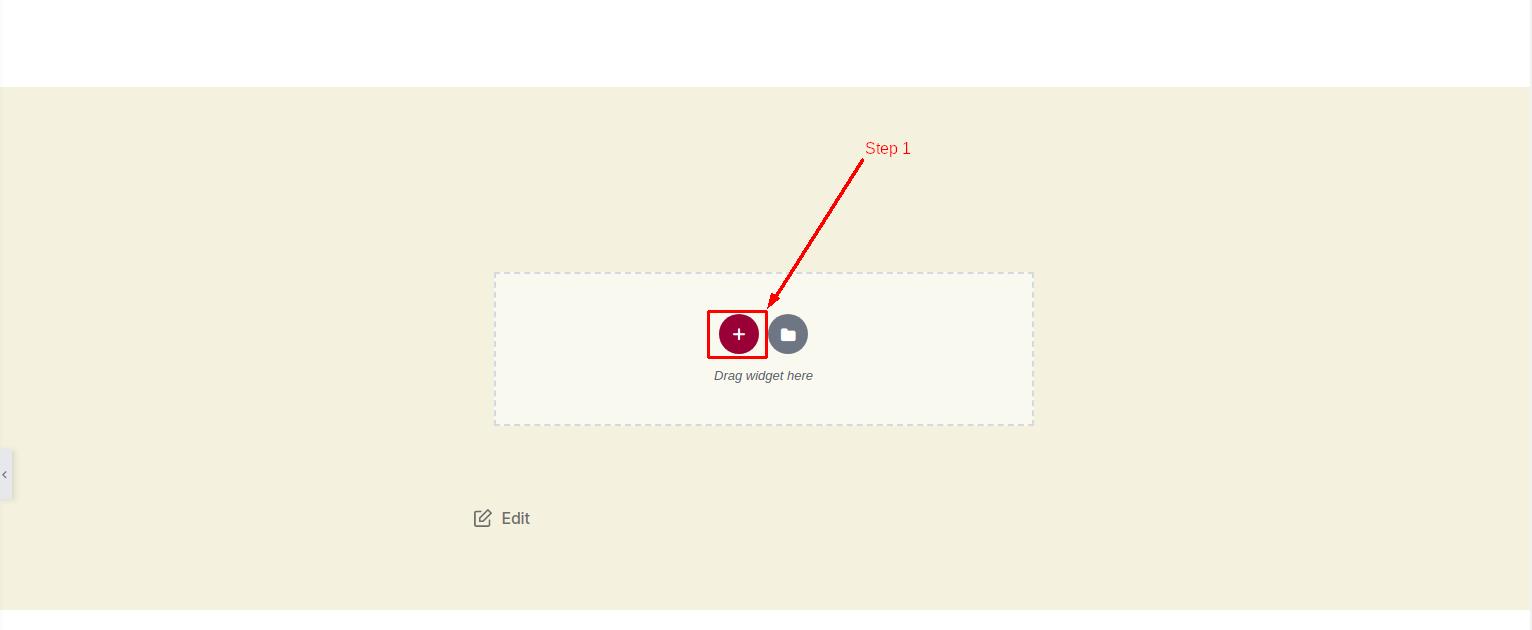
Step 2: Now click on the structure according to your requirements. For this example, I am selecting an option with 4 columns, each with 25% width.
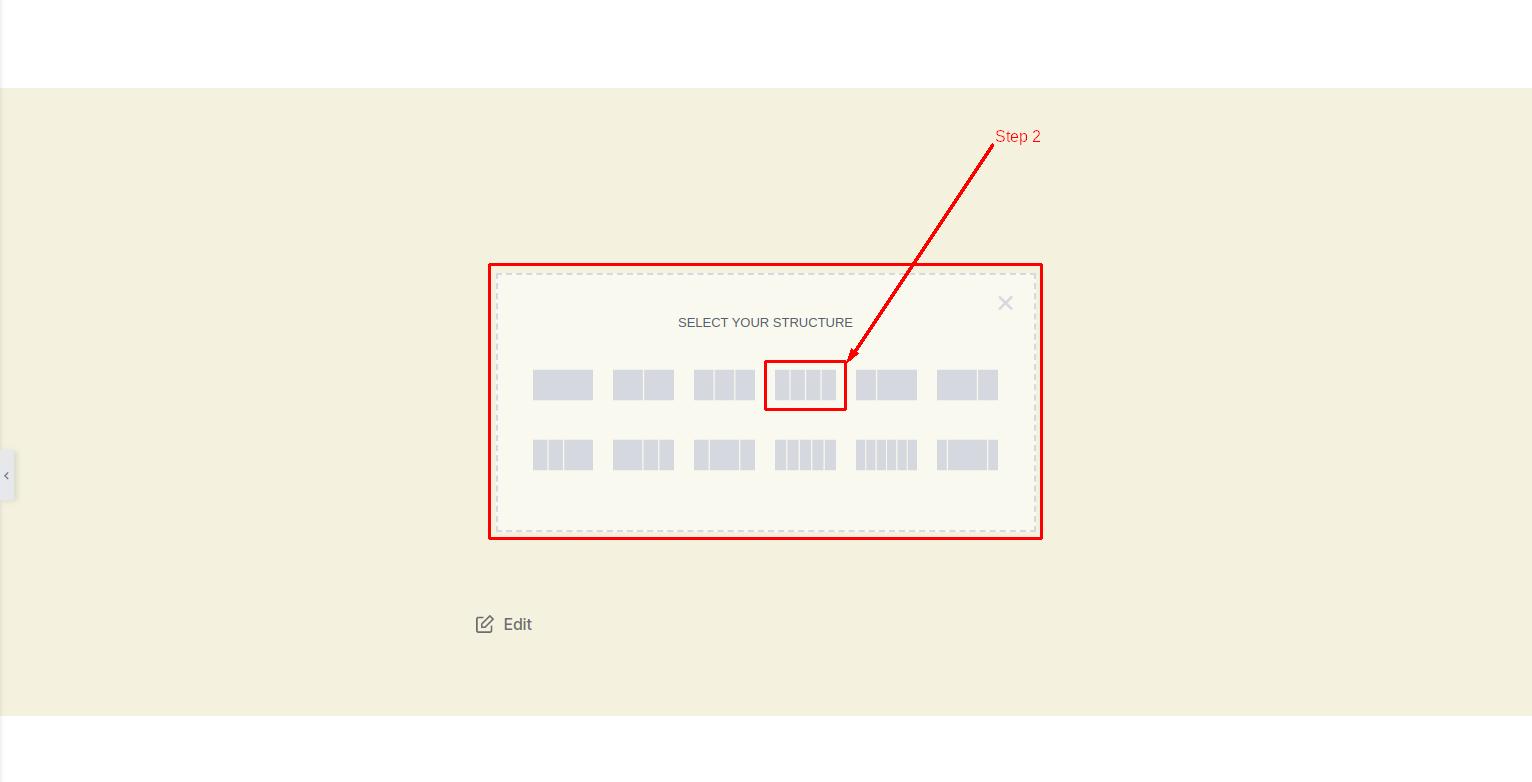
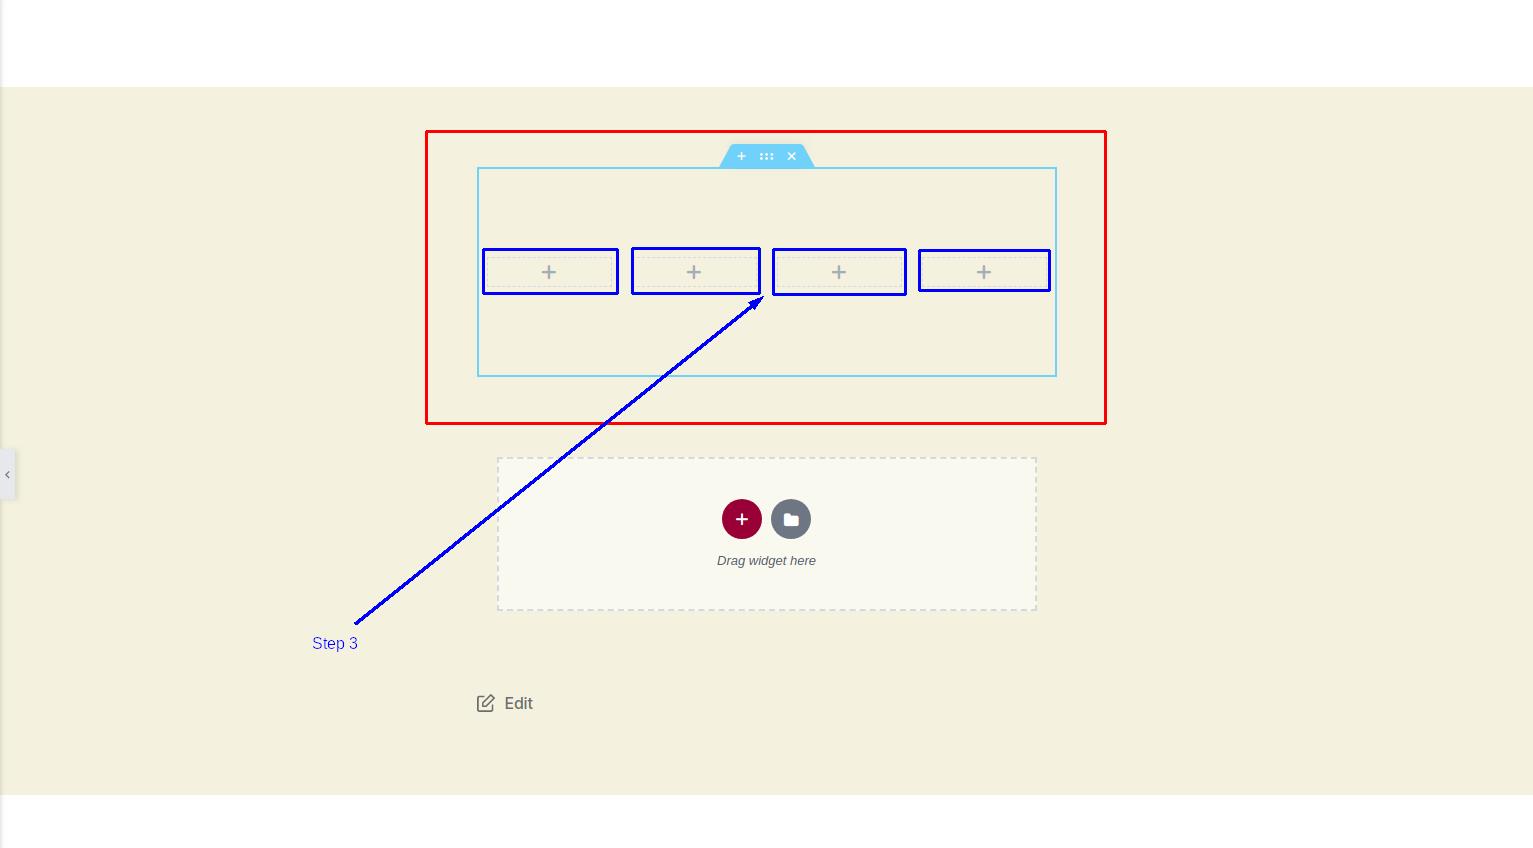
Step 3: Verify the look of the columns. If you are following this tutorial, the output should look like the following image.
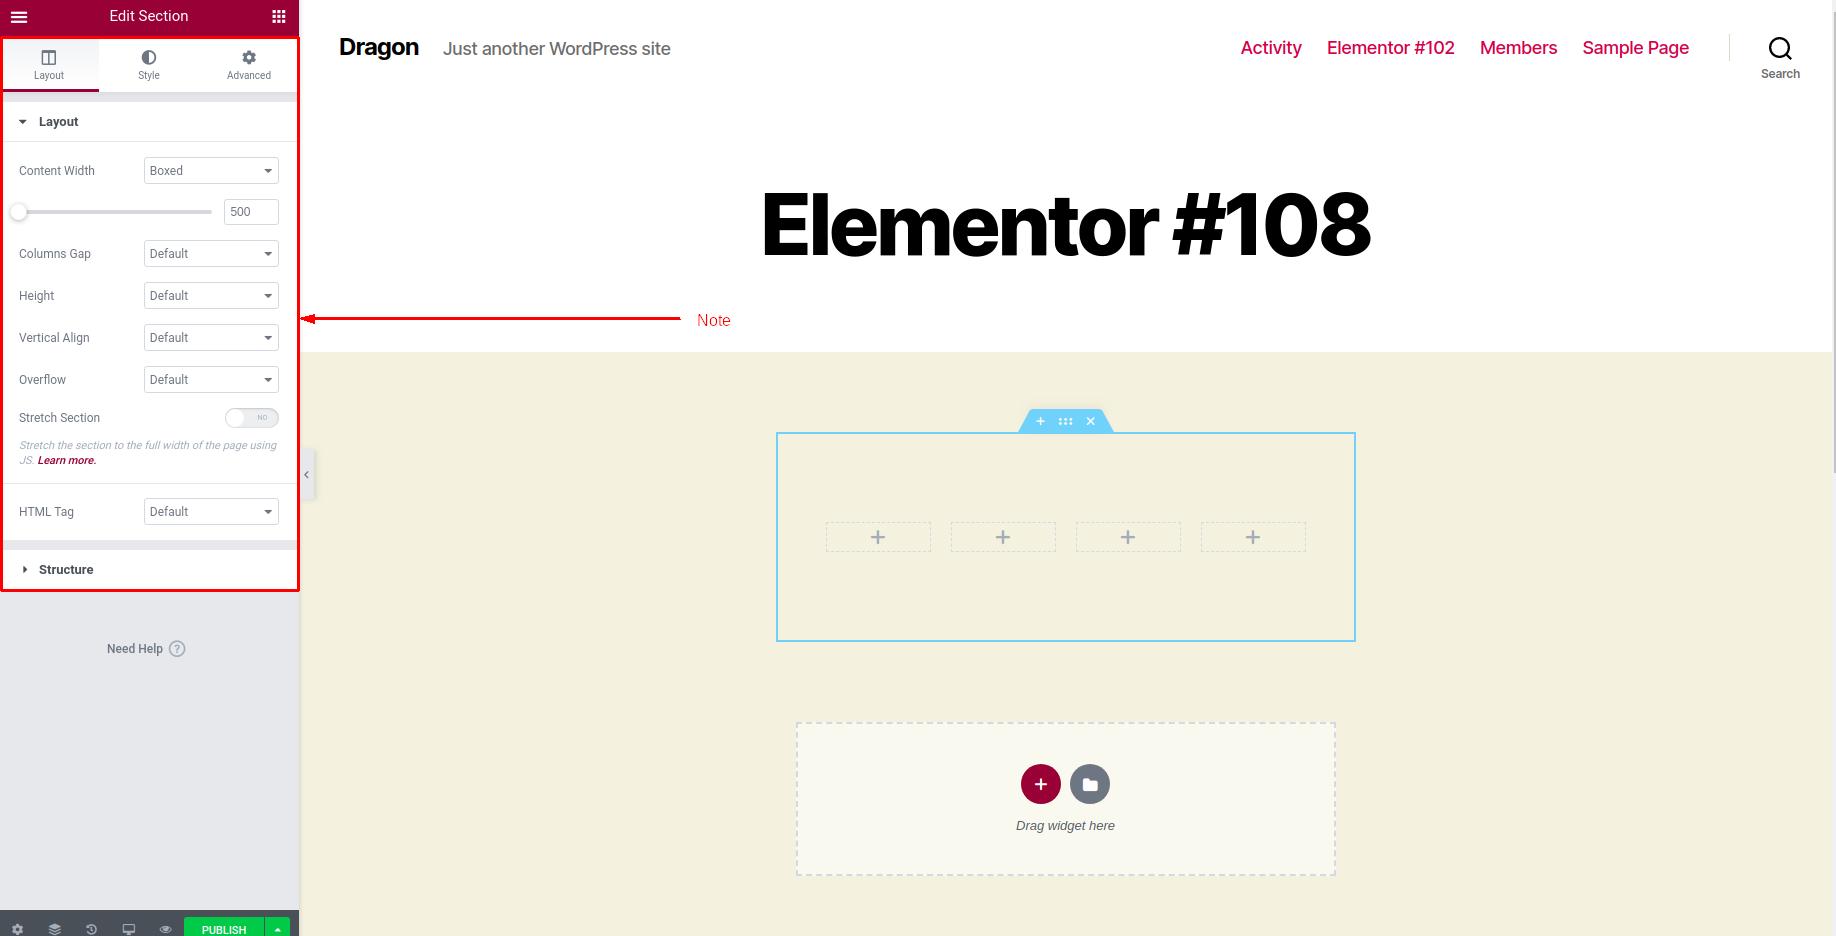
Note 1: When you click on the Structure type, you can also give some other settings to this structure from the Left-side of the display just like the image below. There are 3 tabs available for the Structure Advanced setting. Layout, Style, and Advanced.
With the help of Layout Tab, You can change the Layout of the boxes like Content Width Which means the width of your content and gape between the first edge to the last edge of the outer structure. The default width is set to 500 you can increase it to 1600. And if you choose Full Width instead of Boxed then the width will set the default as 1600.
There are many more important settings available for structure in the Layout tab. You can update important settings like Column gap, Hight, Stretch Section, Vertical Alight and overflow.
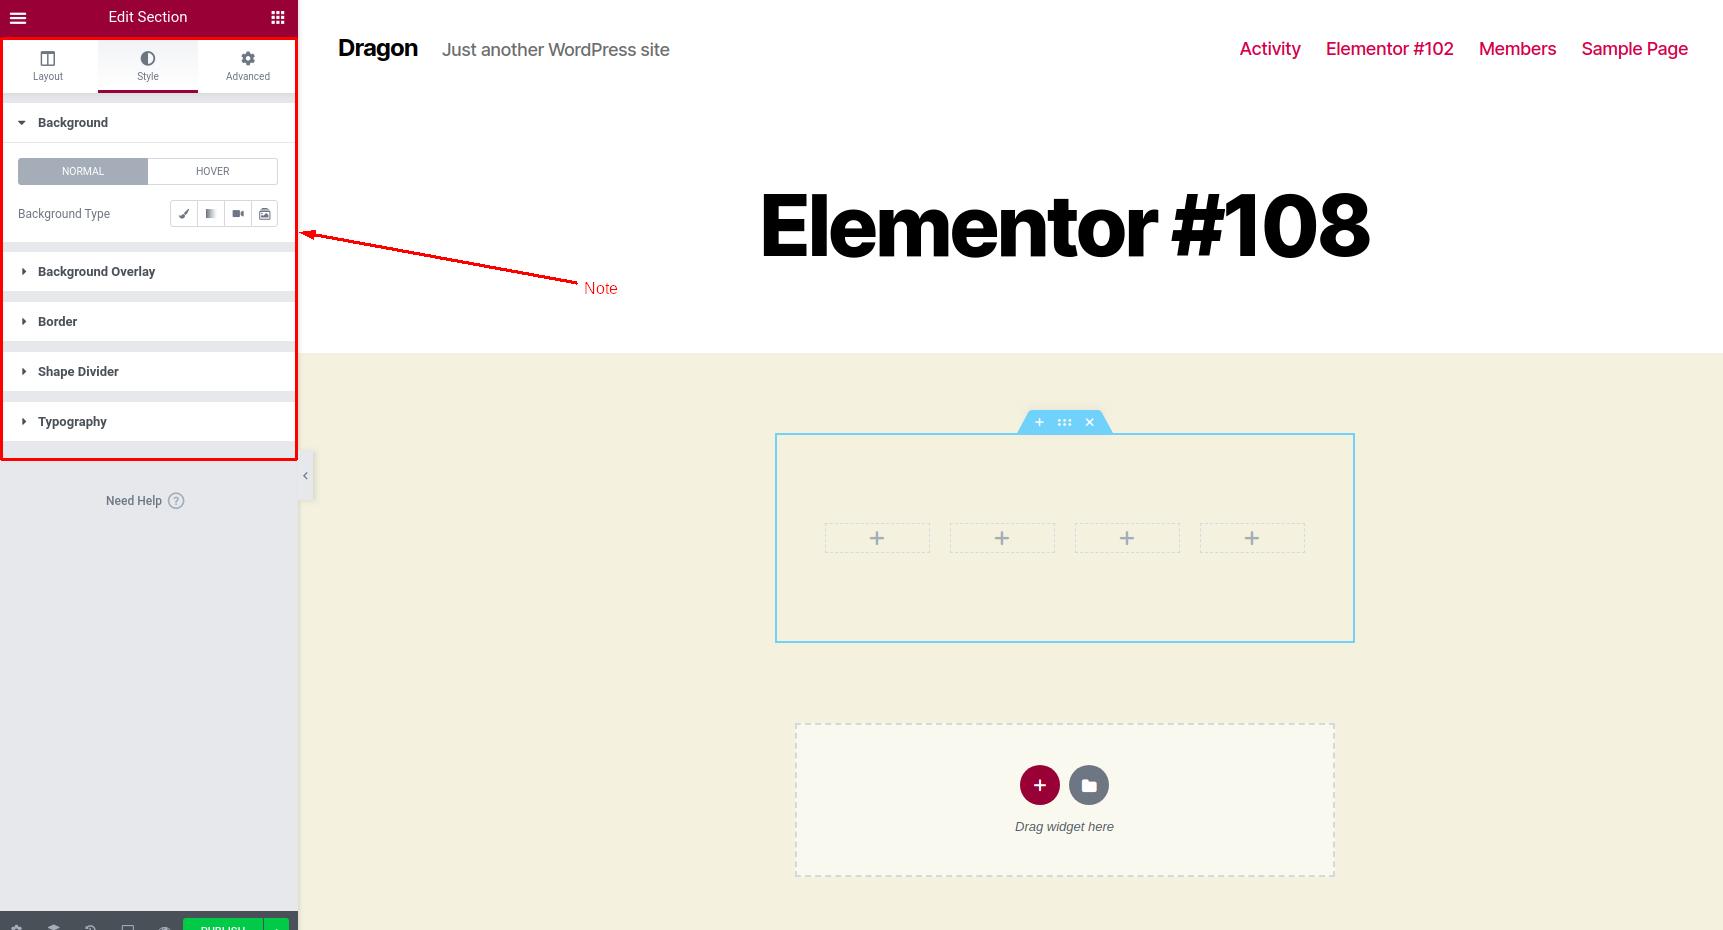
Note 2: In the “Style” tab, there are 5 more options available to make changes to the style of the site. Style means you can change its Background, Background overlay, Border, Shape, etc. You can also choose the type of background of the block. You can change it to Classic, Gradient in the Normal mode or you can choose the Animation whenever mouse pointer hovers on the block.
You can be very creative in the “Style” section of the Elementor. You can create awesome animations without too much efforts. Your creativity is limit when you are desining your website using Elementor.
Note 3: The third tab is the “Advanced” tab, this tab is helpful for display settings. You can set Structure’s margin and padding from the first Advanced tab. Here are some things you can do from the “Advanced” section of Elementor.
- You can choose the Motion Effects of this structure.
- You can make your web content Responsive to different devices like Desktop, Tablet, and SmartPhone.
- You can add custom CSS code from here.
You can also change some advanced settings like Z-index, CSS ID, Custom CSS classes and much more. Now click on the “+” button on any block from the preview of the page to see the list of available elements.
Step 4: Now go to the Elements Section choose an element as per your requirement. In this example, I am selecting the “Image” element.
Step 5: Just click on the Element Drag it and drop it on the Block Where you want.
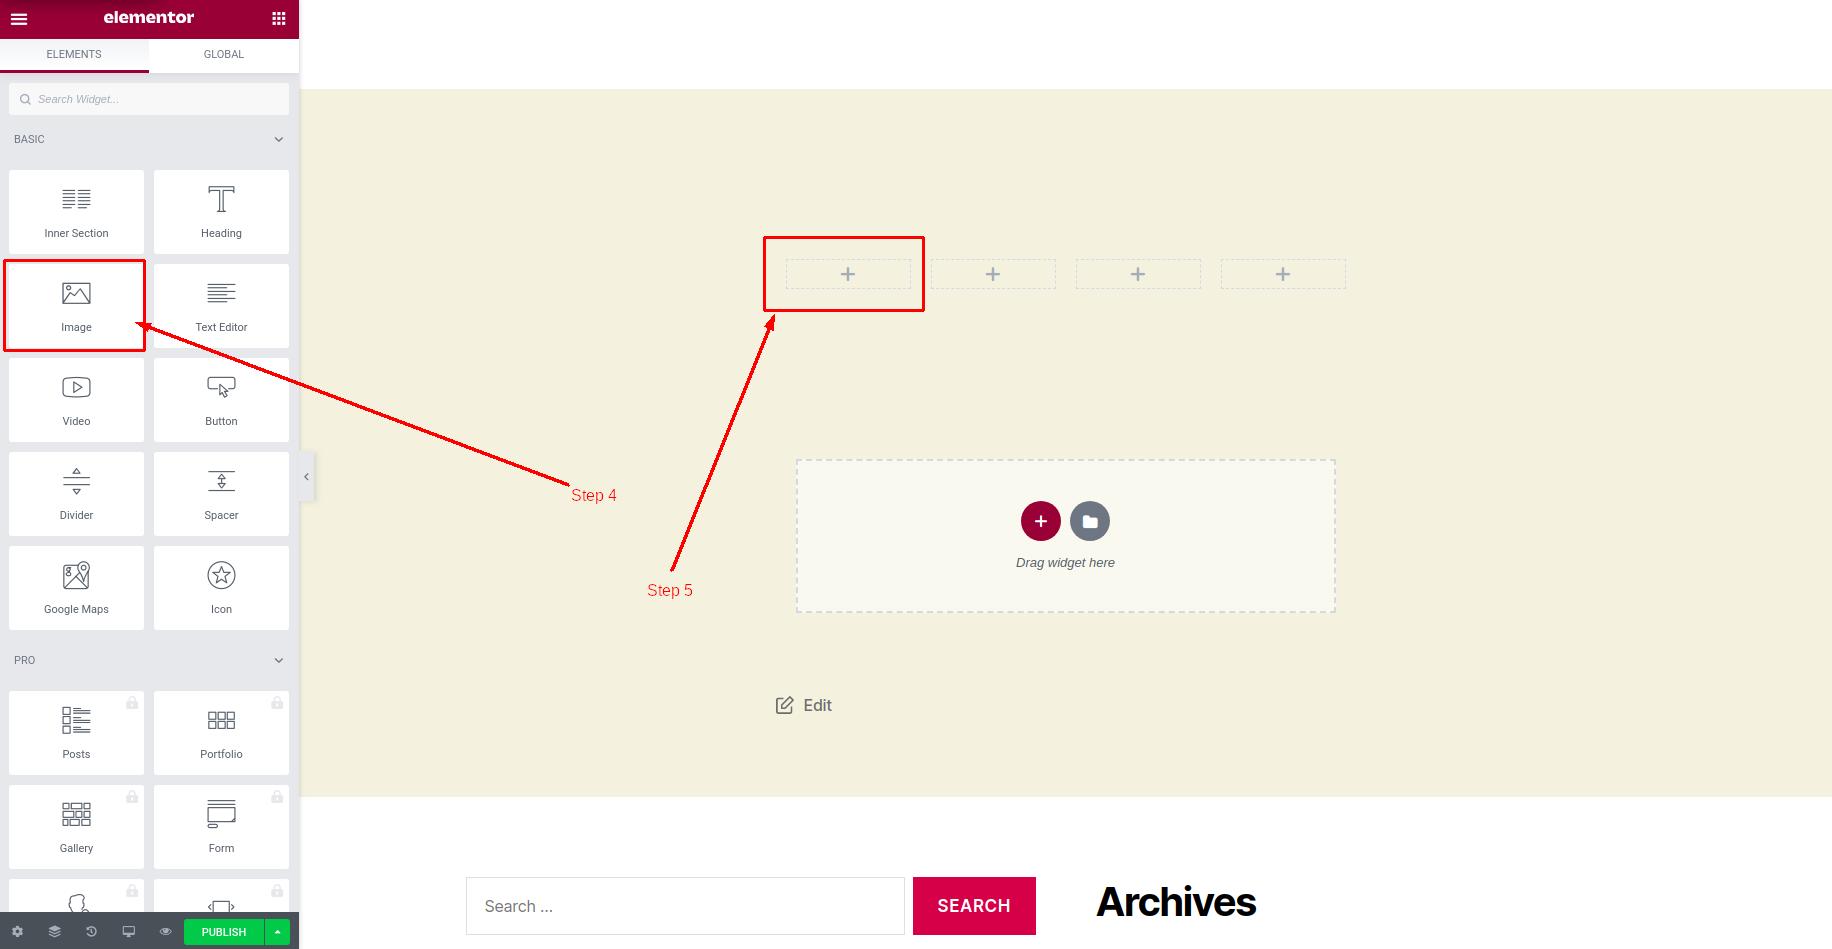
Step 6: When you drop the element, the Block will look like the following image. It will change itself as an image Element.
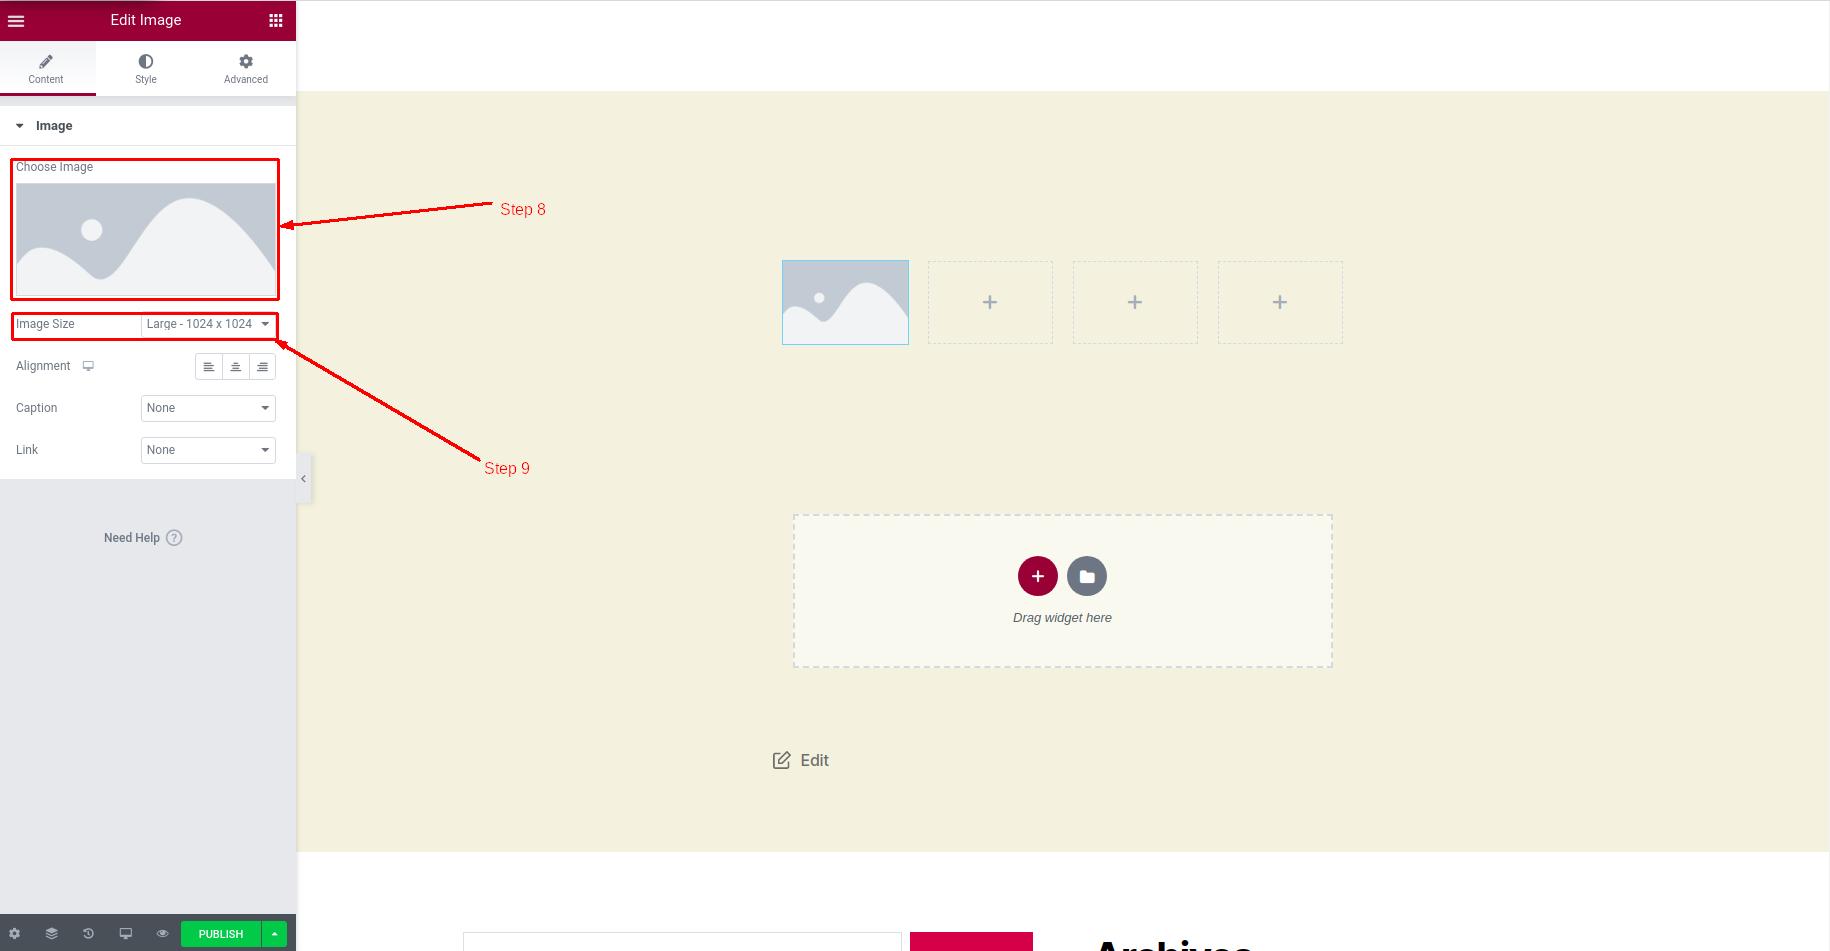
Step 7: Now you will notice some changes in the Element Section. On the left side of your display, there are some options available for the image element like Choose Image, Image Size, Alignment, Captions, and Link.
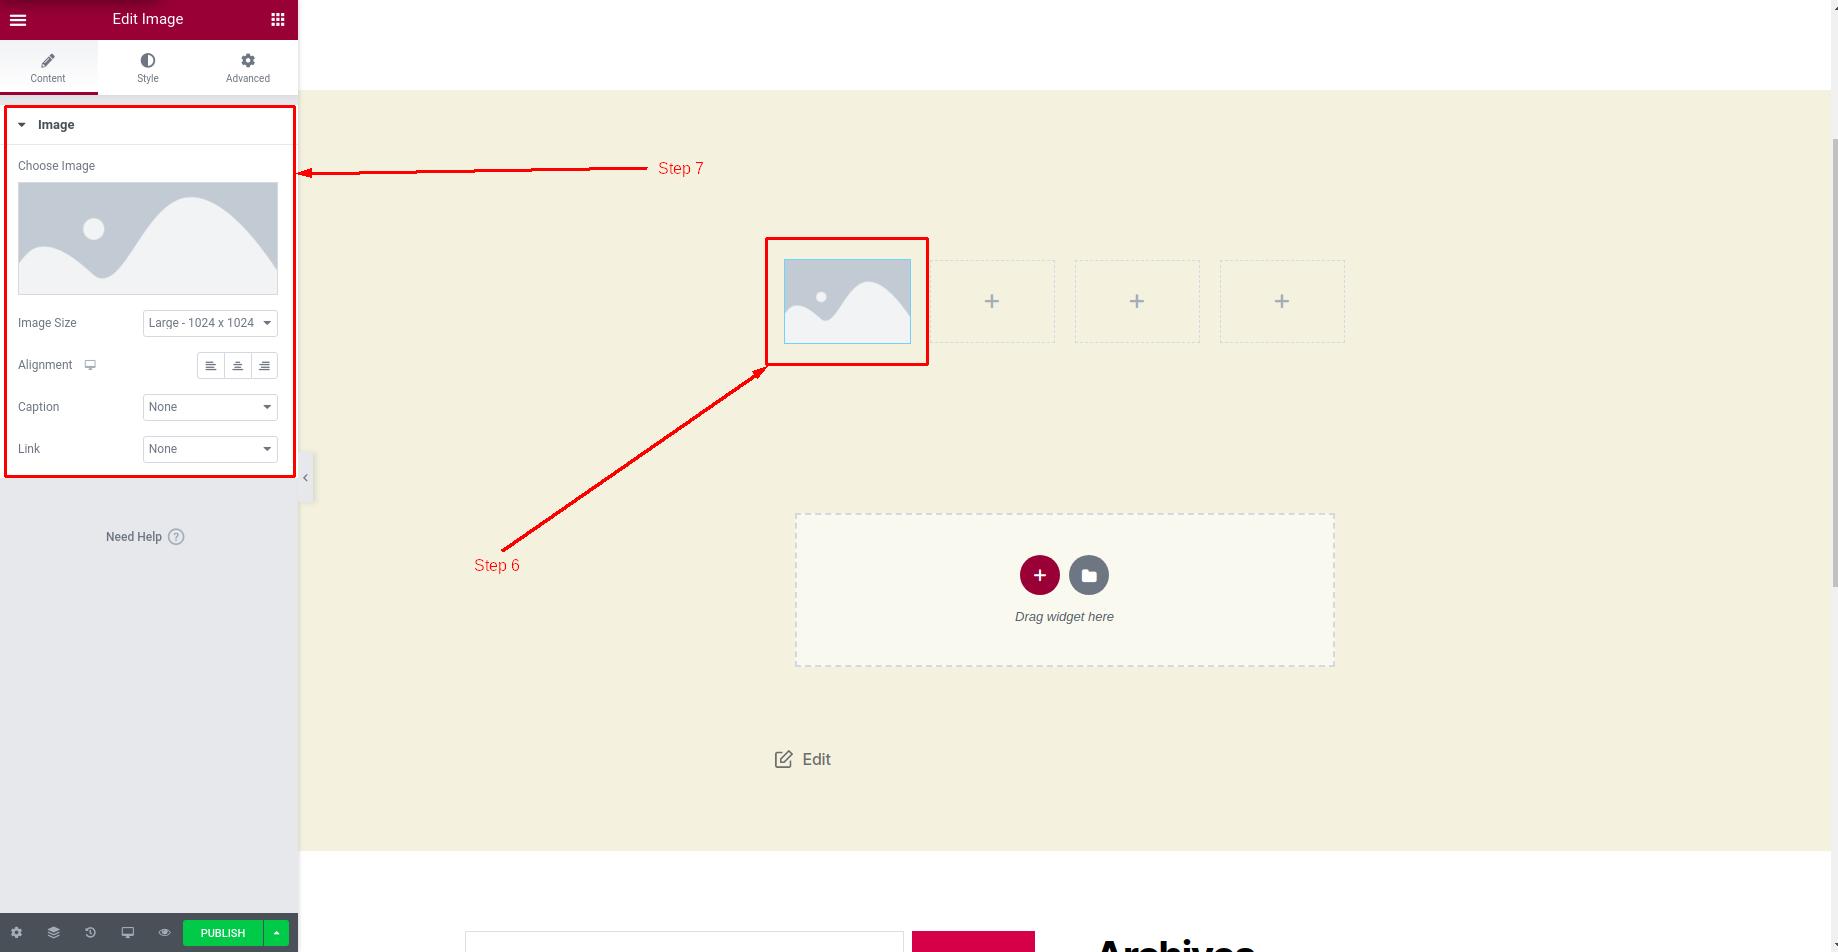
Step 8: Now Click on choose image to choose an image for the element.
Step 9: Click on the Dropdown list available Besides the Image Size and select the image size according to your needs. There are 3 more settings available like Alignments which move the image Left, Right, or Middle.
Then the Caption will help you to describe the image and the Link will help you to create the image as a link.
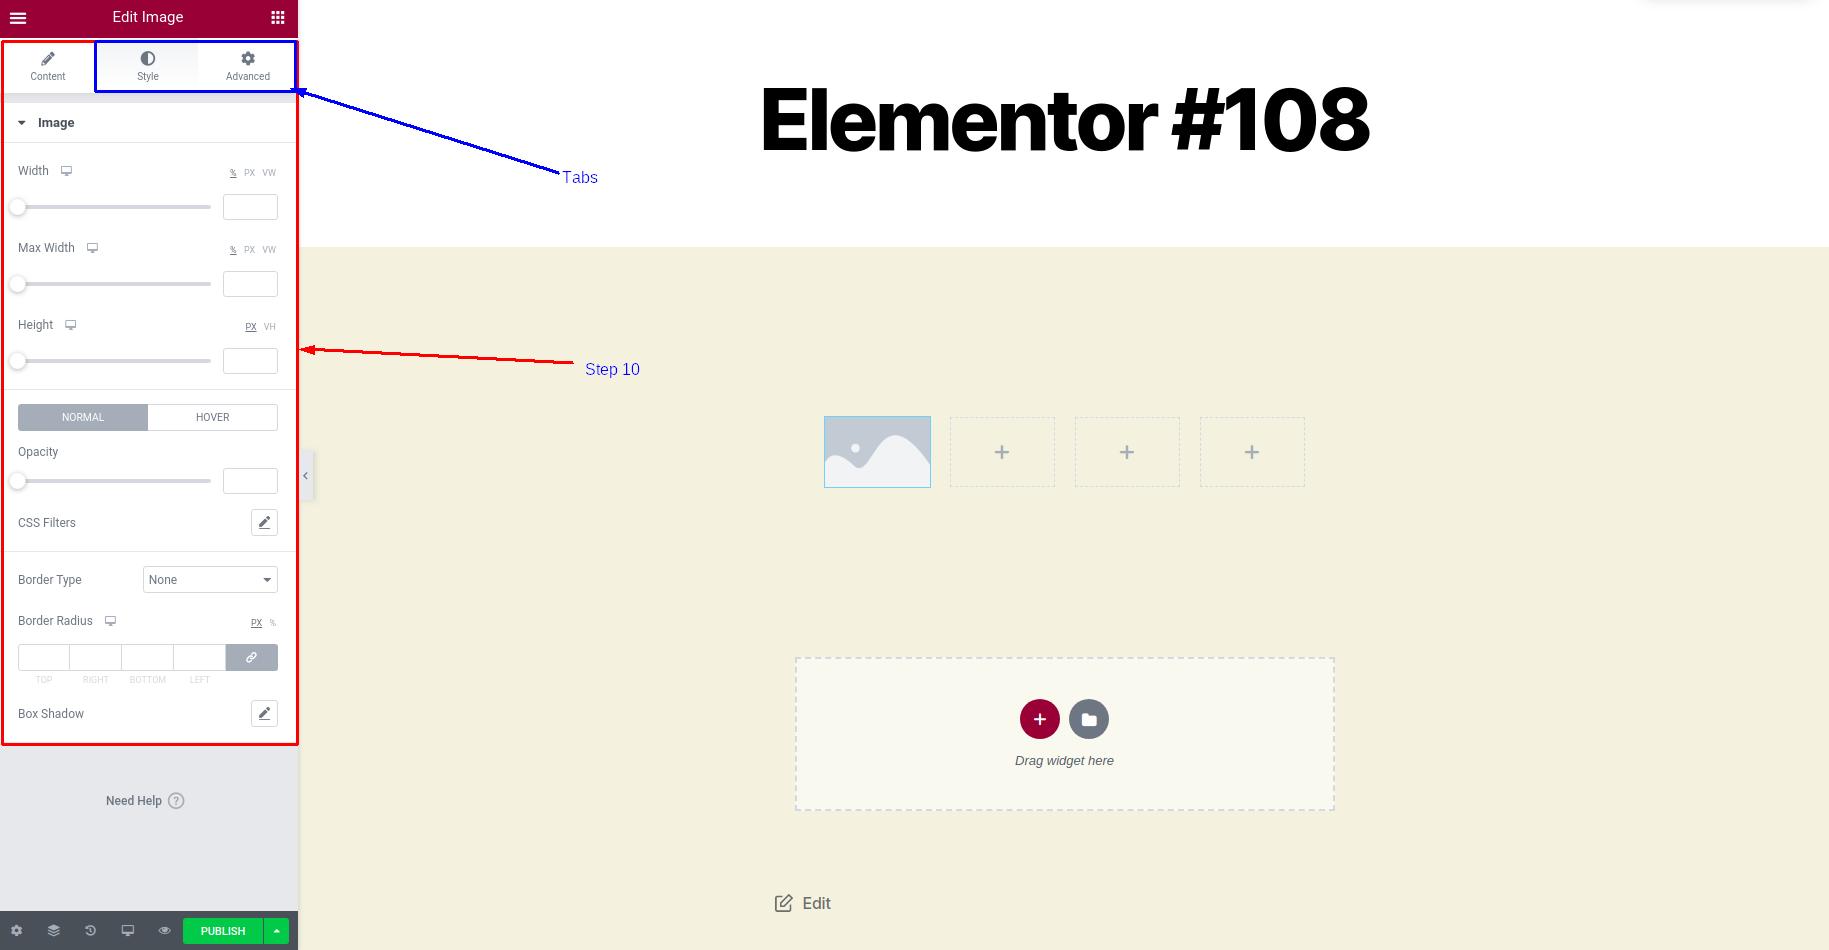
Step 10: Change the style of your element from the tabs as we showed for structure settings. Just see the image below for other important settings for the image element.
You can update settings like width, max width, height, opacity, border type, box shadow, etc. From the advanced tab, you can utilise some other features like responsive settings, margin, padding, Background and much more.
Now let’s see how we can insert image and text in the same block if needed. You can also create 2 different columns inside 1 column and use both as individuals. Just follow the steps to create 2 separate columns if we want to drop 2 different elements in the space of 1 column.
How to use columns and Inner sections
Columns and rows have an important function in the responsiveness of the website. It allows you to strcuture your elements in a way that makes it easier for you to create a responsive website. Elementor allows you to manage columns and rows as per your requirements.
It also allow you to create multiple columns inside one column. You can use the Inner section element to create sub-columns. In this small as well as important sub-topic, we will learn How to use Inner section.
Step 1: Select the block you want to divide in multiple inner columns.
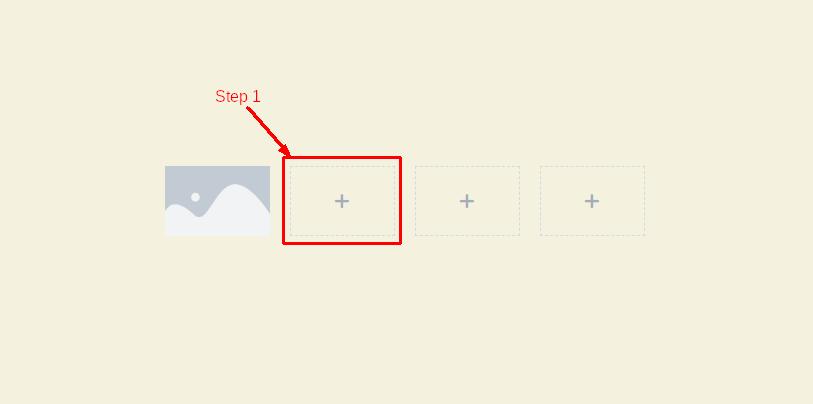
Step 2: Now find the “Inner section” from the left sidebar containing all the elements you can use.
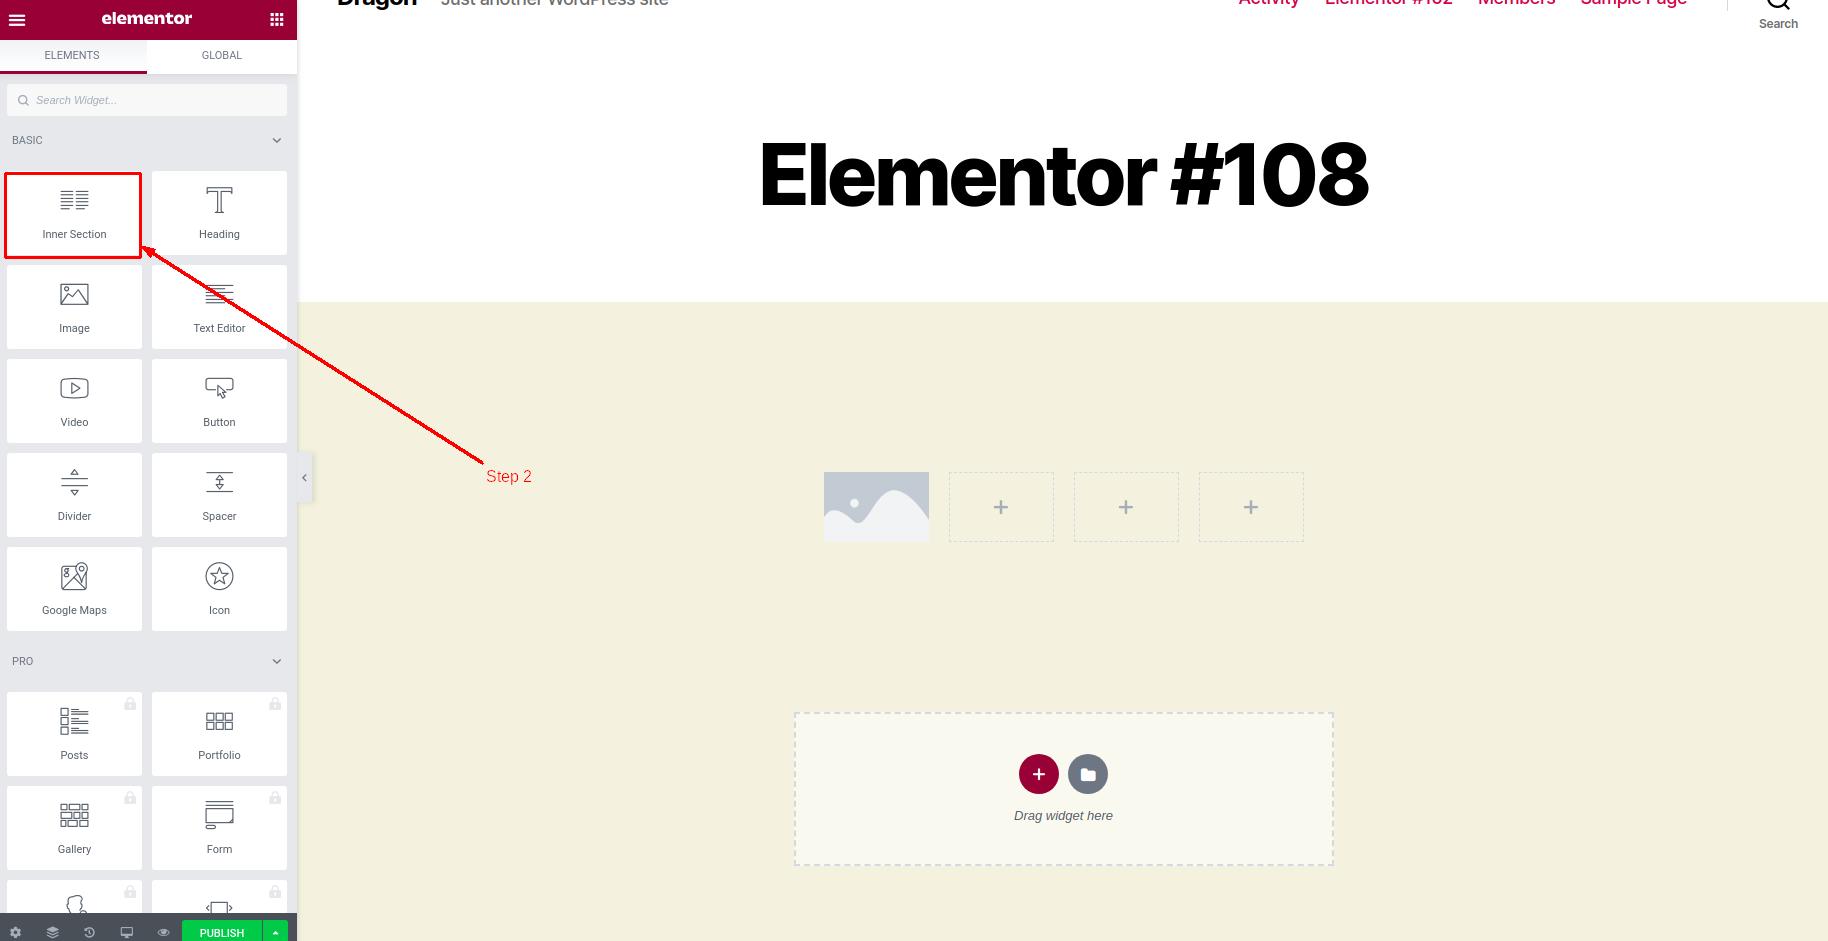
Step 3 and 4: Drag the element from the left sidebar and drop it in the column you want to divide. See the following image for reference.
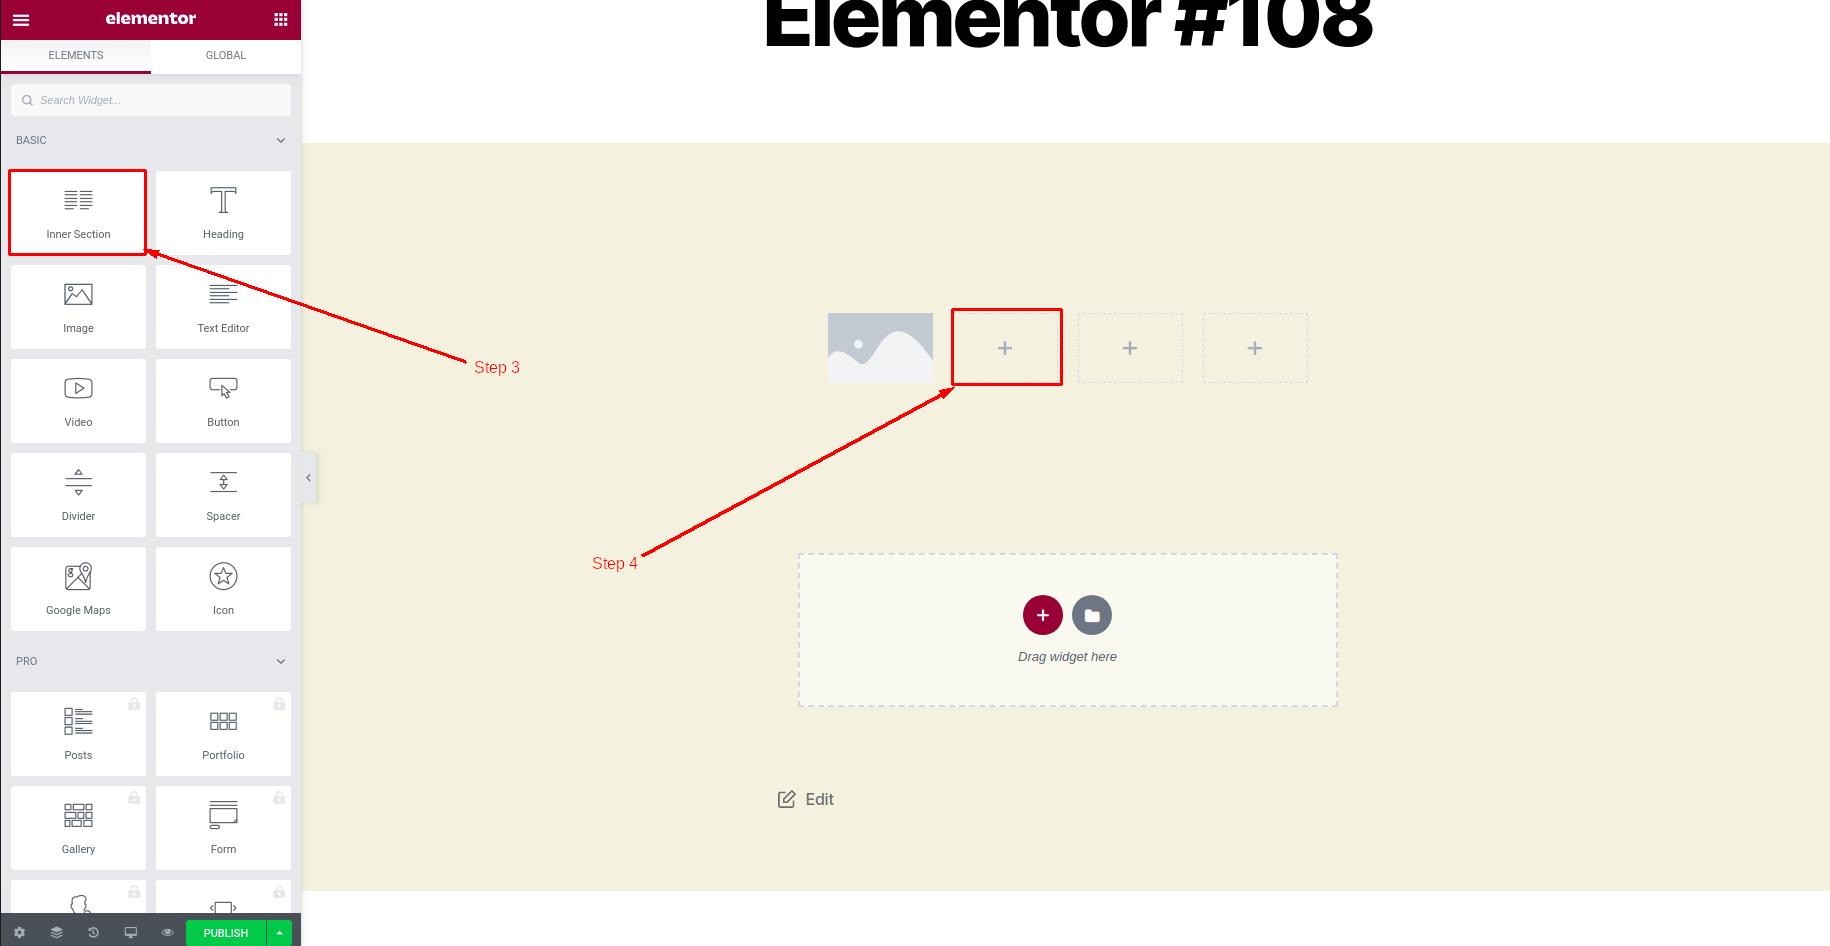
Now you will see that the column you wanted to divide will have two or more sub-columns. You can use these small different sections to host the variety of elements available for you in the left sidebar of Elementor.
Section 3: Website Settings
This section in Elementor allows you to manage the site-wide settings with ease. Usually when you are creating an important project, you want different things to be consistent on the website. For example, the design system, Theme style, Layouts and much more. And that is everything you can manage in this section.
One another major advantage of this section is, You can update the color of your buttons and other elements directly from the website settings. Changing one color will apply changes on all the elements on the website. It means that you won’t have to go and update settings on each and every instance of the Element available on the website.
So, Let’s get started with the Website settings. First of all, we will learn how to access the Website settings section.
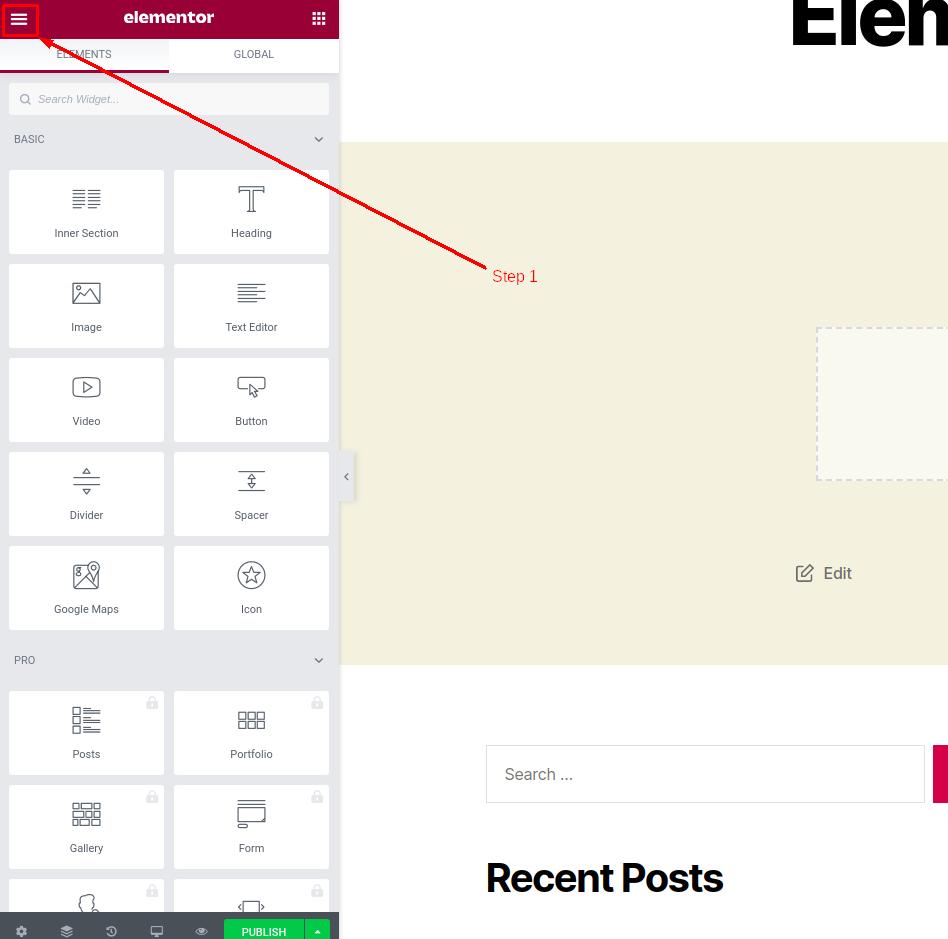
Step 1: Click on the icon containing three horizontal lines at the top-right corner of the page.
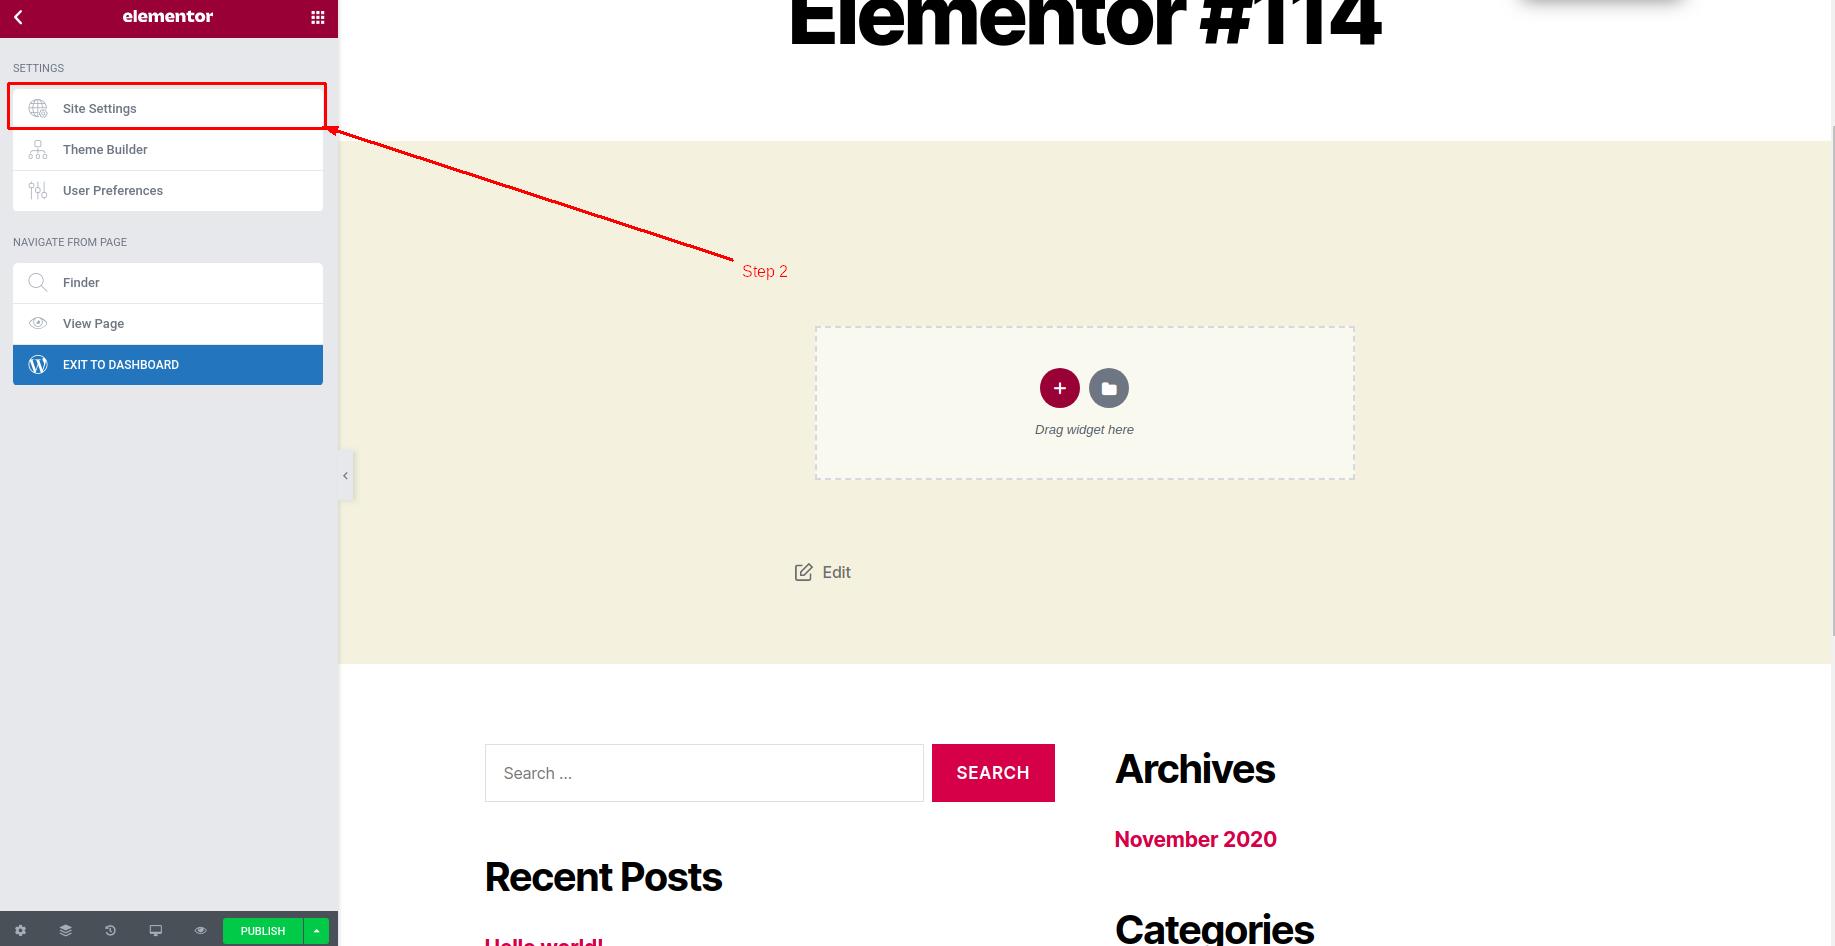
Step 2: Under the “Settings” section, find and click on the “Site settings” option, just like the following image.
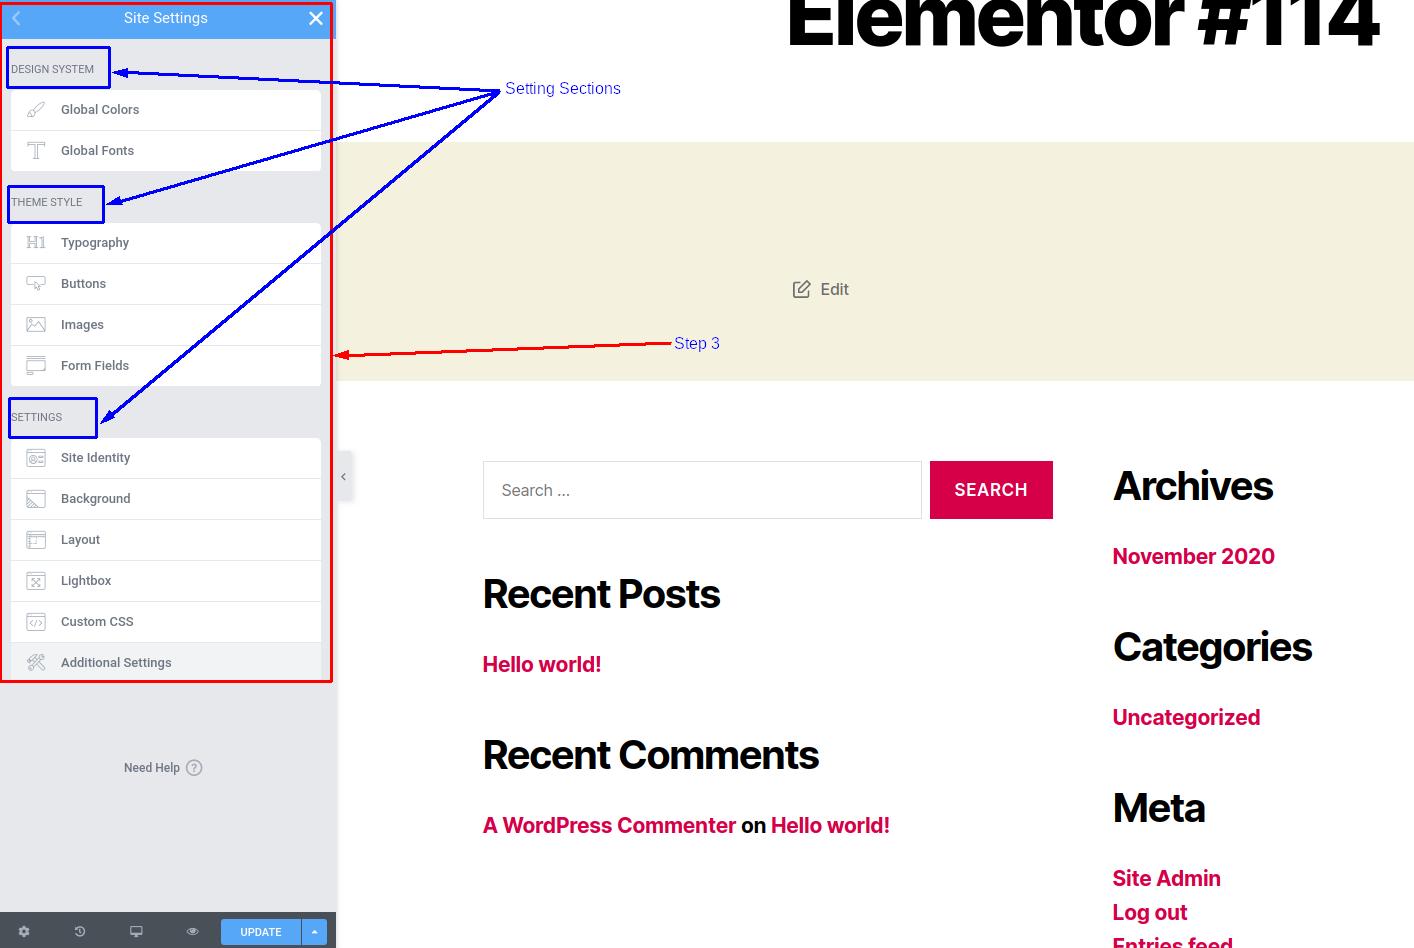
Step 3: Now, you will see a long list of options divided into three major sections. The sections must be Design system, Theme Style and Settings. The whole panel should look like the following image.
We will cover all three sections in detail. So, Let’s get started with the first one.
Design System
Fonts and colors are few of the most important factors in the overall design of the website. Fonts and colors varies with the fundamental understanding of the nature of business and the customers/visitors. For example, You will notice that the news websites and magazines ususally use serif fonts while the SaaS and similar companies use sans-serif fonts to represent the website.
Similarly, colors play an important role in user experience as well as the kind of business you are in. With the help of Design System in Elementor, You can pre-define and update the global fonts and global colors in minutes. First of all, Let’s take a look at Global Colors.
-> Global Colors
Color scheme of the website is very important. The colors on your website should be consistent to create a good user experience. Elementor allows you to pre-define and update the global colors on your site. It also allows you to modify the colors on your website in seconds.
To set or update the global colors, click on the “Global colors” option from Design system. It will show you the list of global colors set for your site. If you want to add more colors, you can click on +ADD COLORS button. If you don’t want any additional global color, You can update the global colors for Primary, secondary, text and accent as per your requirement. The global colors section should look like the following image.
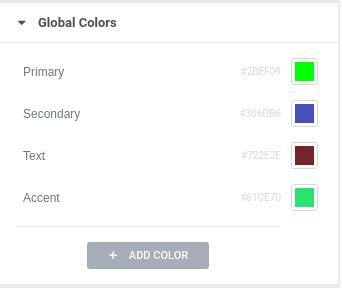
So, this is how you can add and manage global colors of your site using Elementor. Now, Let’s see how to manage global fonts in Elementor.
-> Global Fonts
Fonts are as important as colors. Each and every website has different type of customers and purpose for the customers or visitors. The perfect font selection can make a huge difference. You also have to make sure that the fonts you are using are light weight so that they can load faster.
One additional good feature the Elementor provides is, the fallback fonts. Fallback fonts are the fonts that can be used if the original selection of the fonts does not work due to some exception. So, make sure that your fallback fonts have the same type as your original fonts.
The global fonts management in Elementor should look like the following image. Just like the global colors, You can also set the Global fonts for Primary, Secondary, Text and Accent.
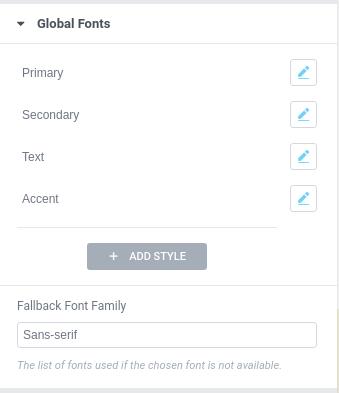
When you click on the “Edit” button marked with the Pencil icon, You will see a full panel that will allow you to set all the properties of the fonts. You can edit Font family, size, weight, style, decoration, letter spacing and much more. The complete edit section should look like the following image.
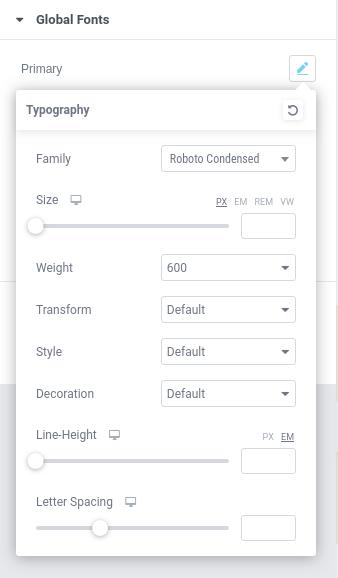
So, this is all you need to know about managing global fonts and colors in Elementor. Now, Let’s see the second section of Website settings that will allow us to set the typography, buttons, images and much more.
Theme Style
The second setting is the Theme Style. With the help of this setting, you can manage the style and theme for Heading Text, Buttons, Images, and Form Fields. The following image shows all the fields for Theme Style Setting. Let’s see each setting in Brief.
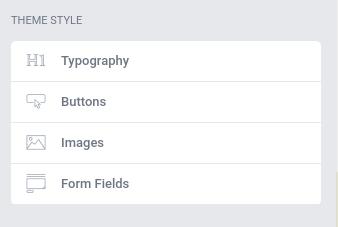
In this section, we will learn how to customize the look of all the basic things any website requires. The first and the most important thing is Typography, Let’s start with it.
-> Typography
Typography is the art and technique of arranging type to make written language legible, readable and appealing when displayed.
The definition of typography makes it easier to understand what we are going to edit and update in the Typography section of the Theme style. We have to make sure that the colors, size of headings, fonts for headings, fonts for text, and all the small things that makes the difference are perfect.
Click on the Typography section and you should see a new section just like the following image.
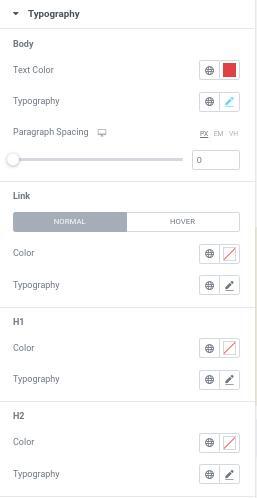
From this section, you can update the typography of the body text, link, and all the headings. See the Globe icon with Colorbox and Edit Icon in front of every text setting. From that color box, you can Directly Assign color and from the Edit button, you can apply Font settings like font type and size, etc.
But from the Global icon, you can assign the default settings which are already set on the Design system as Primary, Secondary, etc. Choose the setting which you already created. So the content type will automatically inherit the settings like color and font settings. You just need to choose the type of content. You can do it to all the text types available on your website.
-> Buttons
Click on the Buttons tab to see the settings for Button elements. There are several types of settings like Typography, Text Shadow, Text Color, Background Color, Box Shadow, Border Type, etc. All of these settings are very important for buttons.
Now there’s also a Global icon in front of every setting. Click on the Global icon to choose Fonts for the button Element which we already chose on Global Fonts. You can also choose fonts from the Edit Button.
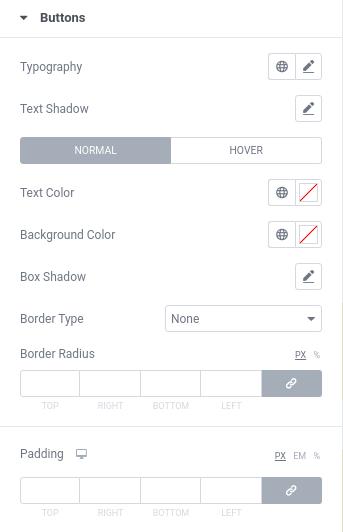
You can also change text color, global color, or choose the color from Colorbox. You can set border radius and padding for the Button Element. Managing the style of the button is easier when you manage it from this section. If you will set the design of the button every time you create a new button, It will quickly become very labor intensive when you decide to change the button style anytime in future.
-> Images
Managing style for all the images on the website from just one set of options and settings does not feel right. Image is a kind of element that requires different styling depending on where we are using an image and in which context we are using an image.
Still, If you want to define some basic settings for all the images you will upload on your site, You can do it from this set of options. From this section, you will be able to define things like Border type, border radius, Opacity, Box shadow and CSS filters. You can also set the default hover properties for images.
-> Form Fields
The look and usability of the forms on your website is cruicial. Your forms and form fields should look clean and easy to use. It is recommended to pre-define the styling of the Form fields from this set of options. And, It is also recommended not to update the styling of form fields individually unless it is very important to do so.
Let’s see what options do we have to pre-define the styling of form fields.
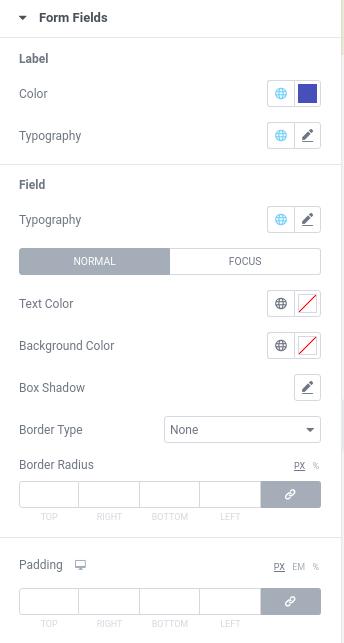
So, you can update color and typography for Label. And, you can update typography, Text color, Background color, Box shadow, and border settings for the actual form field. You can also set different styling for when the form field is in focus. It is good to manage all the form field styling from this set of options to maintain the consistency throughout the website.
Settings
This is the third and last section under the website settings. In this section, we will learn things like managing Site Identity, Background, Layout, Lightbox, custom css and additional settings.
We will cover the first four options from this sectionin detail and those are some of the most important settings available in Elementor to efficiently manage your website. So, Let’s get started with the Site identity settings.
-> Site Identity
There are Four settings in the Site Identity setting tab. Site Name and Site Description are 2 fields that are used to give site name and description(tagline). Type your site name and description and this information will be shown on the front page just as displayed in the following image.
You can also add Site Logo and Site Favicon from here. There is a Box with “+” Sign under Site Logo, Click on the Plus sign and upload the Image or SVG files. There are some Mandatory sizing rules for the image files you upload.
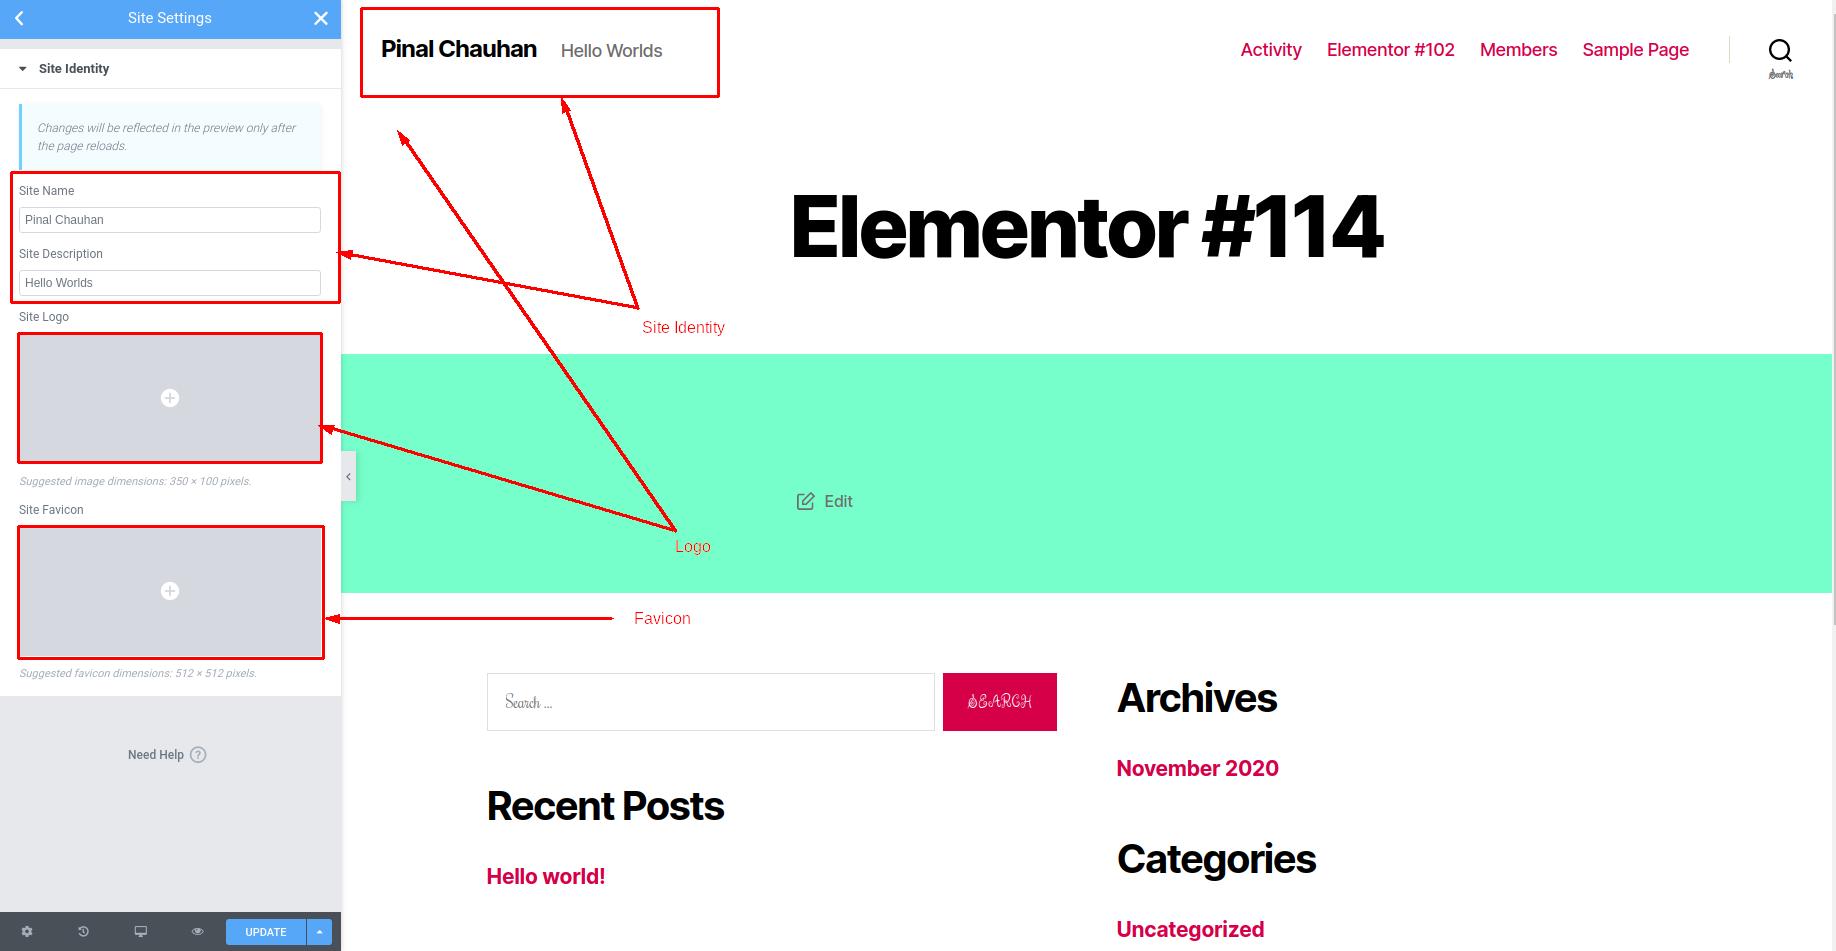
And the last option is to set the Site Favicon, add your logo as image or svg to display it as a favicon. Favicon means when your website loads on the client’s browser, your logo with site name will appear on Browser Tab.
-> Background
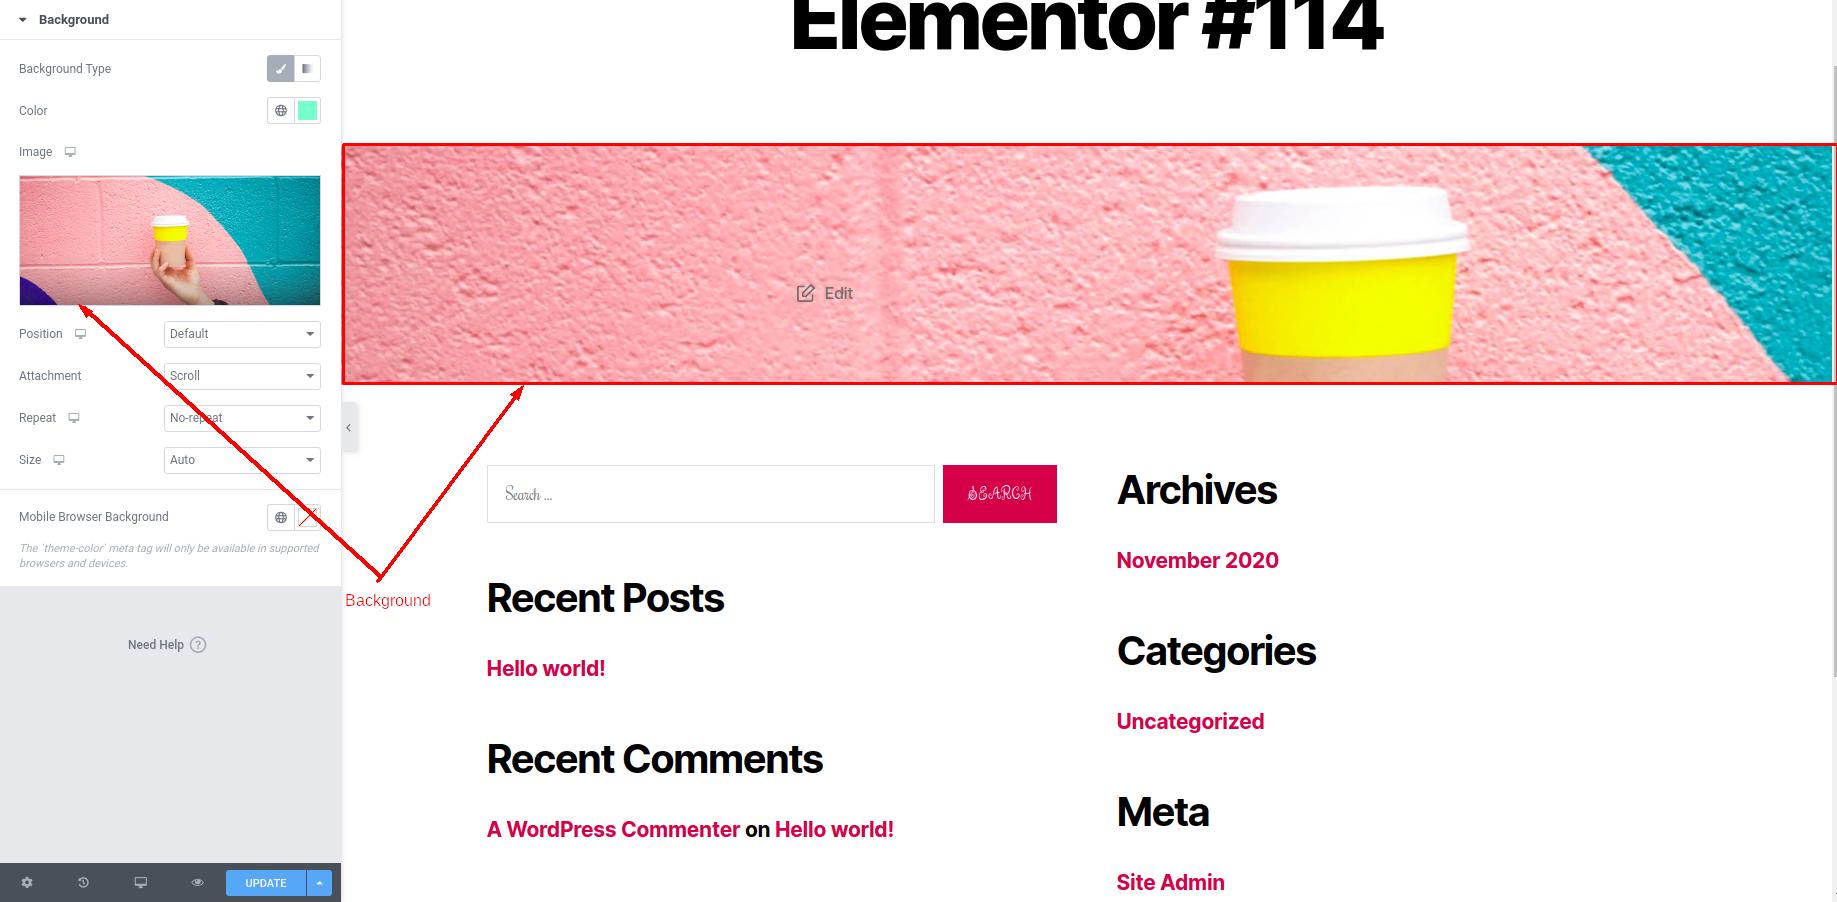
This option helps you make your website background more Attractive. You can add Color, Gradient, or an image to your background. To add an image to your background, find the Image option from the Left-Sided setting section and add your image.
After you choose your image see the next Settings like Position. With The help of positions choose which image portion will show on the website. You can choose the position from the Drop-Down list.
Then there is an interesting option called Background Attachment. If you don’t know the meaning of the attachment, This setting will basically help you to choose whether your image will scroll up-down with the webpage or it must be fixed. Then next is the Repeat setting means you want to repeat the image on scrolling or not.
-> Layout
The layout is basically the overall structure of the website. Within this set of options, You will have to select How much content width you want to set, How much space do you want between widgets, Page title selection, width of the stretched sections and much more.
You can also set the Default Page layout according to your requirements. Other than that, there is not much you can do in this section as there are different types of pages on any kind of website.
-> Lightbox
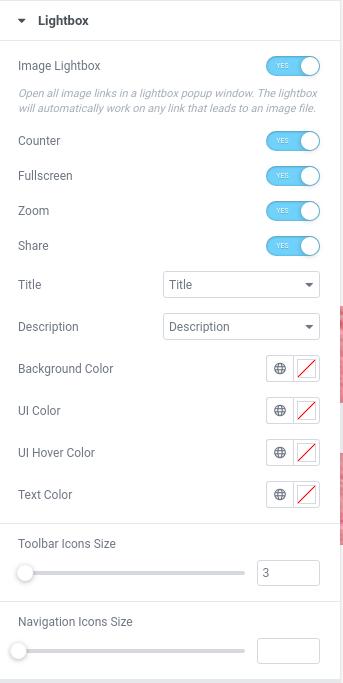
Lightbox means the Preview feature for the image. If you turn on the Lightbox feature, All the images on the site will have a preview feature. Whenever someone will click on an image, the bigger version of the image will appear in a bigger pop-up like section.
You can also turn ON or OFF other settings like Counter, Fullscreen, Zoom, Share from this part of the website settings. You can also change Background Color, UI Color, UI Hover Color, Text Color just as we mentioned earlier. You can choose a color from ColorBox or you can apply Global Color or Global Text here.
Now find a setting called Toolbar Icon Size and Navigation Icon Size. These are 2 slider options available at bottom of the settings. You can manage the Icon Sizes from here. The complete lightbox settings should look like the following image.
So, this is how you can manage Design system, Theme style and Site Settings directly from the fundamental settings provided by the Elementor website builder. These three sections are very important to set up the initial style for your website.
Now, Let’s take a look at all the helper functions provided by the Elementor.
Section 4: Helper Functions
When you are working on a small website with less number of Elements, you won’t require much help of these functions. However, If you are creating a complete website containing hundreds of elements and settings, Helper functions will allow you to speed up the overall development process.
Let’s see what helper functions are available for us in Elementor website builder.
Navigator
Imagine you are building the homepage or the landing page of the website. And the size of the page is huge. It contains tens of sections and hundreds of elements. Now consider you have to find and reorder the specific element. In this case, either you have to scroll up and down a lot to find the element you want to reorder or you can use the Navigator provided by the elementor.
To enable the Navigator, You have to click on the Navigator toggle provided at the bottom-left corner of the page, just like the following image.
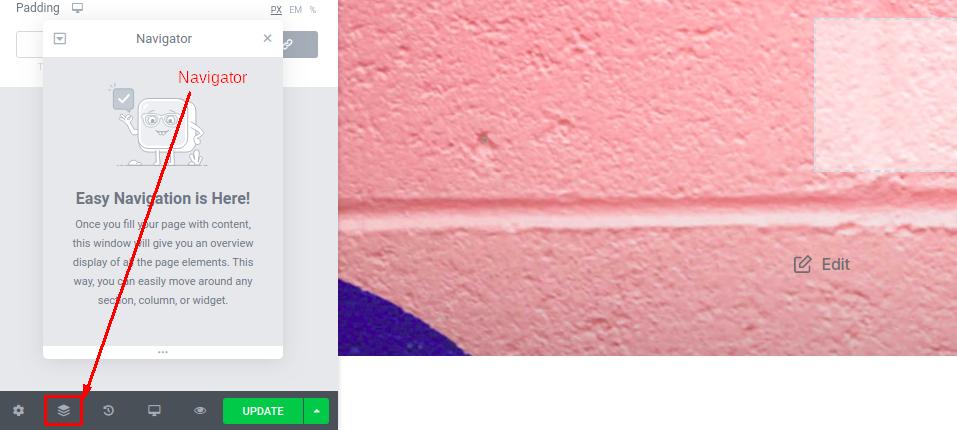
When you click on the Navigator, It will show you a new pop-up containing the list of all the Elements you have on your site. You can drag and drop Elements from one place to another, In other words, change the order of Elements.
You can also click on a specific Element to jump to that element. This is a very cool feature provided by Elementor website builder as it allows us to speed up the development process.
History
The history feature allows you to rollback to a specific change you made on the website. For instance, Let’s say you are working on a specific element right now and you messed up a lot of settings. Now, You want to go back to the instance where you started editing that specific element. With the help of the History feature, you can easily rollback to any specific instance.
If you are a developer, consider this feature a list of commits. You can rollback to any commit as per your mind. To see the editing history, click on the History option given at the bottom-left corner of the page just like the following image.
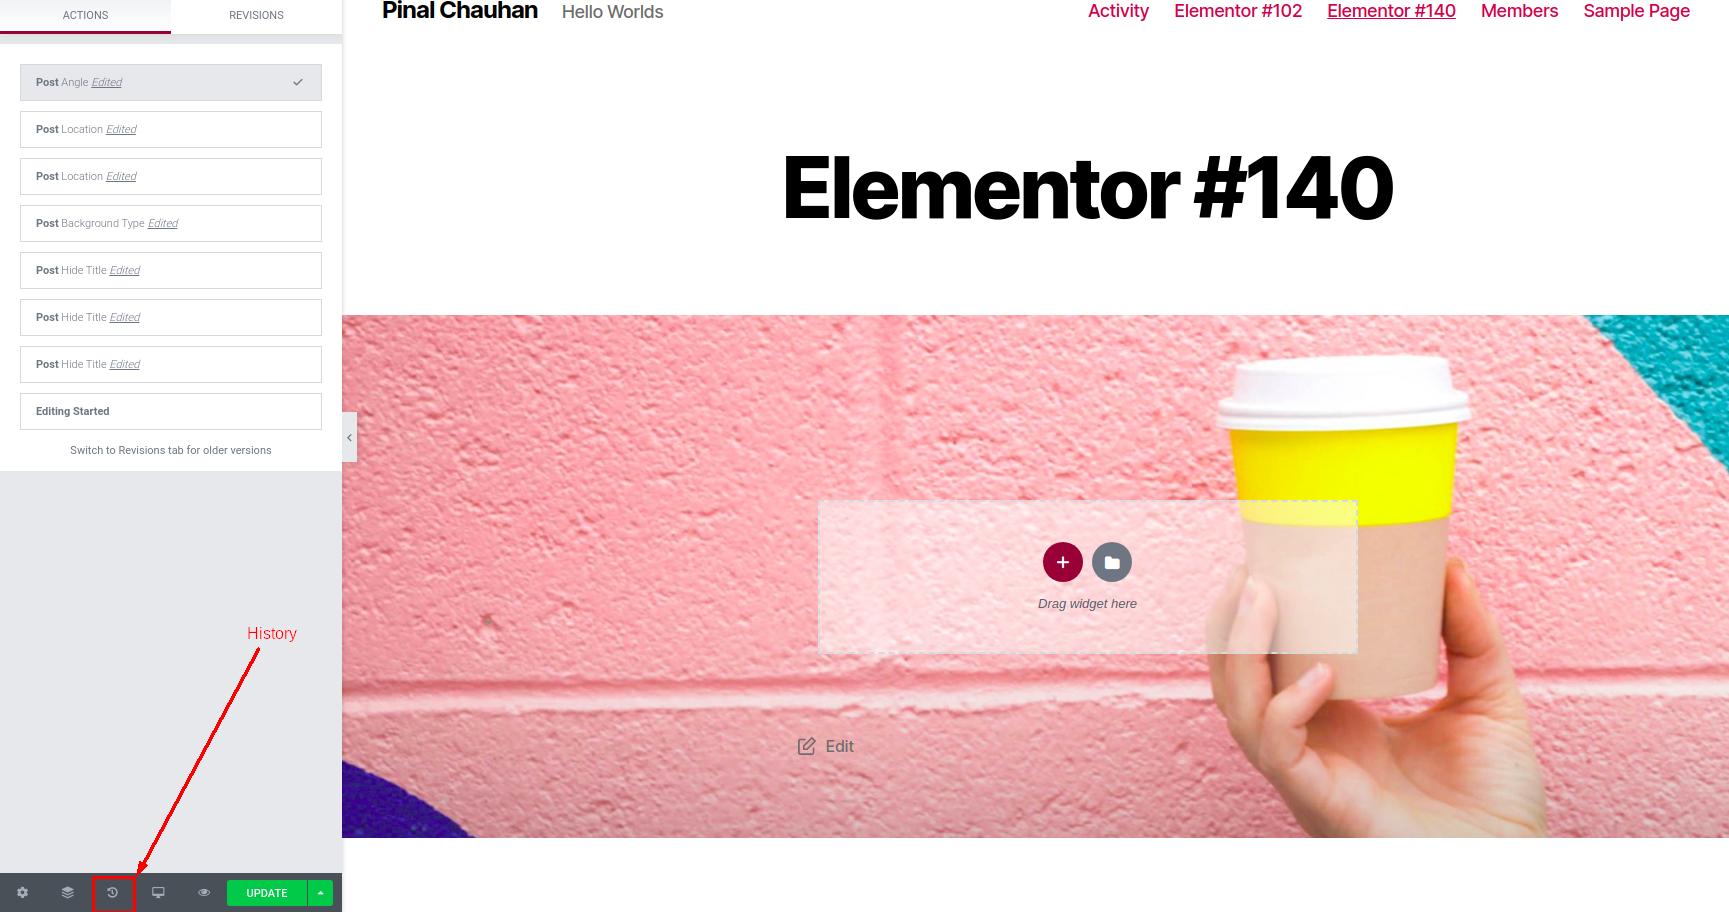
So, this is how the history helper function works. It is a very handy feature when you want to undo multiple things on your website. Now, Let’s see one more awesome helper function provided by the Elementor website builder.
Responsive Mode
We are living in a world where the usage of the mobile phone to surf the web is increasing faster than ever. You have to make sure that your website is usable on devices having different screen size. For example, Mobile, Tablet, Laptop and Desktop.
With the help of this helper function, You can quickly see how your website looks on different screens. You can also set different styling properties for different screens for any specific element. It means that you can be confident that your site will look awesome in any screen.
To change the screen size, click on the Responsive mode option given at the bottom-left corner of the page. It will show you a list of 3 different devices. You can select any one to see how your website will look in that specific device. If you think that changes are required, You can update the settings for that specific screen size to make sure everything looks perfect.
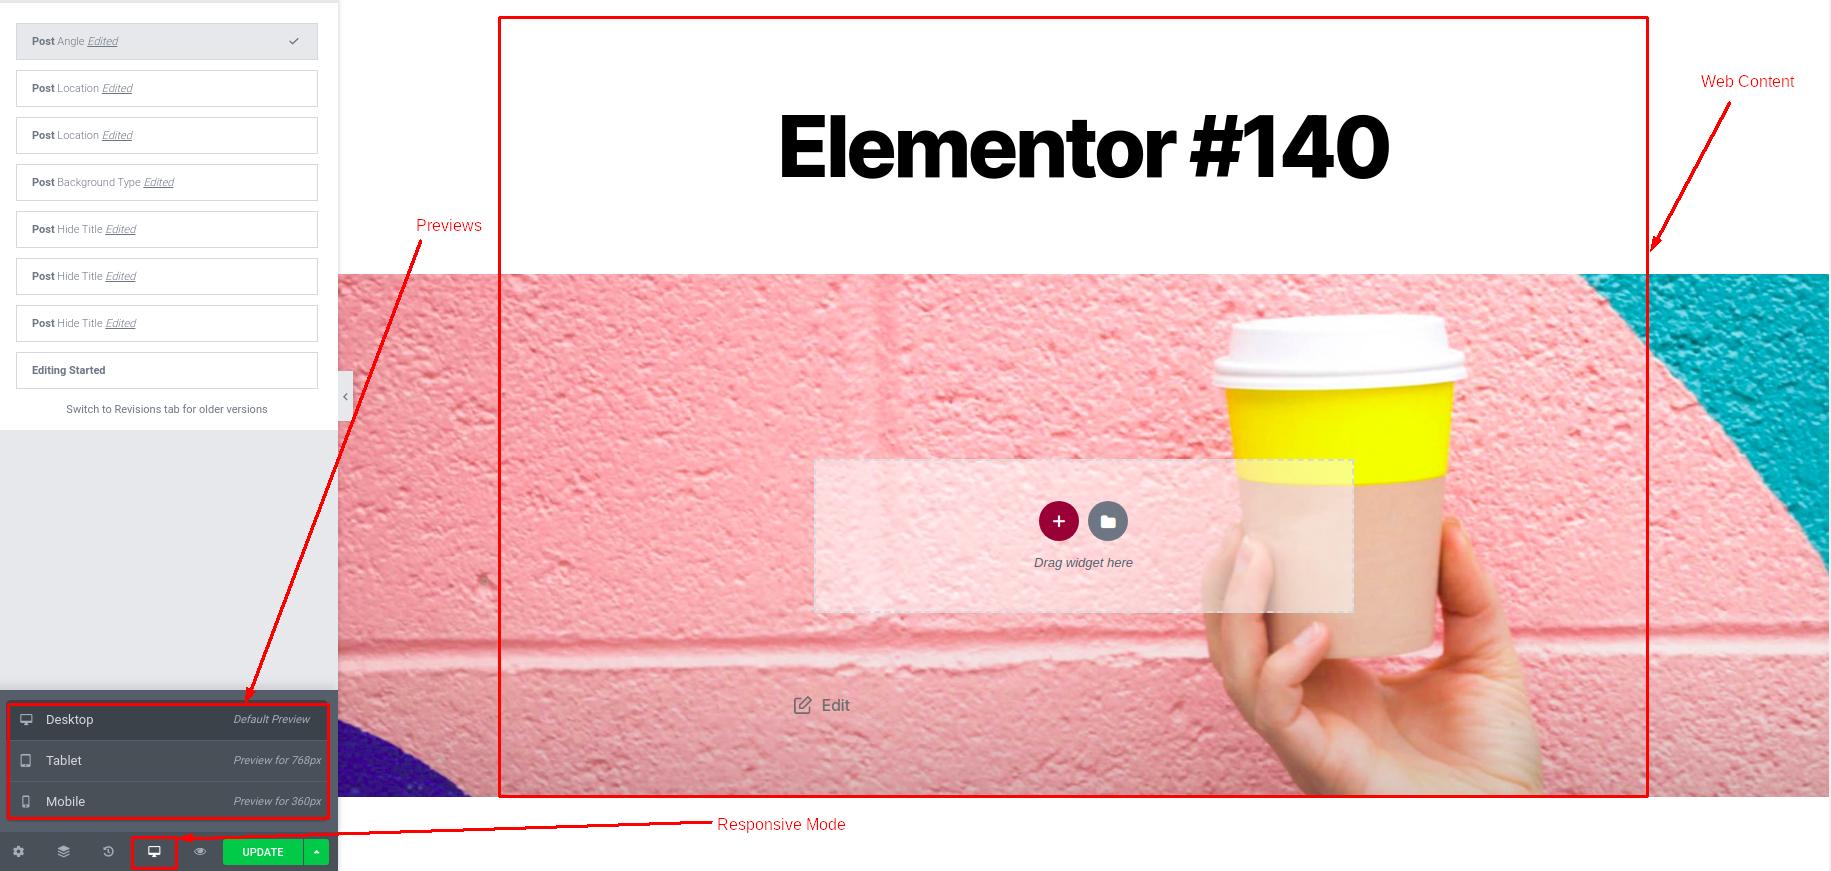
So, this is how you can be confident that your website is responsive and works well on all the devices having different screen sizes.
Conclusion
Elementor website builder is a very powerful WordPress development tool that allows you to create almost any kind of customized WordPress website. You can use Elementor to create a business website, a blog, or both! The paid version of Elementor allows you to select the ready-made template from the template repository. It allows you to just pick up the design you like and edit it according to your requirements. It further improves the speed of website development.
In this in-depth guide, we have covered almost all the important features of Elementor. If you are planning to use the paid version of Elementor, You will also get the Theme builder option that will allow you to create layouts and templates for your website.
So, We hope that this in-depth guide was helpful for you. If you are facing any problem while following this guide, please let us know in the following comment section. We are happy to help!