
GICT knowledge base
Server Hardware Firewall Rules (ACL)
Published
Managing Firewall Rules for Bare Metal Servers in the my.interserver.net Client Portal
The my.interserver.net client portal provides bare metal server clients with a powerful tool to configure firewall rules, offering functionality similar to Cisco Access Control Lists (ACLs). These rules allow you to control network traffic by permitting or denying access based on specific criteria such as IP addresses, protocols, and ports. This manual explains how the firewall rules work and provides examples to help you secure your server effectively. The firewall does not offer dos protection like a scrub IP address, and simply evaluates the rules in place. However restriction a port that is getting attacked will stop the traffic from going to that port.
How Firewall Rules Work
Firewall rules in the client portal act as a filter for incoming traffic to your bare metal server. Each rule is evaluated in sequence, from top to bottom, until a match is found. Once a packet matches a rule, the specified action (Allow or Deny) is applied, and no further rules are checked. If no rule matches, an implicit “ALLOW ALL” policy is used.
Key Components of a Firewall Rule
When creating a rule, you’ll define the following:
- Action: Choose whether to Allow (permit traffic) or Deny (block traffic).
- Source IP: Specify the originating External IP address or range (e.g., a single host, subnet, or “Any” for all sources – your local server ips should not be used).
- Destination IP: Define the target IP address or range (e.g., a specific ip of your server, or any for all ips on your server).
- Protocol: Select the protocol to filter (e.g., TCP, UDP, ICMP, or “All”).
- Port(s): For TCP or UDP, specify source or destination ports (e.g., 80 for HTTP, 443 for HTTPS).
- Port(s): For IP rules can allow or deny a source ip address for all traffic, this is layer3 and no ports are defined.
- Sequence: Rules are processed in order—lower-numbered rules take precedence (first match).
- Sequence: Add a tcp tcp any established rule (Allow TCP traffic only if it is part of an existing connection to allow return traffic back in for more restrictive firewalls).
Important NOTE: If you create a deny all rule for incoming TCP connections, and open specific ports, you must add rule TCP action Permit source ip any destination ip any under port select established. This allows replies back for connections originating from your server (outbound). So while the firewall does not block outbound, an outbound connection return path goes over the inbound rule set. A recommendation action is a rule 900 or higher to appear at the end of the firewall list.

Features Similar to Cisco ACLs
The firewall rules mimic Cisco ACL capabilities, including:
- Standard Filtering: Block or allow traffic based solely on source IP addresses.
- Extended Filtering: Filter based on source/destination IPs, protocols, and ports.
- Sequential Processing: Rules are applied in the order listed, with an implicit deny at the end.
- Granular Control: Specify exact conditions for traffic management, such as allowing only specific services.
Accessing the Firewall Rules Interface
- Log in to my.interserver.net using your client credentials.
- Navigate to the Servers section.
- Select your server from the list.
- Click on the Firewall Rules tab to access the rule management interface.
Creating a Firewall Rule
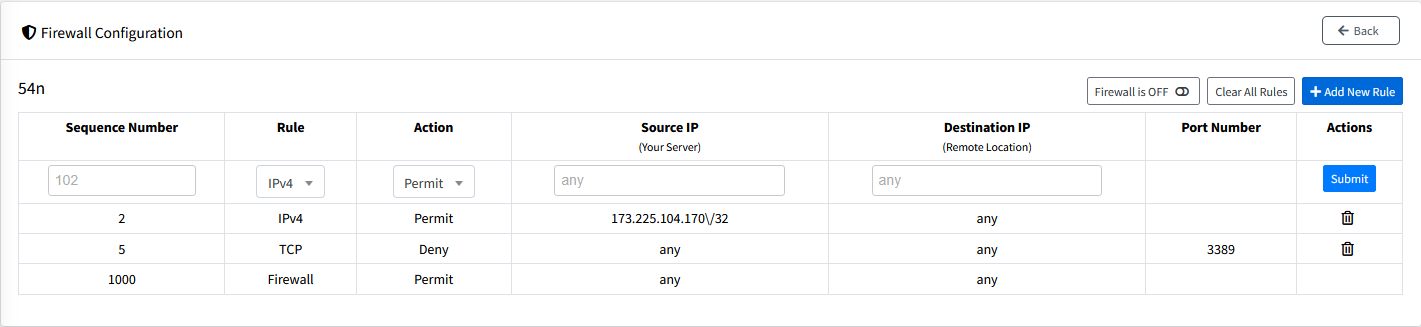
- In the Firewall Rules tab, click Add New Rule.
- Fill in the required fields:
– Action: Select “Allow” or “Deny.”
– Source IP: Enter a specific IP (e.g., 192.168.1.10), a range (e.g., 192.168.1.0/24), or “Any.” The source IP represents your server.
– Destination IP: Enter your server’s IP, a range, or “Any.” The destination IP represents the remote location.
– Rule: Choose “IPV4,” “UDP,” “ICMP,” etc.
– Ports: For TCP/UDP, enter a port number (e.g., 22 for SSH) or range (e.g., 1024-2048). Leave blank for “All” or ICMP.
– Sequence Number: Assign a number (e.g., 10, 20) to determine rule order. - Click Submit to add the rule. It will take effect within moments.
- Use the on/off toggle to enable or disable the firewall.
Best Practices
- Order Matters: Place specific rules (e.g., denying a single IP) before general rules (e.g., allowing all traffic).
- Test Rules: After adding rules, test connectivity to ensure the desired effect.
- Allow by Default: Use a final “Allow All” rule to allow all other traffic.
- Keep it Simple: Avoid overlapping rules to reduce confusion and improve performance.
Example Firewall Rules
Here are practical examples to demonstrate how to use firewall rules effectively:
Example 1: Allow SSH Access from a Specific IP
- Action: Allow
- Source IP: 203.0.113.5 (your trusted IP)
- Destination IP: Your server’s IP (e.g., 198.51.100.10)
- Protocol: TCP
- Port: 22
- Sequence: 10
- Purpose: Permits SSH access only from 203.0.113.5, enhancing security.
Example 2: Block All ICMP (Ping) Traffic
- Action: Deny
- Source IP: Any
- Destination IP: Your server’s IP (e.g., 198.51.100.10)
- Protocol: ICMP
- Port: N/A
- Direction: Inbound
- Sequence: 20
- Purpose: Prevents ping requests, reducing visibility to potential attackers.
Example 3: Allow Web Traffic (HTTP/HTTPS)
- Action: Allow
- Source IP: Any
- Destination IP: Your server’s IP (e.g., 198.51.100.10)
- Protocol: TCP
- Port: 80, 443
- Sequence: 30
- Purpose: Permits public access to a web server while keeping other ports closed.
Example 4: Deny All Other Inbound Traffic
- Action: Deny
- Source IP: Any
- Destination IP: Any
- Protocol: All
- Port: N/A
- Direction: Inbound
- Sequence: 100
- Purpose: Acts as a catch-all to block unspecified inbound traffic, placed last in the list.
Example 5: Allow Outbound DNS Queries
- Action: Allow
- Source IP: Your server’s IP (e.g., 198.51.100.10)
- Destination IP: Any
- Protocol: UDP
- Port: 53
- Direction: Outbound
- Sequence: 10
- Purpose: Enables your server to resolve domain names via DNS.
Troubleshooting
– Rule Not Working? Check the sequence number—ensure a higher-priority rule isn’t overriding it.
– Locked Out? If you accidentally block yourself (e.g., SSH), delete the rule or disable the firewall.
– Testing Access: Use tools like `ping`, `telnet`, or `curl` to verify rule behavior.
Conclusion
The firewall rules in the **my.interserver.net** portal give you robust control over your bare metal server’s network traffic, mirroring the flexibility of Cisco ACLs. By carefully crafting rules and following best practices, you can secure your server against unauthorized access while allowing legitimate traffic. For further assistance, reach out to InterServer’s support team via the client portal.