
GICT knowledge base
Securing your Laravel App: Essential Practice and Tips
Published
Building a web application involves handling sensitive user data, financial transactions, and various interactions that demand a high level of trust. Security breaches can lead to many consequences, including data leaks, unauthorized access, and damage to your reputation in public.
Laravel takes care of these challenges and integrates security features to empower developers to create robust and secure applications.
As of the latest UpGuard security rating, Laravel stands in a good position. Following is the updated security report of Laravel.
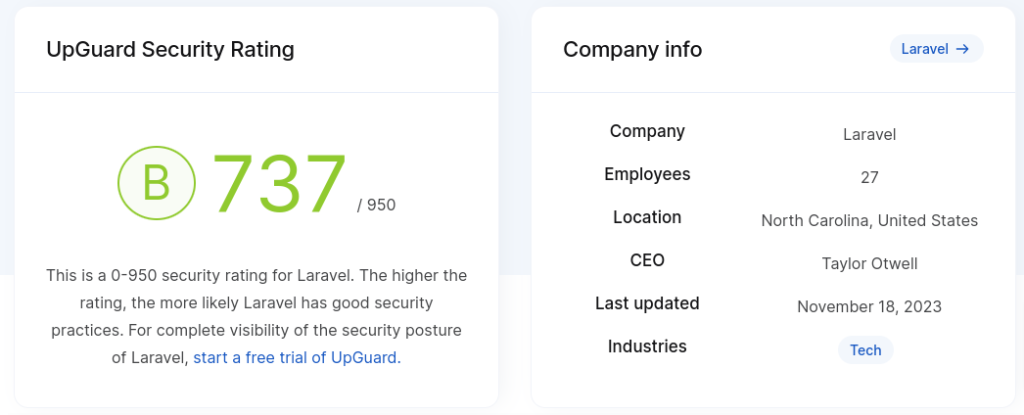
This rating reflects the framework’s commitment to implementing good security practices, providing you with a solid foundation to build upon.
There are multiple factors you need to consider to secure your application. In this article, we’ll dive deep into the factors that help secure your Laravel web application.
Update to the Laravel Latest Application
First thing first. Staying current with software updates is not just a best practice; it’s a fundamental aspect of maintaining a secure and efficient application. Laravel, as a framework, undergoes regular updates, and these updates often include crucial security patches, feature enhancements, and optimizations.
How to safely update your Laravel application
- Review Release Notes: Before updating, carefully review the release notes for the version you plan to upgrade to. Laravel-News provides insights into new features, changes, and any potential backward compatibility issues. This official Laravel documentation article provides a detailed guide on how to upgrade your Laravel application to the latest version. It includes information on how to update your composer.json file, run the necessary commands, and make any necessary changes to your code.
- Backup Your Application: Before initiating any update, it’s crucial to create a backup of your entire application. This ensures that in case of unforeseen issues, you can easily roll back to the previous state. I recommend you use ServerAvatar, the most affordable panel for managing servers and applications. It’s the best tool to manage your Laravel applications, including creating instant and scheduled backups.
- Update Dependencies: Laravel often relies on various dependencies, such as packages and libraries. Ensure that these dependencies are also updated to versions compatible with the Laravel update. You can run the command composer outdated to check for outdated packages and then run composer update to update them.
- Test Locally First: It’s advisable to perform the update in a local or staging environment first. This allows you to identify and address any issues without affecting the live production environment.
- Monitor Deprecations: It may be possible that new Laravel versions deprecate certain features or methods. Monitor deprecation warnings during the update process, as these indicate areas of your code that need adjustment for future compatibility.
Secure Configuration Practices
Having a Laravel background, you know that it provides a flexible configuration system. However, improper configuration causes trouble in terms of vulnerabilities.
Let’s see essential secure configuration practices to help protect your Laravel applications.
Environment Configuration
Laravel allows you to define configuration settings based on the environment in which your application is running. For example, it may be your development, staging, or production environment.
Ensure that sensitive information such as database credentials and API keys are stored securely in the environment configuration files. It’s generally a .env file.
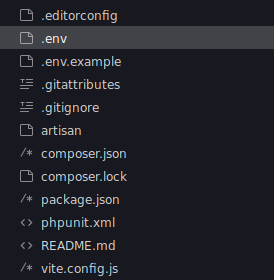
Also, make sure that you never share these files publicly or don’t push them in GitHub.
One of the prime things about using environment-specific configuration is you can change your application’s behavior to different deployment environments
App Key Security
The APP_KEY in your .env file is significant for encrypting sensitive data and securing user sessions.
Following is the command that sets the APP_KEY value.
php artisan key:generate
The key should look like the following.

It is important to keep this key confidential. You can regenerate it whenever you suspect a breach.
Note: Let me clear one doubt that everyone may face: if someone clones your project using git clone … they will have to manually enter the php artisan key:generate for their Laravel app to function correctly.
Session and Cookie configuration
It’s an important step for user authentication and state management. This helps you prevent attacks like session hijacking and session fixation.
You can use secure and HTTP-only cookies for enhanced security. You can configure your session settings in the config/session.php configuration file.
<?php
return [

'secure' => env('SESSION_COOKIE_SECURE', true)

'http_only' => env('SESSION_COOKIE_HTTPONLY', true),

'same_site' => 'lax',

];
Security Headers
Implementing proper security headers in your application’s HTTP responses enhances browser security.
Laravel supports a CSP(Content-Security-Policy) header, which can help you prevent cross-site scripting attacks by specifying which content your application can load.
Below is an example of setting up a default CSP policy that only allows scripts from the same domain to be executed:
$response->header('Content-Security-Policy', "script-src 'self'");
Logging configuration
Logging helps your application perfectly monitor and debug. Laravel provides logging settings by default.
The log configuration is located in the config > logging.php file. And the channels are where you send log information. The default channel is Stack, which utilizes several other channels, such as the daily and single channels.
You can change it by defining the LOG_CHANNEL in the .env file, or you can also specify the channel name as the second parameter in the same logging.php file.
'default' => env('LOG_CHANNEL', 'stack')
I recommend you use the daily channel, as this helps you keep track of daily logs by auto-generating a new log file day by day.
Authentication and Authorization
Authentication in Laravel
User model
Laravel’s authentication system revolves around the User model. Ensure that your User model is correctly configured, extends the Illuminate\Foundation\Auth\User class, and uses the Authenticatable trait.
use Illuminate\Foundation\Auth\User as Authenticatable;
class User extends Authenticatable

{

// ...

}
Authentication controller
Laravel comes with pre-built authentication controllers that handle common authentication tasks, such as login and registration. These controllers can be customized to suit your application’s needs.
Authentication middleware
Laravel uses middleware to protect routes from unauthenticated access. The auth middleware is often applied to routes that require authentication.
Route::middleware('auth')->group(function () {

// Authenticated routes

});
Authorization in Laravel
Laravel provides a simple way to authorize user actions against a given resource. For example, even though a user is authenticated, they may not be authorized to update or delete certain database records managed by your application.
Roles and Permissions
Laravel provides a flexible way to manage user roles and permissions. This can be done using packages like Spatie’s Laravel Permission. Roles define a set of permissions, and users are assigned roles.
Here is the example code of how you can assign a role to any user-
$user->assignRole('writer');
// You can also assign multiple roles at once

$user->assignRole('writer', 'admin');

// or as an array

$user->assignRole(['writer', 'admin']);
Gate and Policies
Laravel’s Gate system allows you to define authorization logic cleanly and expressively. Policies provide a convenient method for organizing authorization logic around a particular model or resource.
Let’s take an example of how you can use gates in the Laravel application.
To create a gate, update the app/Providers/AuthServiceProvider.php file like the following.
<?php
namespace App\Providers;
use Illuminate\Support\Facades\Gate;

use Illuminate\Foundation\Support\Providers\AuthServiceProvider as ServiceProvider;
class AuthServiceProvider extends ServiceProvider

{

/**

* The model to policy mappings for the application.

*

* @var array<class-string, class-string>

*/

protected $policies = [

//

];
/**

* Register any authentication / authorization services.

*/

public function boot(): void

{

Gate::define('isAdmin', function ($user) {

return $user->role == 'admin';

});
Gate::define('isStaff', function ($user) {

return $user->role == 'staff';

});

}

}
Now you can use the gate in the controller like the following.
<?php
namespace App\Http\Controllers;
use Illuminate\Support\Facades\Gate;
class TutorialController extends Controller

{

public function __invoke()

{

if (Gate::allows('isAdmin')) {

dd('Admin allowed');

}
abort(403);

}

}
Enable Two-Factor Authentication
Two-factor authentication (2FA) adds an extra layer of security to your authentication process by requiring users to provide a second factor sent code via email or sent via SMS.
You can use a package called Laravel Jetstream to implement 2FA in your application.
Following are the steps you can install and set Jetstream in your Laravel application.
composer require laravel/jetstream
Then you can run:
php artisan jetstream:install livewire|inertia
After installing Jetstream, you should install and build your NPM dependencies and also need to migrate your database.
npm install
npm run build
php artisan migrate
For more details, you can check How to enable 2FA using Jetstream.
Protecting Against Cross-Site Scripting (XSS) Attacks:
Cross-site Scripting is a common web application security threat where attackers inject unwanted scripts into web pages viewed by other users.
Not to worry. Laravel provides features to help reduce the risk of XSS attacks. Before implementing, developers need to understand this method and implement it correctly.
Reflected XSS
Reflected XSS involves injecting a malicious script that is immediately executed, usually via a URL parameter.
Stored XSS
Stored XSS occurs when the injected script is stored on the server and served to other users.
Using Laravel Blade for Safe Output
Blade Templating Engine
Laravel’s Blade templating engine automatically escapes output by default, making it resistant to XSS attacks. Blade escapes any output within {{ }} brackets, ensuring that user input is treated as plain text.
{{ $userInput }}
Raw Output
If there is a specific case where you need to output raw HTML (for example, when rendering user-generated content), use the {!! !!} syntax. However, exercise caution and ensure that the content is sanitized.
{!! $userGeneratedHTML !!}
Laravel Input Sanitization
You can use the Laravel built-in method to sanitize user input received via requests. Use the below methods to clean and filter output before processing it.
$input = $request->input('user_input');

$sanitizedInput = filter_var($input, FILTER_SANITIZE_STRING);
Content Security Policy
It’s a browser mechanism that helps you prevent XSS attacks by controlling which resources can be loaded.
// Set CSP headers in middleware or directly in web server configuration

header('Content-Security-Policy: default-src \'self\'');
Implement CSP headers using Middleware
Laravel allows you to implement CSP headers using middleware. Create a middleware class and add it to the HTTP kernel like below.
php artisan make:middleware AddCSPHeaders
Register the middleware in the app/Http/Kernel.php middleware array.
<?php
protected $middleware = [

// ...

\App\Http\Middleware\AddCSPHeaders::class,

];
In the middleware-
// In the middleware

public function handle($request, Closure $next)

{

$response = $next($request);

$response->header('Content-Security-Policy', "default-src 'self'");

return $response;

}
Use Input Validation
You can use Laravel’s validation rules to enforce constraints on user input. For example, the alpha, numeric, and email rules can help filter input based on expected patterns.
$validatedData = $request->validate([

'username' => 'alpha_num',

'email' => 'email',

]);
SQL Injection Prevention
Laravel, with its Eloquent ORM, provides built-in protections against SQL injection. Let’s take a look at how we can apply the write method in the SQL queries to prevent SQL injection thoroughly.
Understanding SQL Injection
SQL injection occurs when user input is directly concatenated into SQL queries. Attackers can exploit this vulnerability to manipulate the intended query structure and potentially gain unauthorized access to the database.
Using Eloquent ORM and Query Builder
Laravel’s Eloquent ORM and Query Builder automatically handle parameter binding, which helps prevent SQL injection. When using these features, user input is treated as a parameter rather than being directly embedded in the SQL query.
// Eloquent ORM

$users = DB::table('users')->where('name', $userInput)->get();
// Query Builder

$users = DB::select('SELECT * FROM users WHERE name = ?', [$userInput]);
Database Transactions
Atomic transaction
Wrap database operations in transactions to ensure atomicity. Laravel provides a simple and expressive way to perform transactions using the transaction method.
DB::transaction(function () {

// Database operations

});
Rollback on Failure
If an error occurs during the transaction, Laravel automatically rolls back the changes, preventing incomplete or inconsistent data modifications.
That’s it. By applying the above security features and tools, I guarantee you never face any security vulnerability issues in your Laravel application.
We’ve talked about the important steps, like keeping things up-to-date and using built-in security tools. And it’s like a lock on your digital door.
I hope you like the above article. You can check Laravel’s official document for more information about securing your Laravel application.