
GICT knowledge base
How To Create Pop-Ups Using Popup Builder Plugin
Published
Popup Builder Plugin is one of the powerful pop-up plugins for WordPress sites. It is the perfect solution for any WordPress website. You will have WordPress pop-up types, conditions, and events ( Image Pop-up, Countdown pop-up, Exit Intent to GeoTargeting). Popup Builder helps you create high converting and more options. Moreover, the plugin provides other options such as promotional and informative pop-ups, increased conversion rates, and boosted sales while reaching your marketing goals.
The plugin allows you to display pop-ups anywhere on your site. You need to select any page or post from the “Display Rules” section. You will have multiple pop-up theme options. In the free version, you can customize the advanced settings such as Opening and closing animation, showing limitations, floating buttons, and many more. The premium version includes features like pop-up scheduling, pop-up types, auto close pop-up. Moreover, you can also set the delay time of the pop-ups. It means you can adjust the time of how long you want to show pop-ups to your users.
It connects third-party plugins’ or services’ accounts, like Mailchimp and Aweber pop-up, and uses them for growing your mailing list. You can also automate the nurturing process with autoresponders without any extra effort. Moreover, it allows you to push your website’s visitors to your desired actions based on inactivity. Also, the plugin will help you to increase your sales by showing pop-ups at the right moment based on cart items, specific products, or event cart’s value via WooCommerce or EDD targeting. However, you will have to purchase the premium version of the plugin. So, let’s discuss the basic features of this plugin in brief,
Features:
- The plugin has an easy-to-use interface and a straightforward setup process. Anyone can easily use the plugin, in fact this is a handy plugin. For Beginners this can be the best plugin.
- You will have multiple types of pop-up options such as Image pop-up, HTML pop-up, subscription, countdown pop-up, and many more.
- The plugin is highly customized for pop-ups. For additional customization, you will have a custom JS or CSS section as well.
- Also, the condition section will let you customize the geo-targeting and advanced targeting.
- Using this plugin, you can select the page or post to display the pop-up anywhere on your site from the pop-up settings. Also, you can add events. The event section will let you select the specific actions that will trigger the pop-up.
- The pop-up Builder plugin is free to use. However, if you want to use the pro extensions, you will need to upgrade the plan.
- The premium version of the plugin includes all extensions and advanced features. If you don’t want to buy the premium version, you can purchase the pro extensions separately to use the advanced feature you want.
- Moreover, you will have a design section to select the background’s pop-up themes, color, and opacity.
- You can also display the closing button. Moreover, if you want to add the image of the button, then you can set the image of the closing button. Also, you can adjust the width and height of the closing button.
- Also, you can start lead generation, boost conversation rates by using the Subscription Plus pop-up.
Pricing Details:
Popup Builder is free to use the pop-up customizer plugin. You can install it from the WordPress plugin library for free. Also, the plugin provides a premium version with various advanced features. It offers three paid plans – Starter, Business, and Agency. Also, the starter plan includes all the extensions and provides licenses for two sites. It costs $39.95 per year. The business plan retails at $89.95 per year and comes with licenses for ten sites. The agency plan costs $149.95 per year and provides licenses for unlimited sites. Moreover, the plugin also comes with various extensions, and you can purchase the pro extensions separately to unlock the advanced features. We will explain each feature in this tutorial article. Let’s see how we can easily install and set up the plugin. We also explain to you how to use these pop-up boxes on your website.
How to Install and activate Popup Builder Plugin
The installation process is Straightforward. You can follow the simple steps mentioned below to install and activate the plugin.
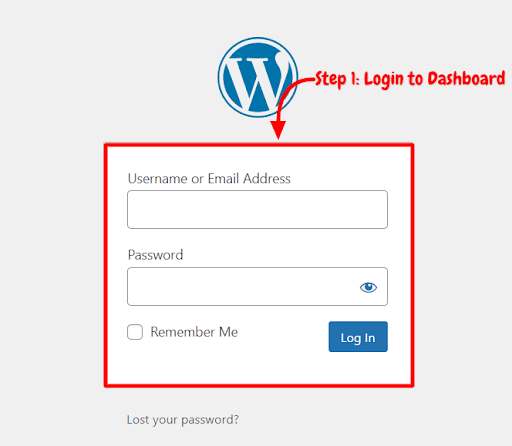
Step 1: First, you need to log in to the WordPress admin dashboard.
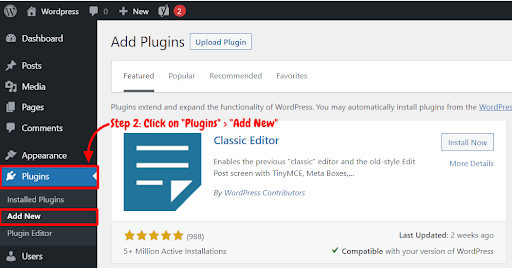
Step 2: Now, you will see the option “Plugins” on the left-hand side panel of the WordPress dashboard. Click on “Plugins,” then select “Add New.”
Step 3: You will see a search bar on the top right-hand side corner of the dashboard. Now, Search “Popup Builder Plugin”.
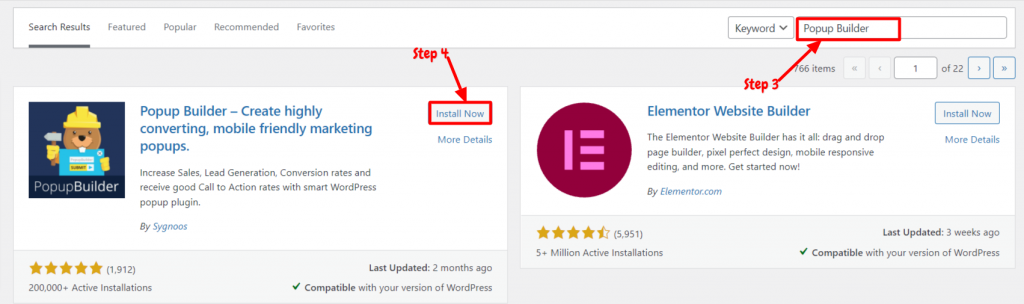
Step 4: After that, you need to click on “Install Now.”
Step 5: After installation, you will need to activate the Pop-up Builder Plugin to use it on your site. Now, click on “Activate.”
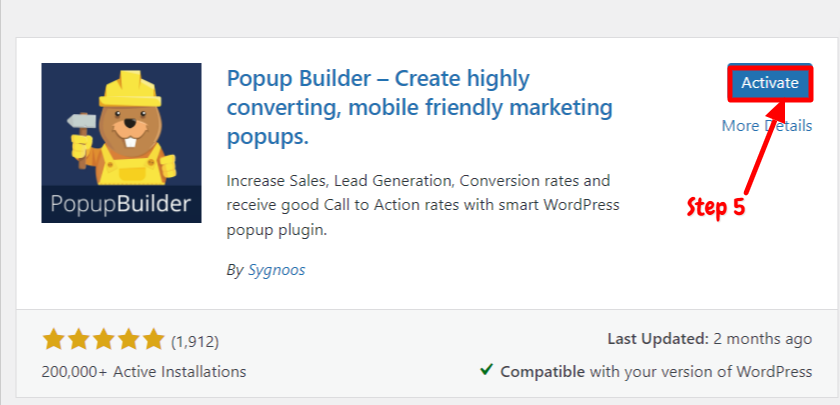
Now you have successfully installed and activated the plugin. You can create and display the pop-ups on the front end of your site using this plugin.
How to Create Pop-ups Using Popup Builder Plugin
After activating the plugin on your site, you can start using this plugin on your site. You can set up and customize the pop-ups using this plugin easily, just with a few clicks. We have explained step by step guide below on how to use Popup Builder Plugin,
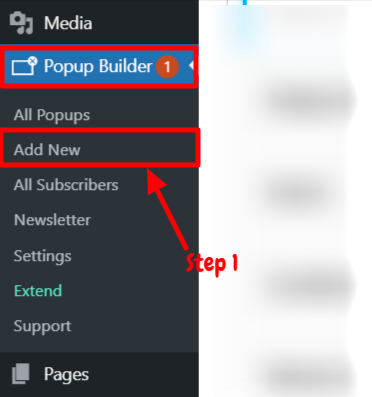
Step 1: First of all, go to the “Pop-up builder” option on the left-hand side panel of the WordPress dashboard. Then select the “Add New” option.
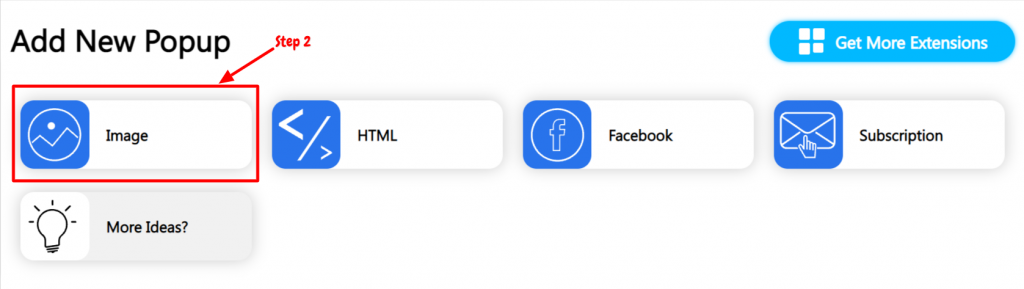
Step 2: You can choose which type of pop-up you want to display on your site. You will have Image, HTML, Facebook, and Subscription options. Choose any one type to create a pop-up.
Here, we are creating an image type of pop-up.
Step 3: After that, enter the name of the Popup.
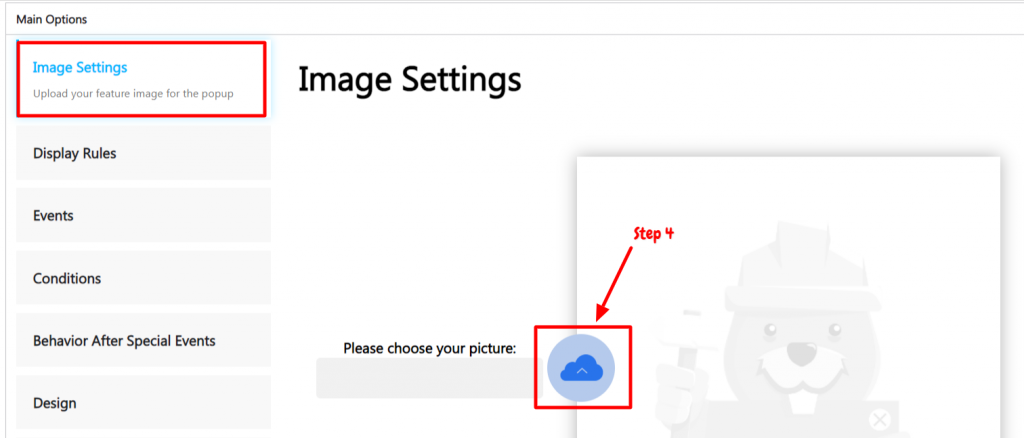
Step 4: Now, scroll down to the “Image settings” section. You can customize many options in these sections like conditions, display, design, dimensions, and other advanced options. First, click on “Image settings.” In this section, you can upload featured images for your pop-up.
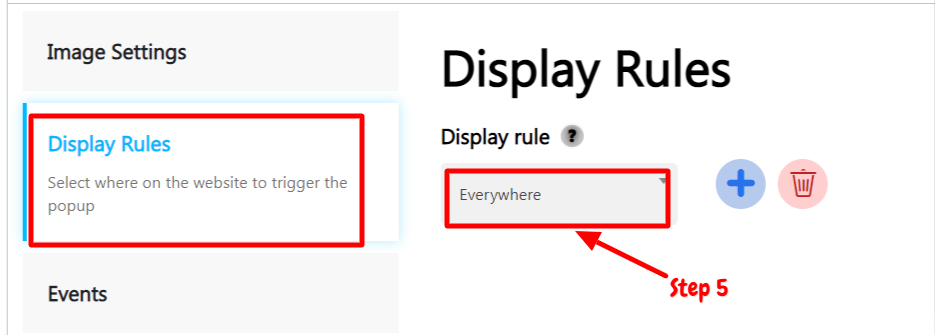
Step 5: Now, go to the “Display Rules” tab. In this section, you can select any page or post where you want to display pop-ups. Moreover, you can delete the selected options.
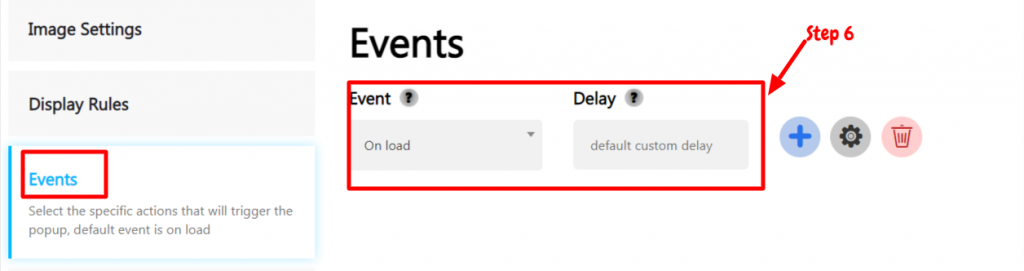
Step 6: The event section will let you select the specific actions that will trigger the pop-up; the default event is on load. You will have many event options like on click, on hover, and many more. Also, it allows you to set the delay time. It means how long you want to show the pop-up to your users.
The condition section will let you edit the geo-targeting and advanced targeting.
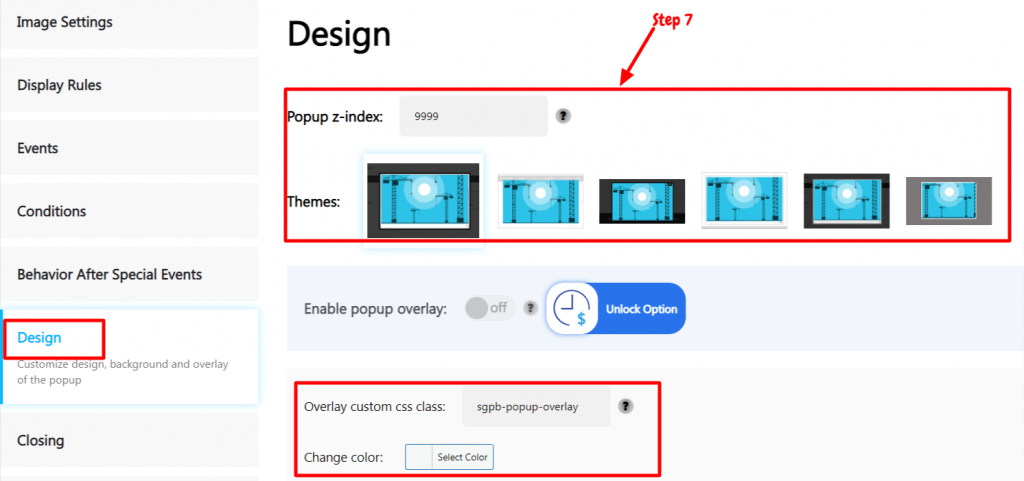
Step 7: Now, click on the “Design” tab. You can set the pop-up z index. You can increase or decrease the index value to select the priority of displaying the pop-up content. Moreover, you will have multiple options in the themes. You can also customize the color and opacity of the background. For additional customization, you will have a content custom CSS section as well.
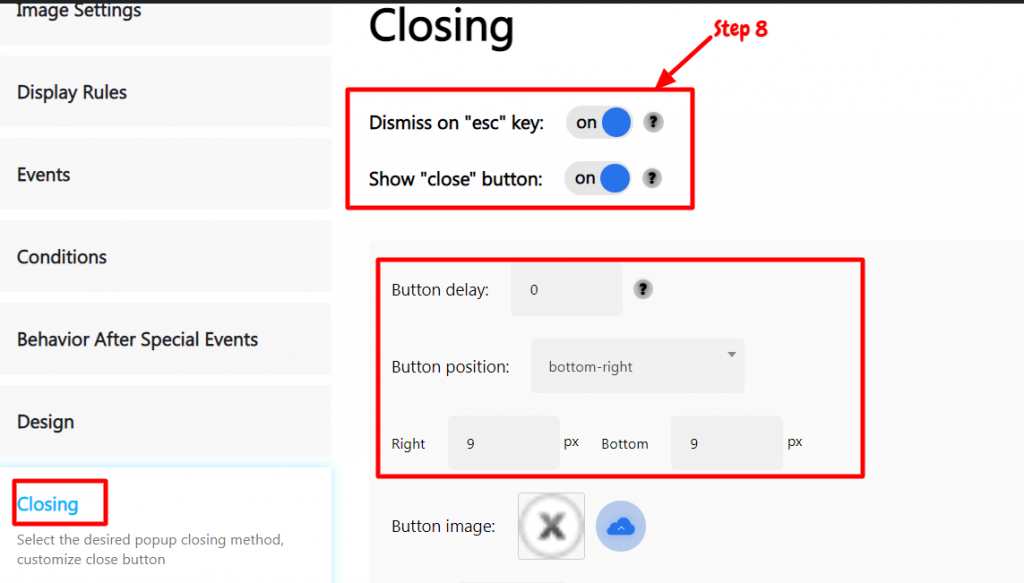
Step 8: In the “closing” section, you can show the close button and “ESC” key. Moreover, you can set the button delay time, width, height, and position. Also, you can upload the image for the button.
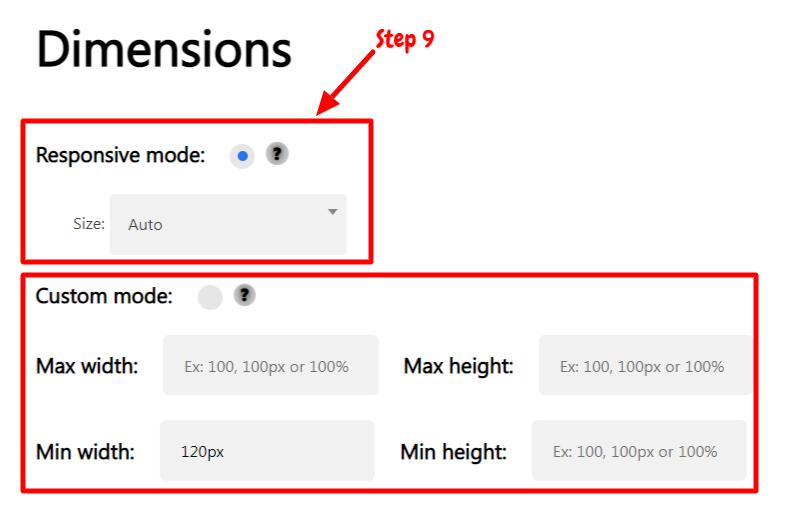
Step 9: In the dimension section, you can make your pop-up mobile-friendly and responsive for all devices. It allows you to enable responsive mode. From the custom mode, you can set the height and width of the pop-up.
Step 10: The advanced section will enable pop-up showing limitation, opening sound, opening and closing animation, pop-up location, and many more. Also, the plugin allows you to enable the floating button. Moreover, you can enable or disable the pop-up counts. For more customization, you will have custom JS and CSS options. However, it will require coding knowledge. Other options such as pop-up scheduling, auto pop-up closing, and disable pop-up closing options are available in the premium version.
Once you are done with the settings, you can publish the pop-up. This way, you can easily add and customize any pop-up on your site.
Conclusion
Popup Builder is one of the best pop-up plugins for WordPress sites. The plugin will let you customize and display the pop-ups anywhere on your site. The plugin is free to use. You can install it from the WordPress plugin directory for free. However, the free version provides enough features to create pop-ups. You will have limited types of pop-up options. In the premium version, you will have many extensions to customize the pop-ups.
The installation and the setup process are very straightforward. You can follow the steps mentioned below to install and activate the plugin. Also, we have explained step by step guide on how to set up this plugin. We hope this article will help you add and customize the pop-ups on your site using the Popup Builder Plugin.