
GICT knowledge base
Installation and Usage Guide for Docker on Ubuntu 20.04
Published
One tool that makes managing application processes in containers easier is called Docker. You can execute your apps in resource-isolated processes by using containers. Virtual machines and containers are comparable. However, containers rely more on the host operating system, are more portable, and are friendlier with resources.
See The Docker Ecosystem: An Introduction to Common Components for a thorough explanation of the various parts that make up a Docker container.
Installing and using Docker Community Edition (CE) on Ubuntu 20.04 is covered in this guide. Installing Docker itself, interacting with images and containers, and pushing an image to a Docker repository are all covered.
In this article, I will explain you how to install Docker on Ubuntu 20.04 server.
Prerequisites
To continue this lesson, you will require the following:
One Ubuntu 20.04 server was configured using the Ubuntu 20.04 initial server setup guide, which included a sudo non-root user and a firewall.
If you want to generate your images and push them to Docker Hub, as detailed in Steps 7 and 8, you’ll need an account there.
Step 1: Docker Installation
It’s possible that the Docker installation package included in the official Ubuntu repository isn’t the most recent one. Installing Docker from the official Docker repository will guarantee that we get the most recent version. In order to accomplish so, we will first create a new package source, install the package, and then add the GPG key from Docker to confirm the downloads are legitimate.
Update your current package list first:
sudo apt update
Installing the following prerequisites will enable apt to use packages over HTTPS:
sudo apt install apt-transport-https ca-certificates curl software-properties-common
Next, add to your system the GPG key for the official Docker repository:
curl -fsSL https://download.docker.com/linux/ubuntu/gpg | sudo apt-key add -
To APT sources, add the Docker repository:
sudo add-apt-repository "deb [arch=amd64] https://download.docker.com/linux/ubuntu focal stable"
Additionally, the Docker packages from the recently uploaded repository will be added to our package database. Verify that you are going to install from the Docker repository rather than the standard Ubuntu repository:
apt-cache policy docker-ce
Install Docker lastly:
sudo apt install docker-ce
At this point, Docker ought to be installed, the daemon launched, and the process set to launch at boot. Verify that it is operating:
sudo systemctl status docker
You now get the Docker client, or docker command line utility, in addition to the Docker service (daemon) when you install Docker. The docker command will be covered later in this blog.
Step 2: Run the Docker Command (Optional) Without Sudo
By default, only the root user or a user in the docker group—which is formed automatically during Docker installation—may execute the docker command. An output similar to this may appear if you try to run the docker command without first prefixing it with sudo or without being a member of the docker group:
Add your username to the docker group to prevent having to type sudo each time you execute the docker command:
sudo usermod -aG docker ${USER}
You can either type the following or log out of the server and back in to apply for the new group membership:
su - ${USER}
To proceed, you will be required to input your user password. Type the following to confirm that your user has been added to the docker group:
groups
In the event that you need to add a user to the docker group while not signed in, use the following to indicate that username explicitly:
sudo usermod -aG docker username
The remainder of this post will presume that you are a user in the docker group and that you are using the docker command. If you would like not to, please add sudo before the commands
Next, let’s examine the docker command.
Step 3: Making Use of the Docker Command
To use docker, provide it with a series of parameters, commands, and options. Its syntax looks like this:
Type to see all of the available subcommands:
docker [option] [command] [arguments]
To see what choices are available for a given command, type:
docker
To see what choices are available for a given command, type:
docker docker-subcommand --help
To see Docker system-wide information, use:
docker info
Let’s investigate a few of these directives. First, let’s deal with some photos.
Step 4: Utilizing Docker Images
Docker images are used to construct Docker containers. These images are automatically pulled by Docker from Docker Hub, a Docker registry run by Docker, the organization that created the Docker project. Docker Hub allows anyone to host their Docker images. Thus, most Linux distributions and applications you’ll need will have images uploaded there.
Type the following to see if you can view and download images from Docker Hub:
docker run hello-world
The default repository, Docker Hub, is where Docker got the hello-world image since it couldn’t find it locally at first. The application within the container ran and displayed the message after Docker formed a container from the downloaded image.
The search subcommand of the docker command can be used to look for images that are accessible on Docker Hub. In order to find the Ubuntu image, for instance, enter:
docker search ubuntu
OK represents an image created and maintained by the organization spearheading the project in the OFFICIAL column. Use the pull subcommand to download the desired image to your computer after you’ve located it.
Install the official Ubuntu image on your PC by running the following command:
docker pull ubuntu
Once an image has been downloaded, use the run subcommand to use the downloaded image to launch a container. As seen by the hello-world example, the Docker client will download the image first and then run a container using it if it still needs to be downloaded when docker is invoked using the run subcommand.
Enter the following to view the photographs that have been downloaded to your computer:
docker images
The images you use to run containers can be altered to create new images, which can then be uploaded—technically called “pushed”—to Docker Hub or other Docker registries. This is something you’ll see later in the tutorial.
Let’s take a closer look at container operation.
Step 5: Docker Container Operation
A container that runs and ends after sending out a test message is the hello-world container that you launched in the preceding step. That’s only some of what containers can do; they can also be interactive. They are virtual machines with better resource friendliness.
Let’s run a container with the most recent Ubuntu image as an example. You can access the container using an interactive shell by using the -i and -t switches together:
docker run -it ubuntu
Take note of the command prompt’s container id. As an illustration, it is similar to d9b100f2f636. When the time comes to delete the container, you’ll need that container ID to identify it.
Any command can now be executed inside the container. Let’s update the package database within the container as an example. Since you are executing commands as the root user inside the container, you do not need to prefix them with sudo:
apt update
Next, install any program on it. Let’s set up Node.js now:
apt install nodejs
By doing this, the official Ubuntu repository’s Node.js gets installed within the container. After installation is complete, confirm that Node.js is installed:
node -v
In your terminal, the version number will be visible.
You can only make modifications inside the container, and they will stay there. At the prompt, type exit to get out of the container. Next, let us examine the management of the containers within our system.
Step 6: Handling Docker Containers
On your PC, you will have a large number of active (running) and dormant containers after using Docker for some time. Use to see which ones are active:
docker ps
During this tutorial, you launched two containers: one from the Ubuntu image and one from the hello-world image. Although both containers are not currently in use, they are still there on your system.
Run docker ps with the -a switch to list all containers, including active and inactive:
docker ps -a
Put the container with the -l switch to see the most recent one you created:
docker ps -l
Use docker to start with either the container ID or the container name to restart a stopped container. With the ID 1c08a7a0d0e4, let’s launch the Ubuntu-based container:
docker start 1c08a7a0d0e4
After the container starts, you may check its status with docker ps.
Use docker stop followed by the container ID or name to end a running container. This time, we’ll use quizzical_mcnulty, the name that Docker gave the container:
docker stop quizzical_mcnulty
Once you’ve determined that a container is no longer needed, use the docker rm command to delete it, providing either the name or the container ID. To identify and delete the container linked to the hello-world image, use the docker ps -a command to obtain its name or container ID.
docker rm youthful_curie
With the –name switch, you can launch a new container and give it a name. The –rm switch can also be used to build a container that, when terminated, destroys itself. For additional details on these and other parameters, see the docker run help command.
You can create new containers by converting containers into images. Let’s examine how that functions.
Step 7: Converting a Container’s Modifications to a Docker Image
Similar to virtual machines, Docker images allow you to create, edit, and remove files when they boot up. Your modifications will only take effect for that particular container. The changes are irreversible after you use the docker rm command to delete it, albeit you can start and stop it at that point.
The process of saving a container’s state as a new Docker image is demonstrated in this section.
You have an Ubuntu container running an image after installing Node.js inside of it, but the container itself is not the same as the image that was used to generate it. However, you may use this Node.js container as a foundation for other images in the future.
Next, use the following command to commit the modifications to a fresh Docker image instance.
docker commit -m "What you did to the image" -a "Author Name" container_id repository/new_image_name
While the -a switch designates the author, the -m switch provides a commit message that helps you and others understand the modifications you made. When you launched the interactive Docker session earlier in the tutorial, you noted the container_id. The repository is typically your Docker Hub login unless you have added further repositories.
For instance, the command would be as follows for the user Sammy, whose container ID is d9b100f2f636:
docker commit -m "added Node.js" -a "sammy" d9b100f2f636 sammy/ubuntu-nodejs
The updated image is kept locally on your computer when you commit it. You will discover how to push an image to a Docker registry, such as Docker Hub so that other users can access it later in this lesson.
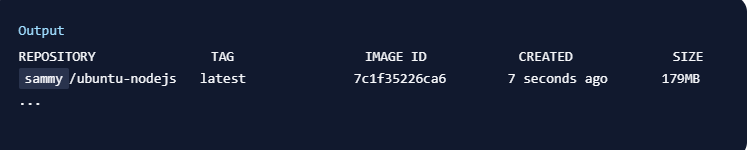
Listing the Docker images once more will display both the updated image and the original one from which it was derived:
docker images
The new image in this example is called ubuntu-nodejs, and it was created by taking a copy of the Docker Hub image of Ubuntu. The modifications are reflected in the size difference. The installation of NodeJS was the alteration in this instance. You can use the updated image the next time you need to launch an Ubuntu container with NodeJS pre-installed.
The software can be automatically installed in a fresh image by using a Dockerfile to build images. That needs to be covered in this tutorial, though.
Conclusion:
In conclusion, installing Docker on Ubuntu 20.04 is a straightforward process that can greatly enhance your development and deployment workflows. By following the step-by-step guide outlined in this article, you can quickly set up Docker on your Ubuntu system, enabling you to create, deploy, and manage containerized applications with ease. With Docker’s robust capabilities for isolation, scalability, and portability, you’ll be well-equipped to streamline your software development process and accelerate the delivery of your applications. If you have any questions, feel free to write down in the comment section. We are happy to help!