
GICT knowledge base
Install Subsonic Media Server on Linux: Complete Setup Guide
Published
Want to stream your music and videos from anywhere? Subsonic turns your Linux machine into a powerful personal media server. This guide shows you how to install and configure Subsonic on Ubuntu and Debian systems with proper security settings.
What Makes Subsonic Special?
Subsonic is a web-based media streaming platform that puts you in control of your entire media library. Unlike paid streaming services, you own everything and decide who gets access.
Key Benefits
- Stream from Any Device: Access your media library through any web browser. No special software needed on your computer.
- Wide Format Support: Play MP3, AAC, FLAC, OGG, WMA, and many other audio formats without conversion.
- Mobile Apps Available: Official apps for Android and iOS let you stream on the go.
- Automatic Format Conversion: Built-in transcoding converts files automatically for smooth playback on any device.
- Multiple User Accounts: Create separate accounts for family members with different permission levels.
- Podcast and Radio Support: Listen to podcasts and internet radio stations directly through the interface.
System Requirements
Before starting, make sure you have:
- Ubuntu or Debian Linux system
- Sudo privileges
- Active internet connection
- Storage space for your media files
Installation Steps
Step 1: Update Your System
Keep your system current to avoid compatibility problems:
sudo apt update && sudo apt upgrade -yStep 2: Install Required Software
Subsonic needs Java to run and FFmpeg for media processing:
sudo apt install openjdk-8-jre ffmpeg curl -y- openjdk-8-jre: Java runtime that powers Subsonic
- ffmpeg: Handles audio and video transcoding
- curl: Downloads files from the internet
Step 3: Download Subsonic Package
Get the latest Subsonic installation file:
wget https://sourceforge.net/projects/subsonic/files/subsonic-6.1.6.debThis downloads the DEB package directly to your current directory.
Step 4: Install Subsonic
Run these commands to install the package:
sudo dpkg -i subsonic-6.1.6.deb
sudo apt-get -f install
The second command fixes any missing dependencies automatically.
Step 5: Access the Web Interface
Open your browser and visit:
http://localhost:4040
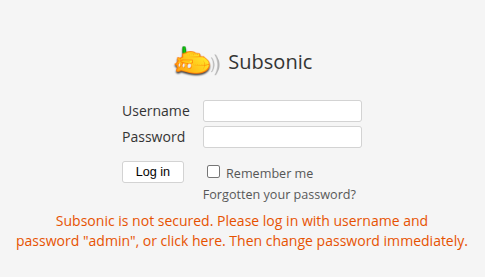
For remote access, use your server’s IP address instead of localhost.
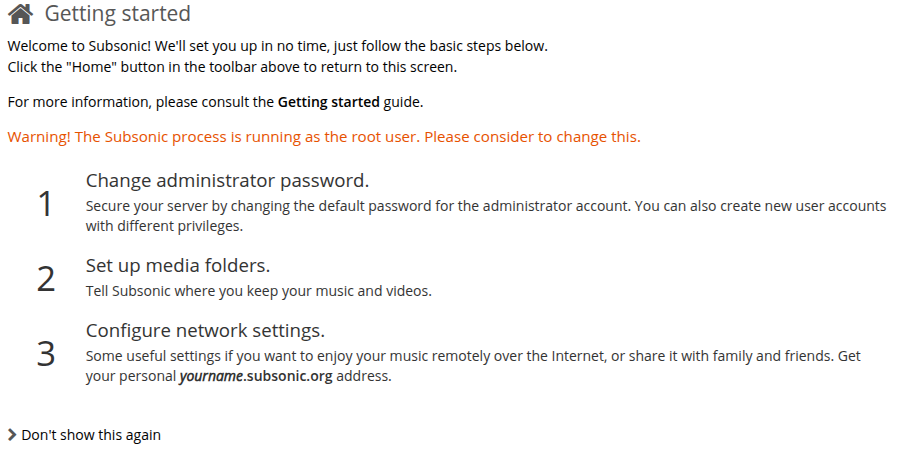
Step 6: Change Default Password
The system will ask you to change the admin password on first login. Choose a strong password to protect your media server.
Configuring Your Media Library
Adding Media Folders
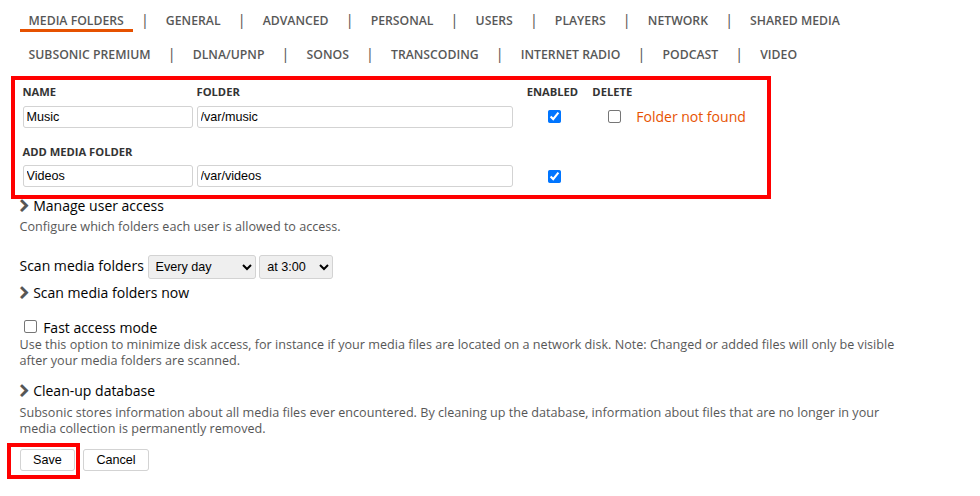
- Navigate to Settings in the top menu
- Select Media Folders
- Click Add Folder
- Enter the full path to your media directory
Example paths:
- Music:
/var/music - Videos:
/var/videos
Click Save and Subsonic will scan these folders automatically.
Setting Up Transcoding
Transcoding converts media files to compatible formats on the fly.
Navigate to Settings > Transcoding and add this command:
ffmpeg -i %s -map 0:0 -b:a 128k -v 0 -f mp3 -
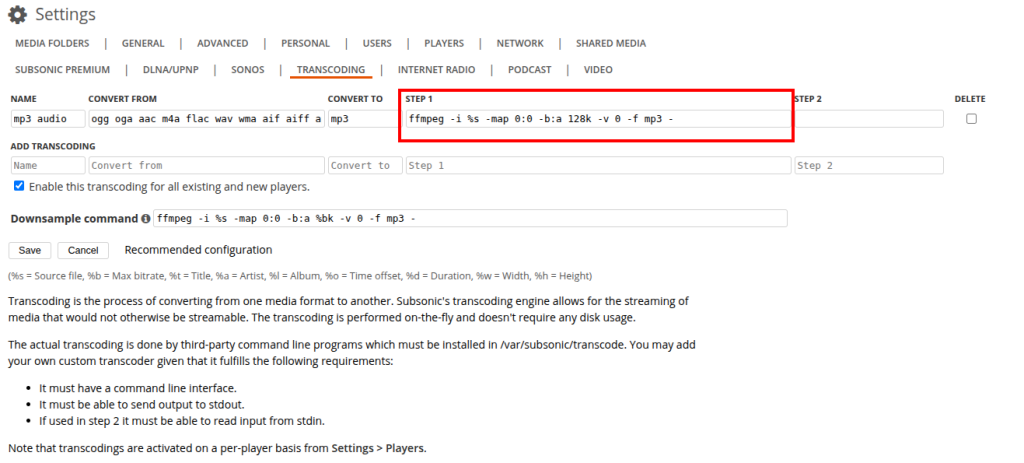
This converts various audio formats to MP3 at 128 kbps bitrate for streaming.
Setting Up a Reverse Proxy
A reverse proxy adds security and lets you use a custom domain name. Choose either Nginx or Apache.
Option A: Using Nginx
- Install Nginx:
sudo apt install nginx -y- Create configuration file:
sudo nano /etc/nginx/sites-available/subsonic.conf- Add this configuration:
server {
    listen 80;
    server_name yourdomain.com www.yourdomain.com;

    location / {
        proxy_pass http://127.0.0.1:4040/;
        proxy_set_header Host $host;
        proxy_set_header X-Real-IP $remote_addr;
        proxy_set_header X-Forwarded-For $proxy_add_x_forwarded_for;
        proxy_set_header X-Forwarded-Proto $scheme;

        proxy_http_version 1.1;
        proxy_set_header Upgrade $http_upgrade;
        proxy_set_header Connection "upgrade";
    }

    gzip on;
    gzip_types text/plain text/css application/json application/javascript text/xml application/xml application/xml+rss text/javascript;
}- Enable and restart:
sudo ln -s /etc/nginx/sites-available/subsonic.conf /etc/nginx/sites-enabled/
sudo systemctl restart nginx
Option B: Using Apache
- Install Apache:
sudo apt install apache2 -y- Enable required modules:
sudo a2enmod proxy
sudo a2enmod proxy_http
sudo a2enmod ssl- Create configuration file:
sudo nano /etc/apache2/sites-available/subsonic.conf- Add this configuration:
<VirtualHost *:80>
    ServerName yourdomain.com
    ServerAlias www.yourdomain.com

    ProxyRequests Off
    ProxyPass / http://127.0.0.1:4040/
    ProxyPassReverse / http://127.0.0.1:4040/

    <Proxy *>
        Order deny,allow
        Allow from all
    </Proxy>

    ErrorLog ${APACHE_LOG_DIR}/subsonic_error.log
    CustomLog ${APACHE_LOG_DIR}/subsonic_access.log combined
</VirtualHost>
- Enable and restart:
sudo a2ensite subsonic.conf
sudo systemctl restart apache2
Adding SSL Security
Protect your connection with HTTPS encryption using Let’s Encrypt.
Install Certbot
sudo apt update
sudo apt install certbot python3-certbot-nginx python3-certbot-apache -y
Get SSL Certificate
For Nginx:
sudo certbot --nginx -d yourdomain.com -d www.yourdomain.comFor Apache:
sudo certbot --apache -d yourdomain.com -d www.yourdomain.comFollow the prompts and enter your email address. Certbot automatically configures HTTPS for you.
Access your secure server:
https://yourdomain.com
Mobile Streaming
Android Users
Download the official Subsonic app from the Google Play Store. Enter your server address and login details to start streaming.
Google Play Store Link
iPhone Users
Get the iSub app from the Apple App Store. It provides a smooth streaming experience with offline playback support.
Apple Store Link
Performance Tips
- Optimize Transcoding: Adjust bitrate settings based on your internet speed. Lower bitrates use less bandwidth but reduce audio quality.
- Use Gzip Compression: The Nginx configuration includes gzip compression for faster page loading.
- Regular Updates: Keep Subsonic updated to get new features and security patches.
Troubleshooting Common Problems
- Port Already in Use: If port 4040 is taken, change it in
/etc/default/subsonicand restart the service. - Permission Denied Errors: Make sure Subsonic can read your media folders:
sudo chmod -R 755 /path/to/media - Proxy Not Working: Check your firewall settings and make sure port 80 and 443 are open.
Security Best Practices
- Strong Passwords: Use complex passwords with numbers, letters, and symbols.
- Regular Backups: Backup your Subsonic database and configuration files regularly.
- User Permissions: Give users only the access they need. Avoid creating unnecessary admin accounts.
- Keep Software Updated: Update Subsonic, Java, and your Linux system frequently.
Conclusion
Subsonic transforms your Linux server into a personal streaming platform. You get complete control over your media, access from anywhere, and no monthly subscription fees. The installation process is straightforward, and the features rival commercial streaming services.
Whether you have a massive music collection or just want to stream videos to your devices, Subsonic handles it all efficiently.