
GICT knowledge base
How to install Ghost CMS on Ubuntu 22.04 Server
Published
Ghost CMS is a popular choice for bloggers, writers, and businesses who want a simple and fast platform to manage their content. Since its launch in 2013, Ghost has been installed on over 3 million websites worldwide, making it a trusted tool for anyone looking to create and publish content online. Unlike more complex systems, Ghost is designed to be lightweight and focused, giving you everything you need to write and share your content without any unnecessary distractions.
Built on modern language like Node.js, Ghost is known for its speed and efficiency. Whether you’re starting a personal blog or managing a site with high traffic, Ghost can handle it all with ease. Its clean, minimalist design makes it easy to use, while still offering powerful customization options to suit your needs.
In this tutorial, we’re going to show you how to install Ghost CMS on an Ubuntu server. Whether you’re setting up a new blog or creating a professional website, this step-by-step guide will help you get Ghost up and running quickly. By the end, you’ll have a fully functional Ghost site that’s ready for you to start creating and sharing your content.
Before we get started with the steps, there are some prerequisites.
Prerequisites
To set up a site on Ghost CMS, You need following things.
- Ubuntu VPS/Dedicated server: You can get one from Interserver. It starts at $6 only.
- Root Access: If you are using Interserver VPS, You can set the root password while creating a VPS. If you are not using Interserver, You will need access to root using password or SSH key.
Once you have these covered, We can move on to the steps.
Install Ghost CMS on Ubuntu 22.04
The complete installation process is divided into multiple sections to make it easier for you. So, Let’s get started with the first section.
Initial Setup
Step 1: Log in to your Ubuntu 22.04 server using root username and password/SSH key.
Step 2: Once you are in, Execute the following command to update repositories and process existing updates on the system.
# sudo apt-get update && sudo apt-get upgrade -y
It might take some time depending on the number of pending updates on your system. It might also ask you to restart your server.
Step 3: Now, Create a user for your ghost project on your server. We will use adduser command to do so.
# adduser ghostdemo
It will ask for a new password for our user. It will also ask for some additional information and confirmation. It’s fine if you ignore all the additional information for the user except the password.
Step 4: Now, We will provide root privileges and log in to the user account using the following two commands.
# usermod -aG sudo ghostdemo

# su - ghostdemo
Once the initial setup is done, we can move forward to install necessary
Install Nginx, MySQL and Node.js
Step 1: To install Nginx, Execute the following command on your server.
$ sudo apt-get install nginx -y
Step 2: It might take a few minutes. Once done, we can move on to install MySQL database. Execute the following command to install MySQL.
$ sudo apt-get install mysql-server mysql-client -y
MySQL installation will take a bit longer than nginx. It will not prompt you to create root password for root user yet. Once it is completely installed, we can move on to install Node.js on the server.
Step 3: Execute the following command to add to download node setup script.
$ curl -sL https://deb.nodesource.com/setup_18.x -o nodesource_setup.sh
Step 4: Execute the following command to execute the shell script we just downloaded.
$ sudo bash nodesource_setup.sh
Step 5: Now, Execute the following command to install Node.js.
$ sudo apt-get install nodejs -y
Step 6: Finally, Execute the following command to verify the Node.js installation on your server.
$ node -v
If the Node.js is successfully installed, You will be able to see the current node version as an output.
Install Ghost-CLI on Ubuntu
Installing Ghost CLI is a very straightforward process consisting of few steps only.
Step 1: Execute the following comm1and to install Ghost CLI on your Ubuntu server.
$ sudo npm install ghost-cli@latest -g
It might take several minutes to install Ghost CLI. Let the process continue. Once done, we can verify the installation.
Step 2: Verify the installation by executing the following command.
$ ghost help
If Ghost CLI is successfully installed, You will be able to see the help information of ghost. Now, It is time to create a database for our ghost project.
Create and Configure Database
In this section, we will create a MySQL database along with a MySQL user with permissions on the database.
Step 1: Log in to your MySQL server using the following command.
$ sudo mysql;
Step 2: Execute the following command to create a database.
mysql> CREATE DATABASE ghostdb;
Step 3: Execute the following command to create a database user for our database.
mysql> CREATE USER 'ghostdbuser'@'localhost' IDENTIFIED BY 'password';
Do not forget to replace ‘ghostdbuser’ and ‘password’ with your desired values.
Step 4: Execute the following MySQL query to provide all privileges on our database to our user.
mysql> GRANT ALL PRIVILEGES ON ghostdb.* TO 'ghostdbuser'@'localhost';
Step 5: Execute the following command to reload the privileges from the grant table.
mysql> FLUSH PRIVILEGES;
Now, Our database is ready to manage our ghost data. Remember or note down the database name, username and password. We will use it in the next section.
Create a Ghost Directory and Project
Finally, we are going to create our ghost project. Before that, we need to create a directory and set permissions.
Step 1: Execute the following command to create a directory for your project.
$ sudo mkdir -p /var/www/projectname
Step 2: Set the correct ownership for the project directory. Execute the following command to set ownership to the user we created in the first section.
$ sudo chown username:username /var/www/projectname
Do not forget to replace ‘username’ and ‘projectname’ with the actual username and project directory name. For this example, we can set ghostdemo as username and projectname as project name.
Step 3: Set the correct permission for the project directory by executing the following command.
$ sudo chmod 775 /var/www/projectname
Step 4: Finally, navigate to our project directory so we can install a new ghost instance.
$ cd /var/www/projectname
Step 5: Once you are in the project directory, execute the following command to download and install ghost.
$ ghost install
It will take several minutes to download and install packages. It will show you many prompts to get information in the installation once the files are downloaded.
Here are the prompts and How to provide information about your setup.
- Enter your blog URL: Enter the domain or subdomain that you want to use on your blog. Note that your URL/domain should be pointed to the IPv4 of your server. You can modify this from DNS records.
- Enter your MySQL hostname: Unless you are using different server to host your database, You can keep it default and just hit Enter.
- Enter your MySQL username: Enter the name of the user we created while creating database.
- Enter your MySQL password: Enter the password of the user we just created in previous section.
- Enter your MySQL database name: Enter the name of the database here.
- Do you wish to set up Nginx? Yes.
- Do you wish to set up SSL? Yes. It is recommended to have SSL. And Ghost CLI will install it very quickly.
- Enter your E-mail (For SSL Certificate): Enter your correct email as Let’s Encrypt will send you reminder when your SSL certificate is about to expire.
- Do you wish to set up Systemd? Yes.
- Do you want to start Ghost? Yes.
After the installation is done, You will get a message “Ghost was installed successfully! To complete setup of your publication, visit: https://yourwebsite.com/ghost”. Now, All that is remaining is creating an administrator account and start publishing!
Create an Administrator Account
It is very easy to create a first admin account in Ghost. To create one, Just navigate to the following URL.
https://yourdomain.com/ghost/
Note the /ghost at the end. You can use this URL to access your admin panel. Once you are there, You will have to enter the Blog name, Your Full name, Email address and password. Here is how it looks like for confirmation.
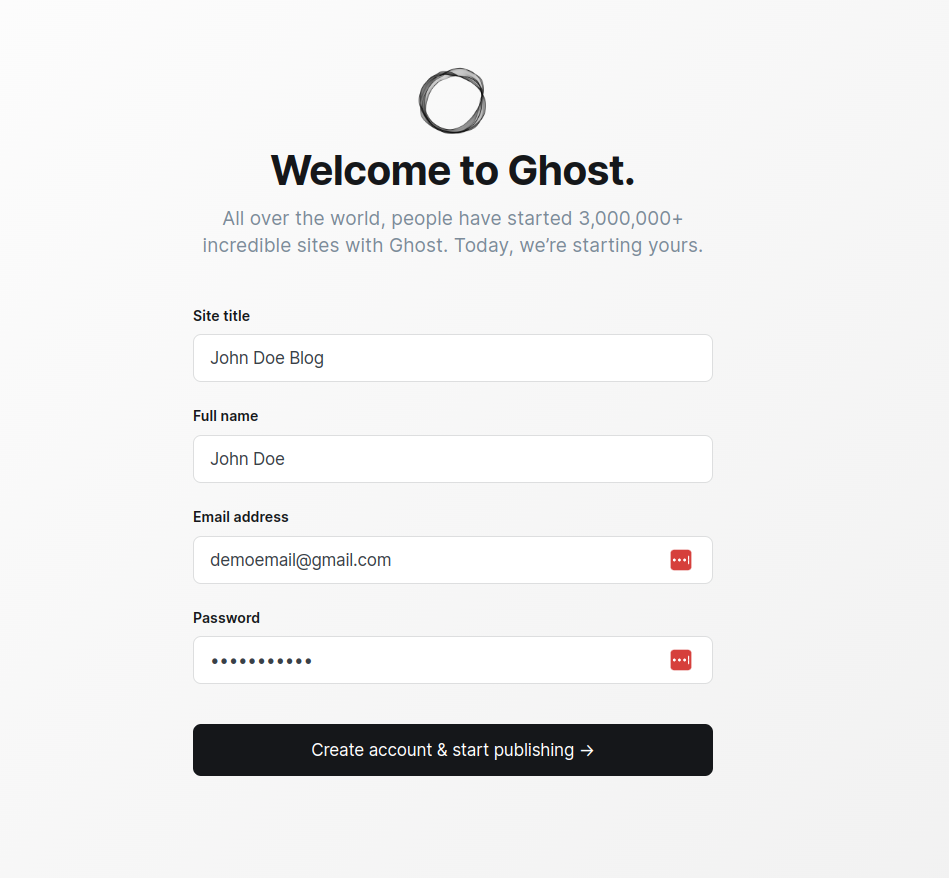
After entering the information in the form, Click on “Create account & start publishing”. It will redirect you to the administration panel of ghost. You can now start publishing or modifying your Ghost site!
Conclusion
Installing Ghost CMS on an Ubuntu server might seem like a complex process, but with the right steps, it becomes straightforward and manageable. Ghost’s minimalist design and focus on performance make it an ideal choice for content creators who want a simple, yet powerful platform. By following this guide, you’ve not only set up a robust content management system but also learned the foundational skills to manage your server and database. With your Ghost site up and running, you’re now ready to focus on what truly matters: creating and sharing great content with the world. Happy blogging!
If you have any questions or queries, Please feel free to let us know in the comment section given below. We are happy to help!
Related guides
Send a Custom Welcome Email Using Ghost
Learn how to automate welcome emails for new members on your Ghost site using Zapier.
GhostHow to Add Comments to Your Ghost Theme
Learn how to easily add comments to your Ghost theme. This guide covers the steps to enhance engagement and build a community around your content.
GhostHow to Add an Offer Banner in Ghost
Learn how to create an attractive offer banner in Ghost to promote special offers directly on your site.
GhostHow to Add Social Media Icons to Your Site in Ghost
Enhance your Ghost site by adding social media icons. Follow this step-by-step tutorial to integrate icons seamlessly, connect with your audience, and boost your site's...