
GICT knowledge base
How to Configure Custom Sticky Buttons in WordPress
Published
WordPress is one of the most popular CMS(Content Management System). It is powering millions of sites since the initial launch in 2003. With the help of WordPress, you can create websites that are fully responsive with all of your devices Like Smartphones, Laptops, etc. WordPress also allows you to create fully customized websites. WordPress also provides Features like Themes, External Plugins, database Interactions and much more.
There is no need for any technical knowledge for creating a website with WordPress. WordPress has a huge repository of free plugins and themes that allow you to improve the functionality and the look of your website. For instance, Let’s say you want custom sticky buttons on one edge of the site that redirects a visitor to your social media profiles. To acomplish this, WordPress repository has a plugin that allows you to create a customizable sticky buttons.
Let’s see one of the plugin’s detailed information like installation, Configuration, and its general settings. This tutorial is about one of the useful plugins called Sticky Side Buttons. With the use of this plugin, you can add side buttons with your customization and it also enables the Social Media buttons. Let’s see how we can easily install that plugin and configure it.
Install Sticky Side Buttons in WordPress
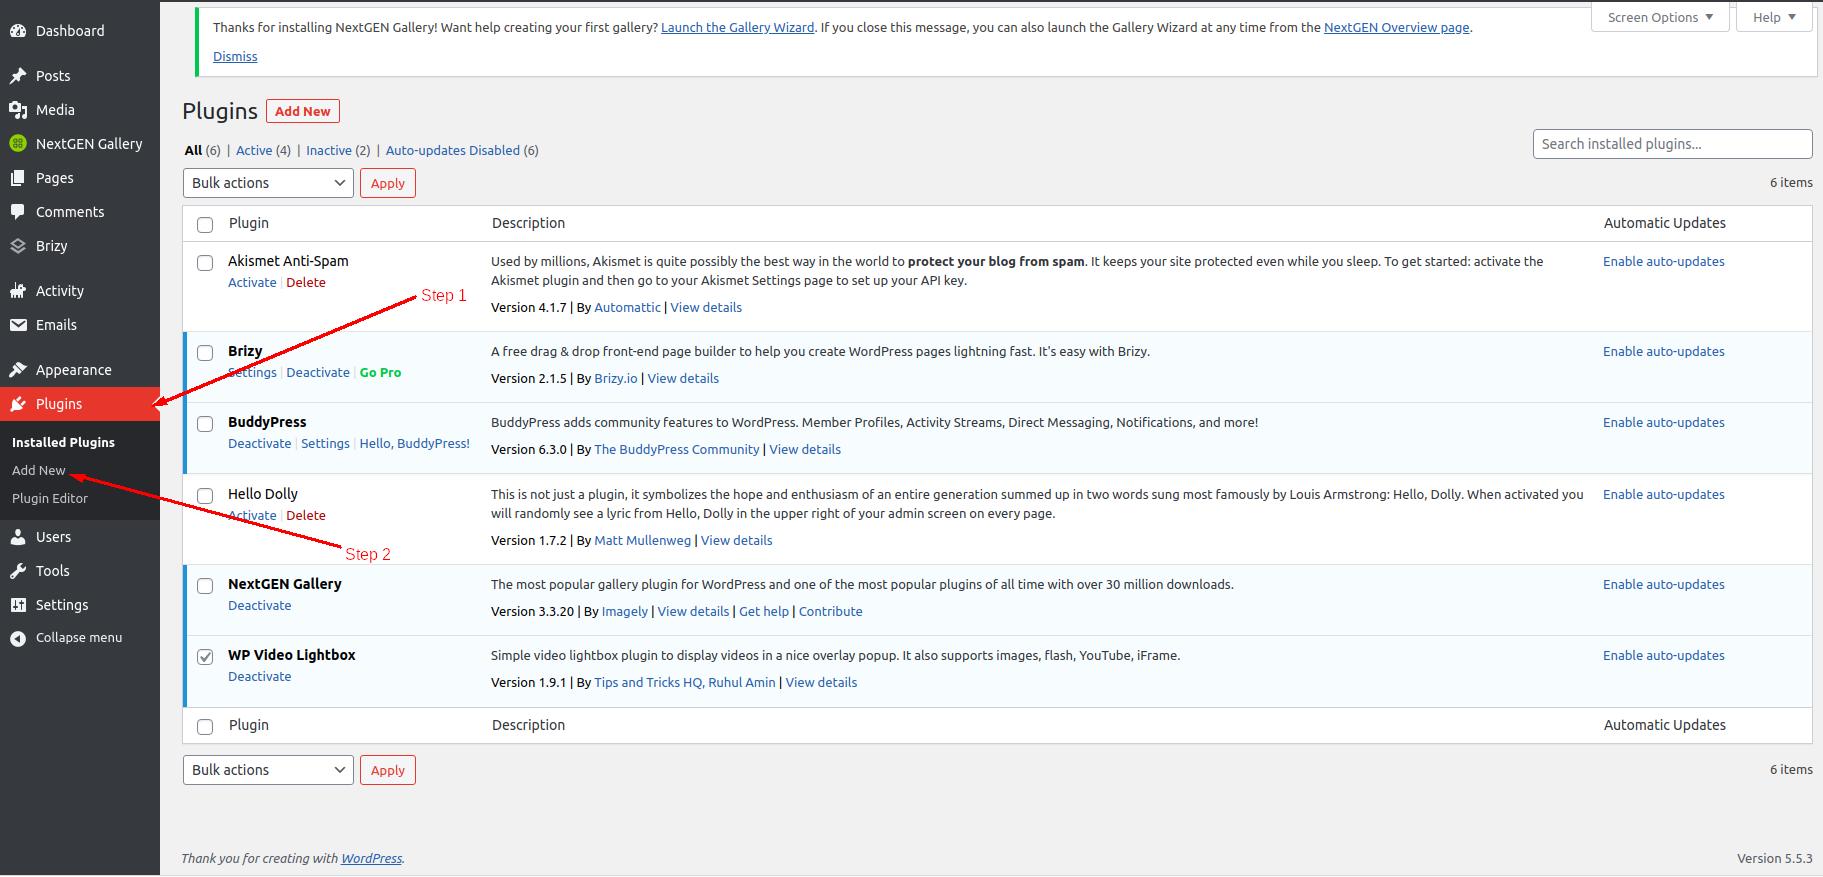
Step 1: Go to your WordPress Dashboard and Click on Plugins from the left sidebar.
Step 2: Now Click on ADD New tab to install a new plugin.
Step 3: Now Click on the Search TextBox and type “Sticky Side Buttons” just like the following image.
Step 4: Find the Plugin with the icon you can see in the image below.
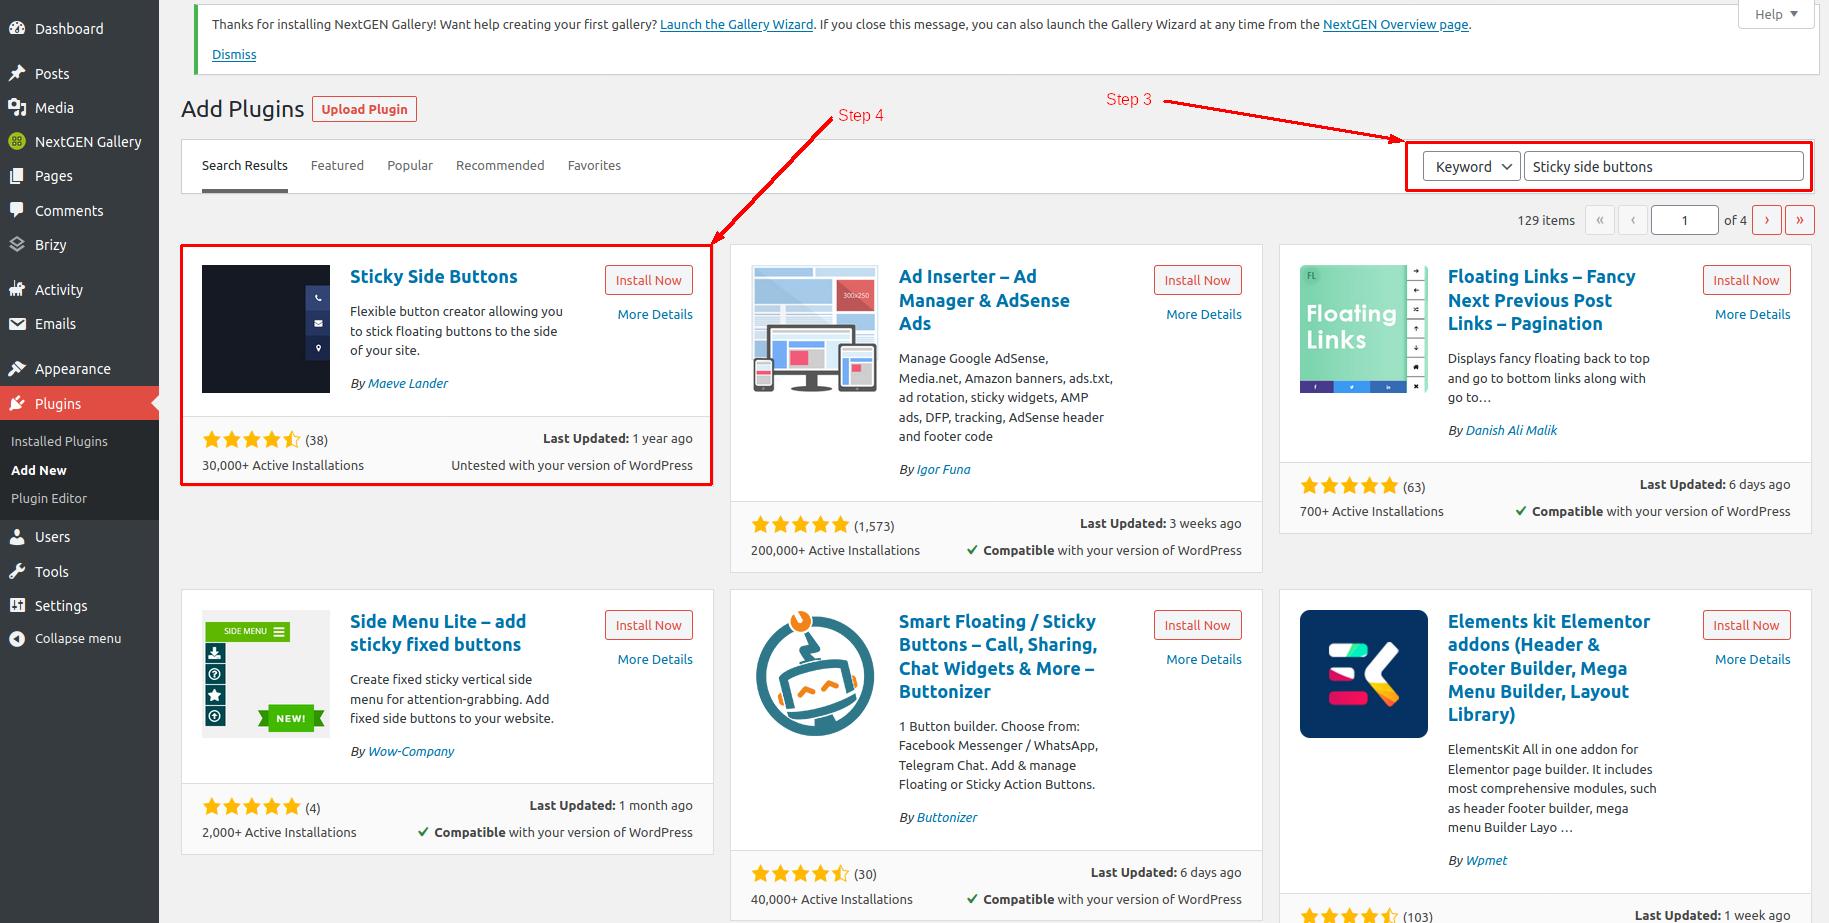
Step 5: Click on the “Install” button to install it.
Step 6: Once installed, click on the “Activate” button to activate the plugin.
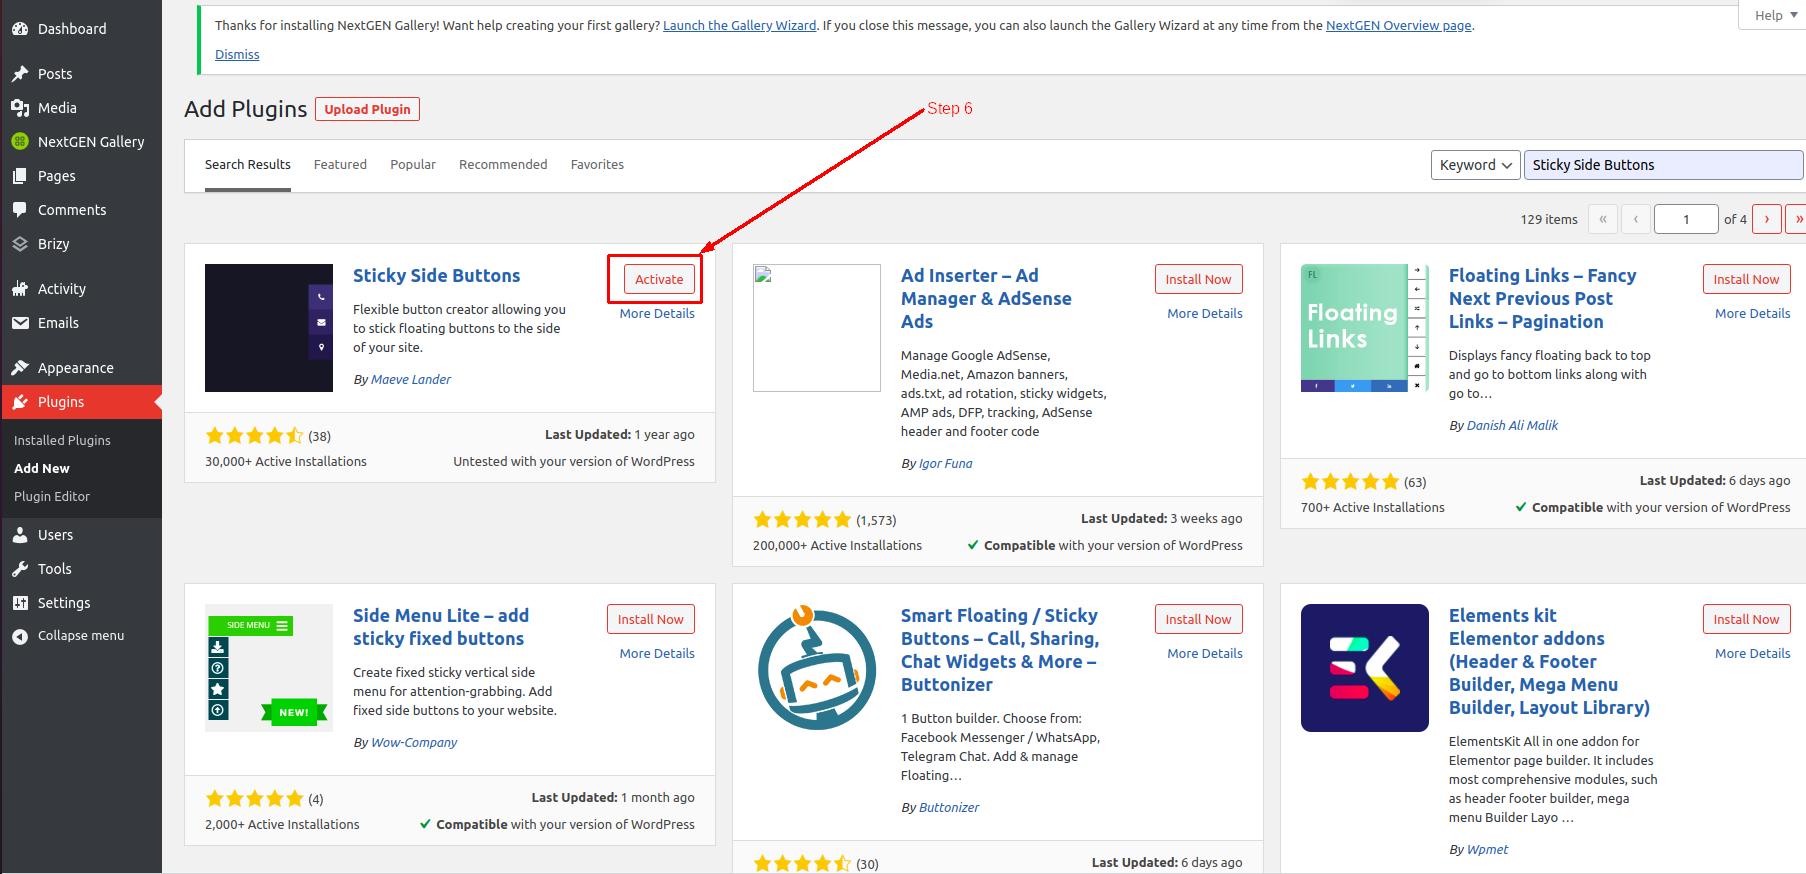
Step 7: The Activate button-click will bring you to the Installed Plugins Tab. You should see the Sticky Side Button Plugin in the list.
Pro Tip: Click on the “Enable auto-updates” buttons for the plugins you want to update automatically.
How to use Sticky Side buttons in WordPress
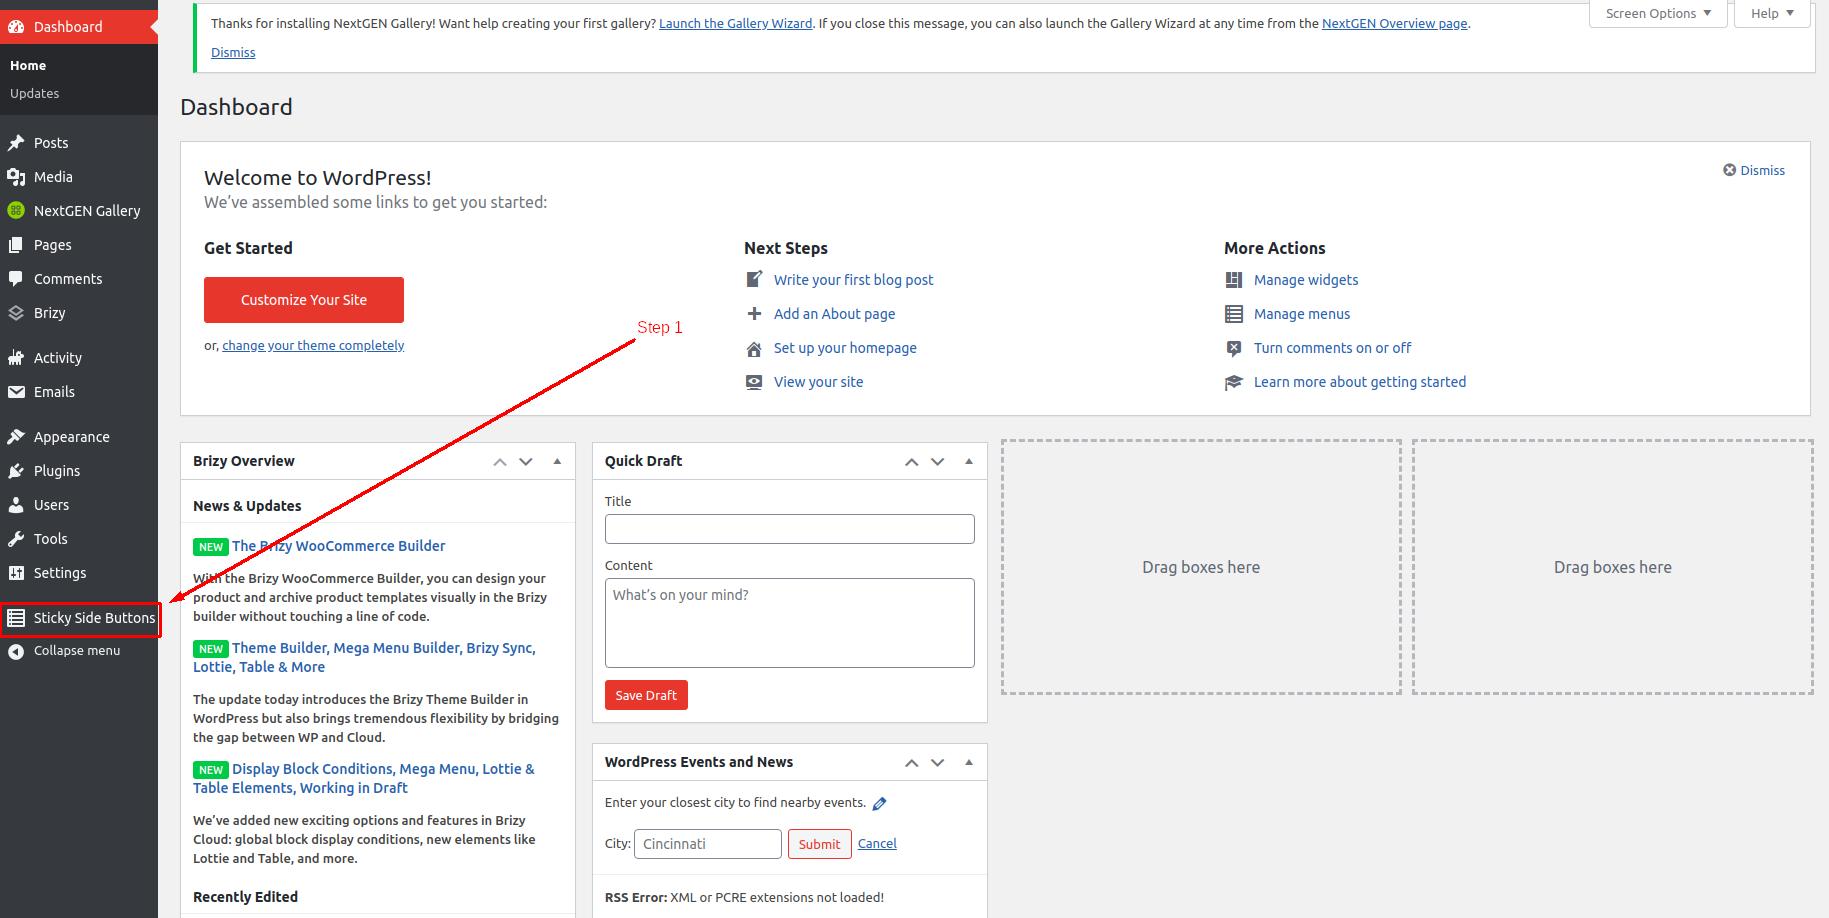
Step 1: First of all, Log in to the admin panel of your WordPress side. From the left sidebar, click on the “Sticky side buttons” option.
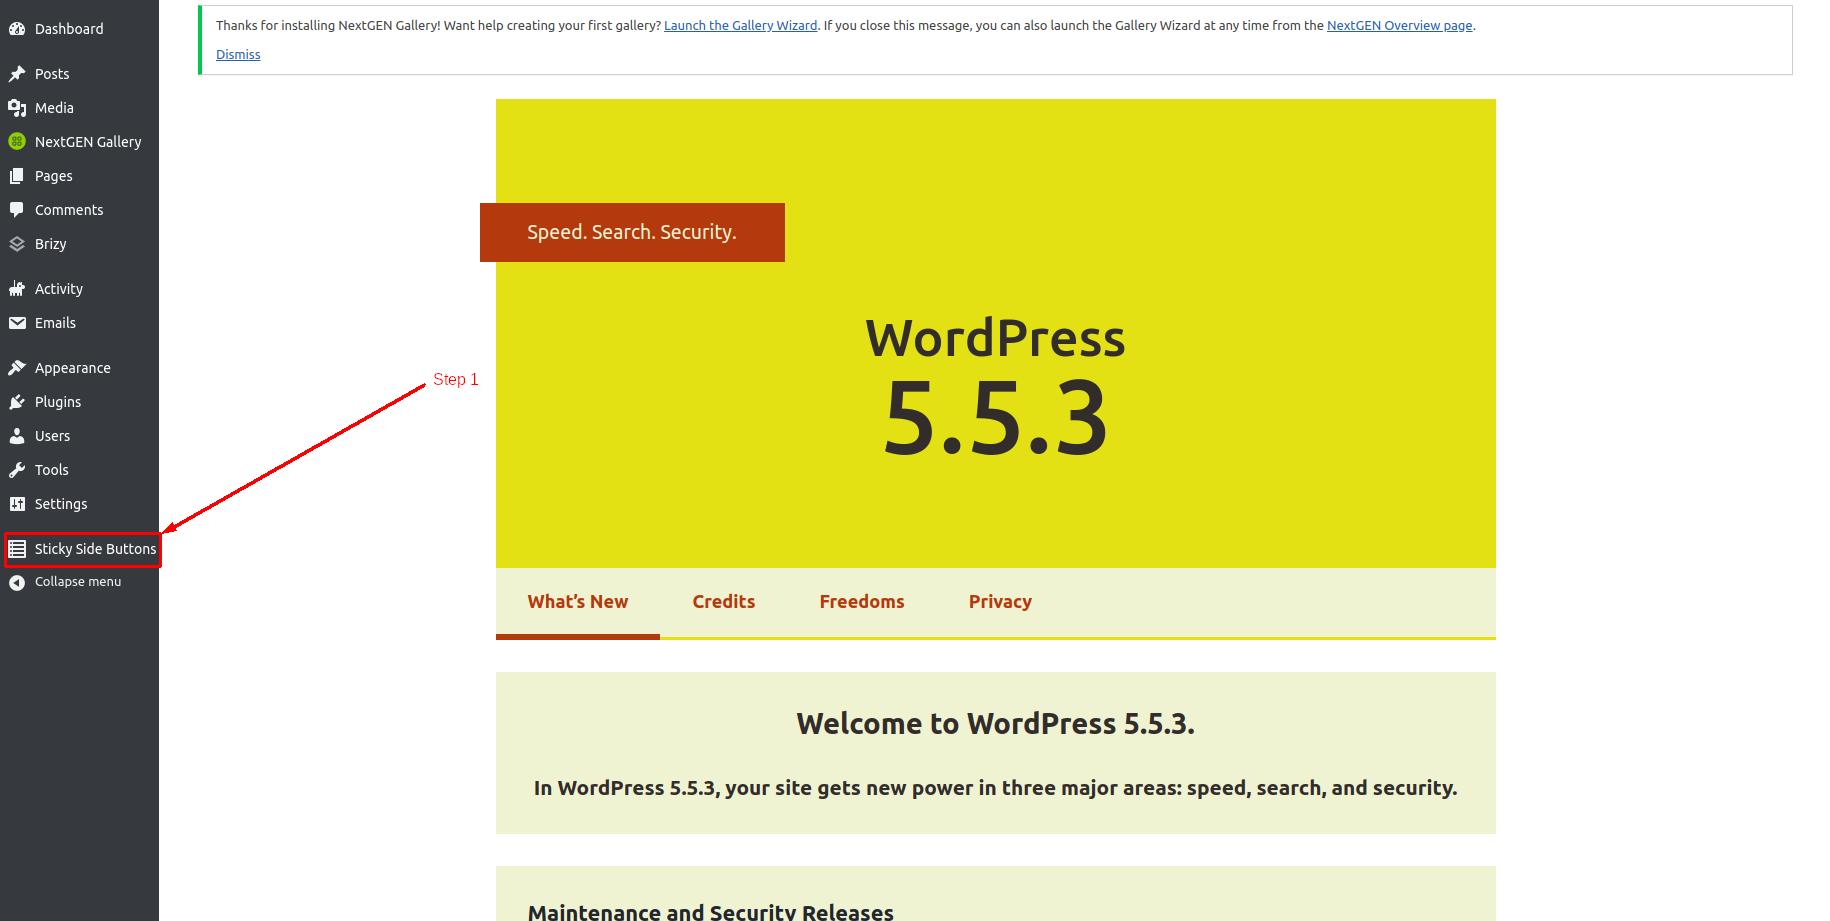
Step 2: The Click will take you to the page that should look similar to the following image.
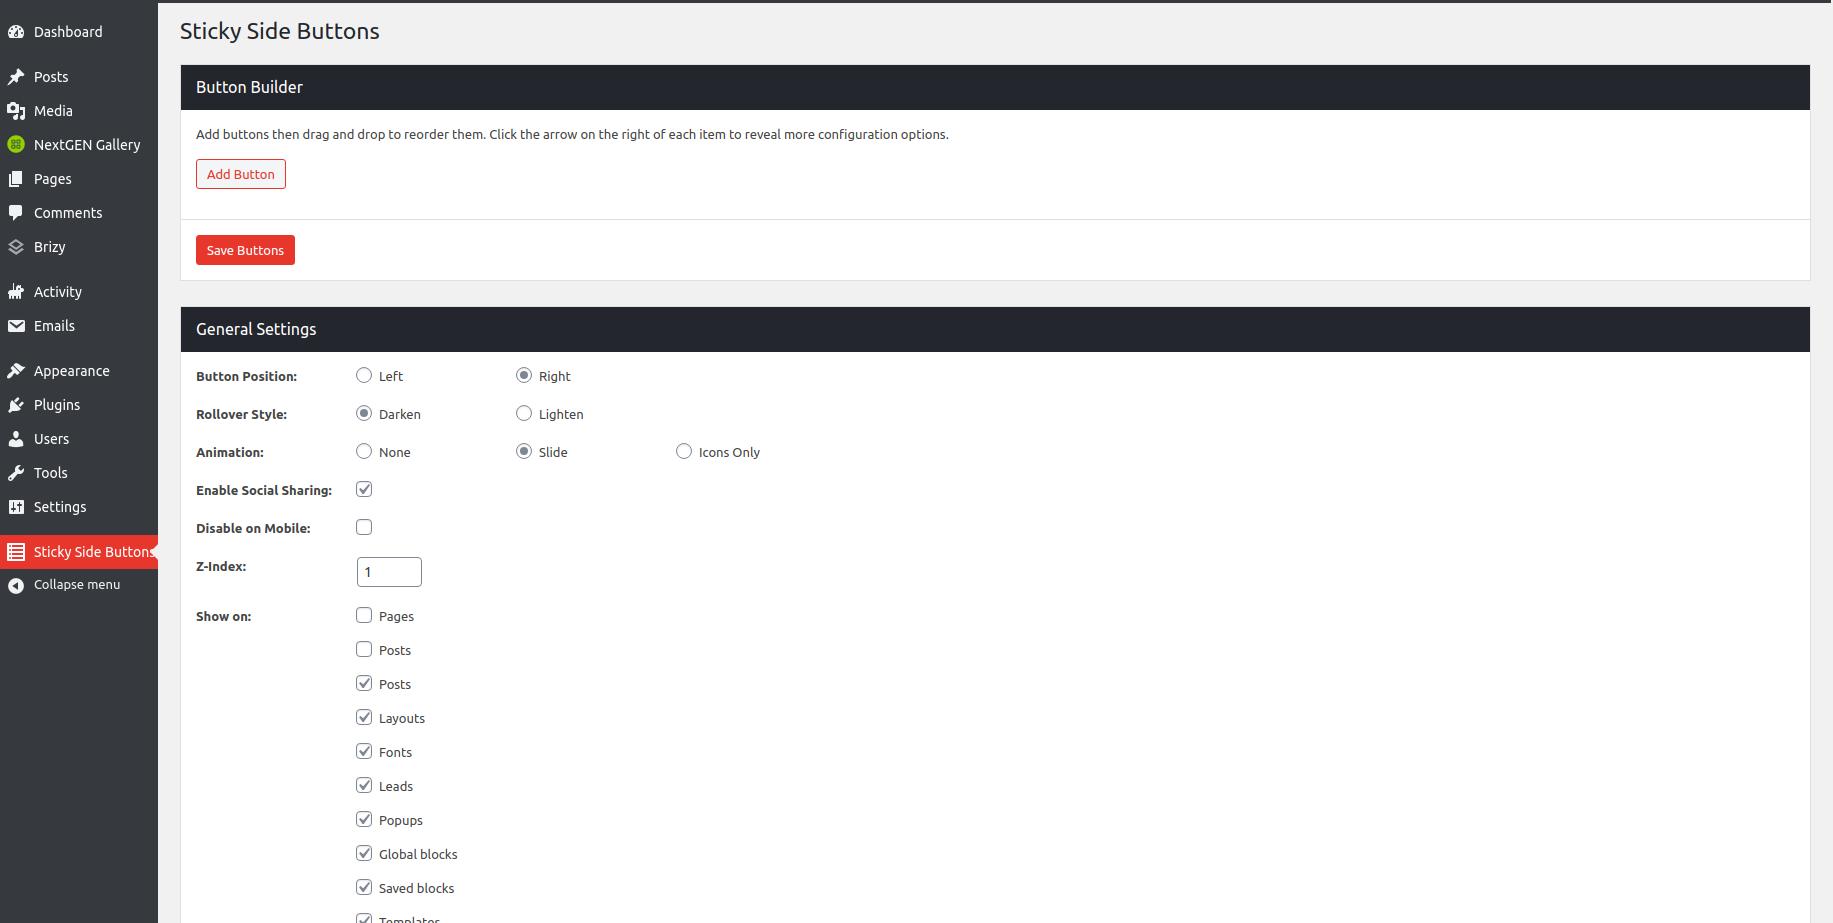
The “Sticky Side Buttons” is a simple plugin with one page containing two sections called Button builder and general settings. In this section, we will see how to add and modify buttons in the pallete. In the next section, we will see the general settings section of the plugin.
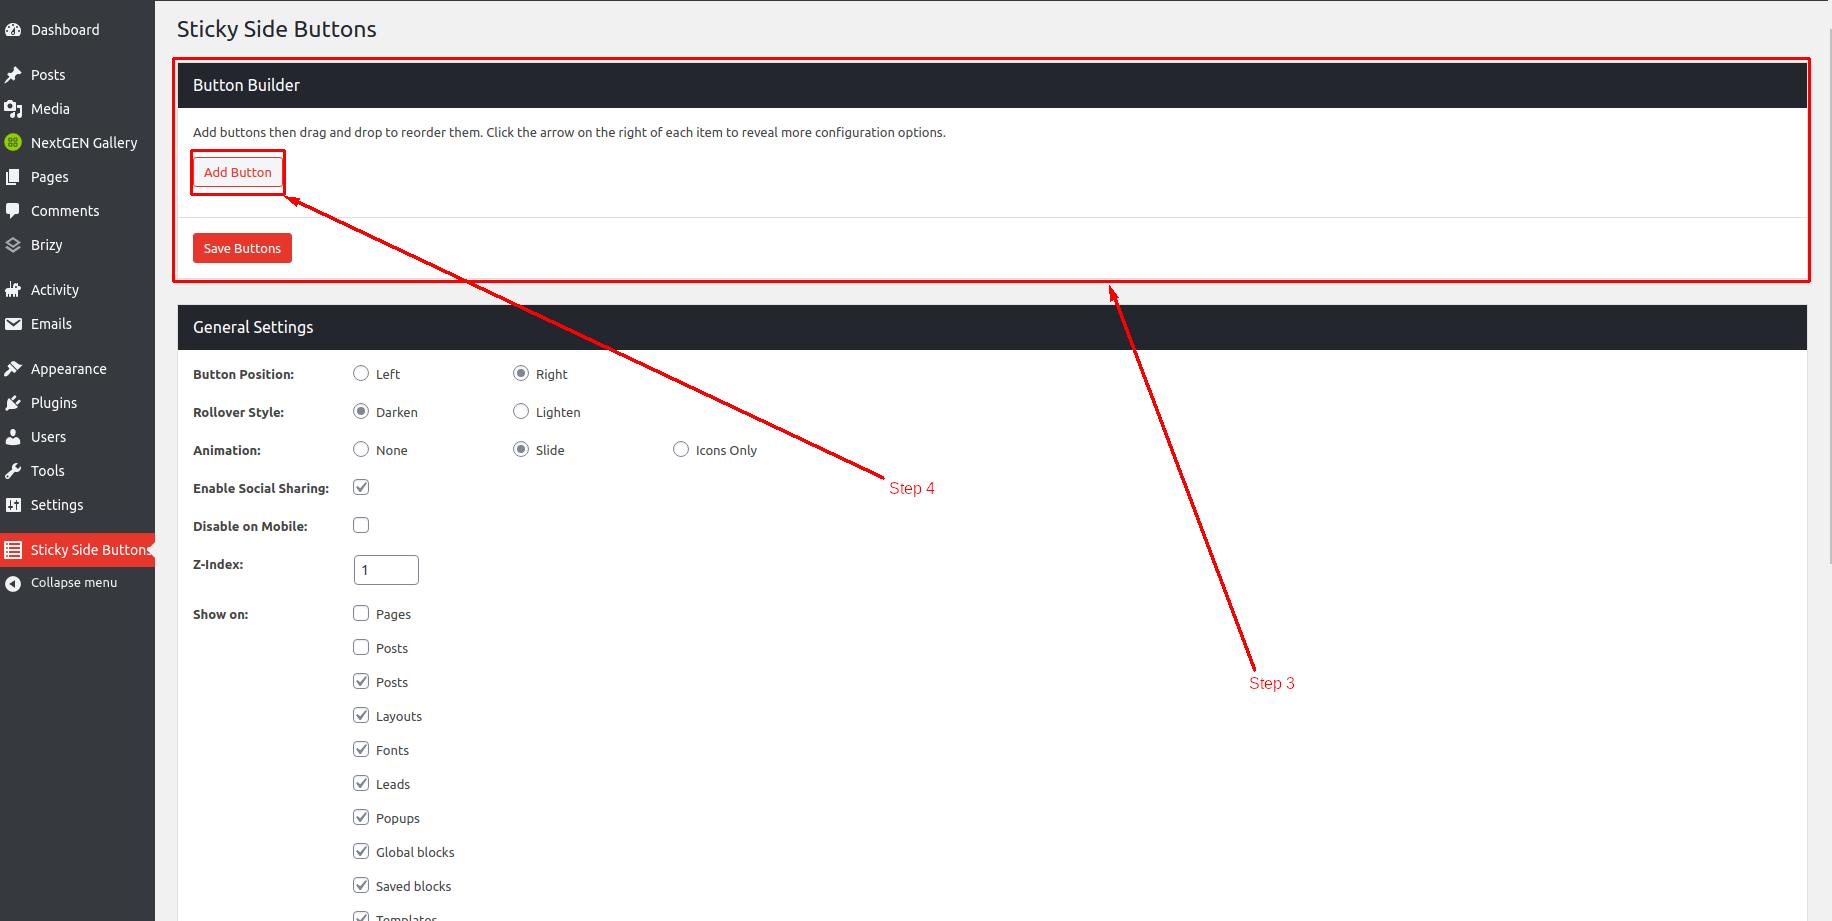
Step 3: Now there is a section called Button Builder. This section allows you to create and manage sticky side buttons.
Step 4: To create a new button, click on the “Add Button” button. See the following screenshot for reference.
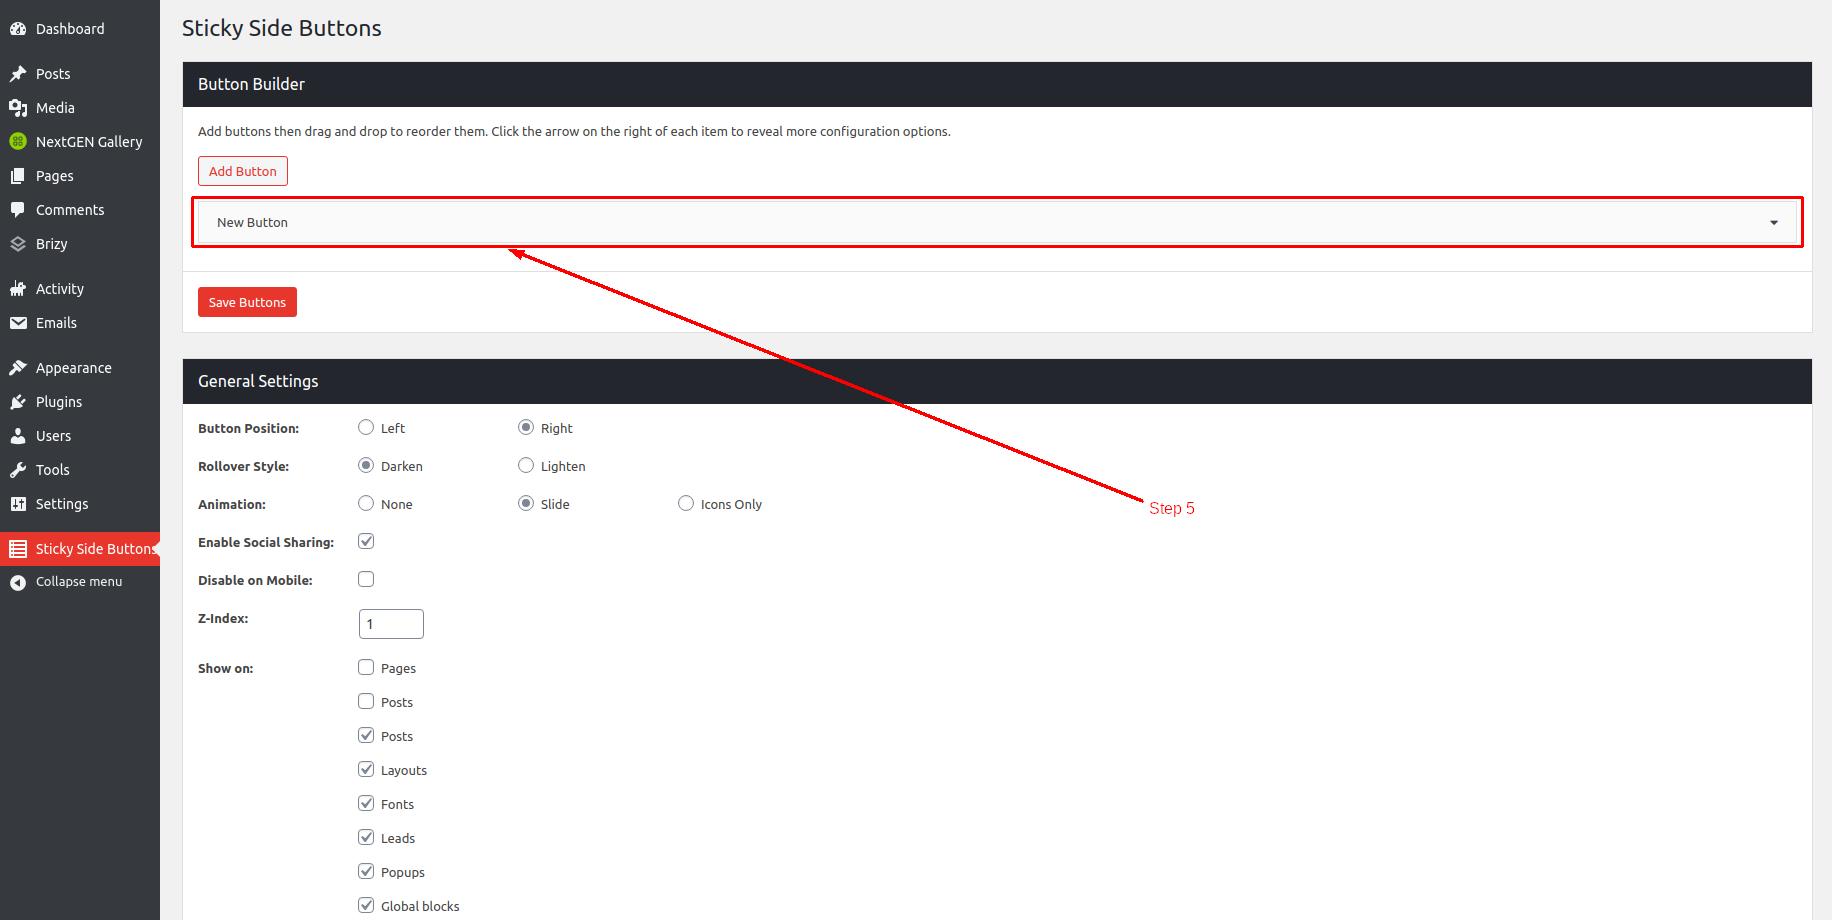
Step 5: Now Click on the New Button Tab to Expand the tab and see options available to create a custom button.
Step 6:Now After Clicking the New Button Tab you will see Two blocks. You can see the blocks in the below image.
Let’s go into the brief.
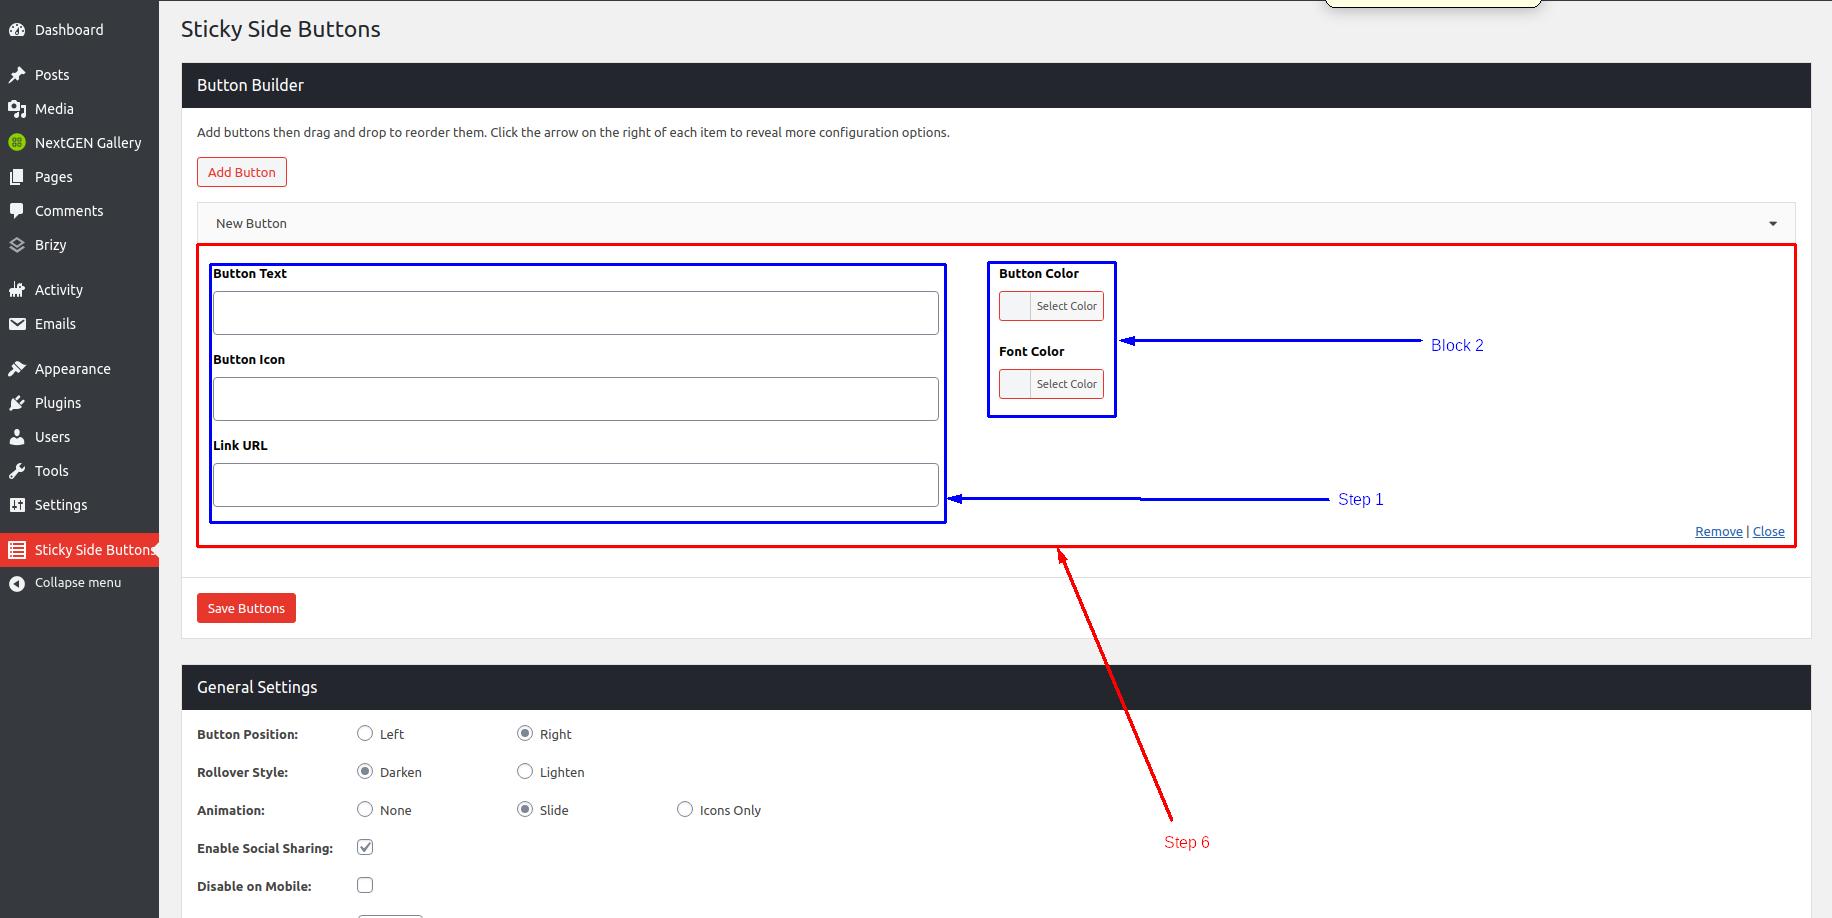
Block 1: Block 1 is for the button configuration. It allows you to set the button text, icon and target link for your button.
Block 1 – Step 1: Now you can see First TextBox as Button Text. Just click on the Textbox and type the name for the button. In this example, I want to create a button for Email.
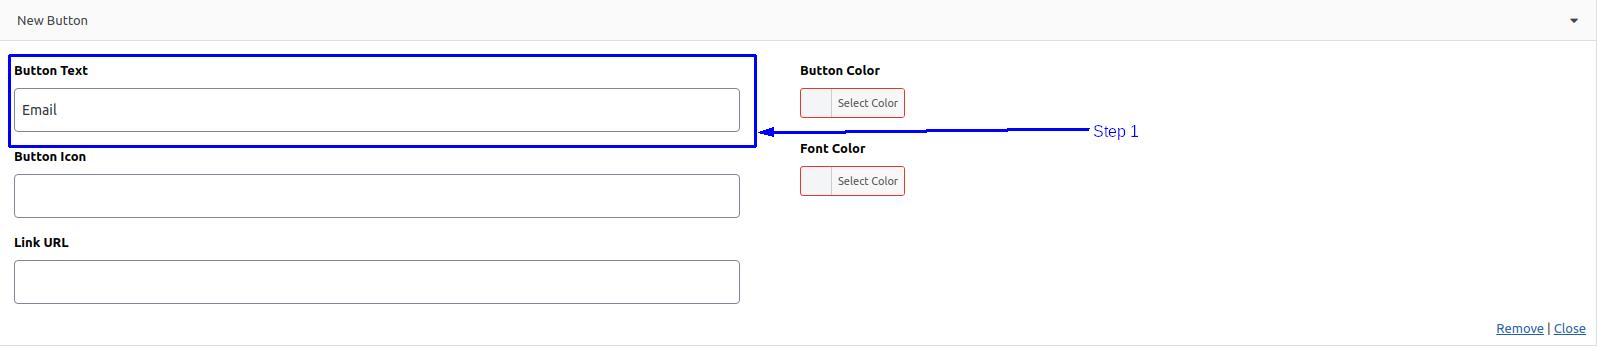
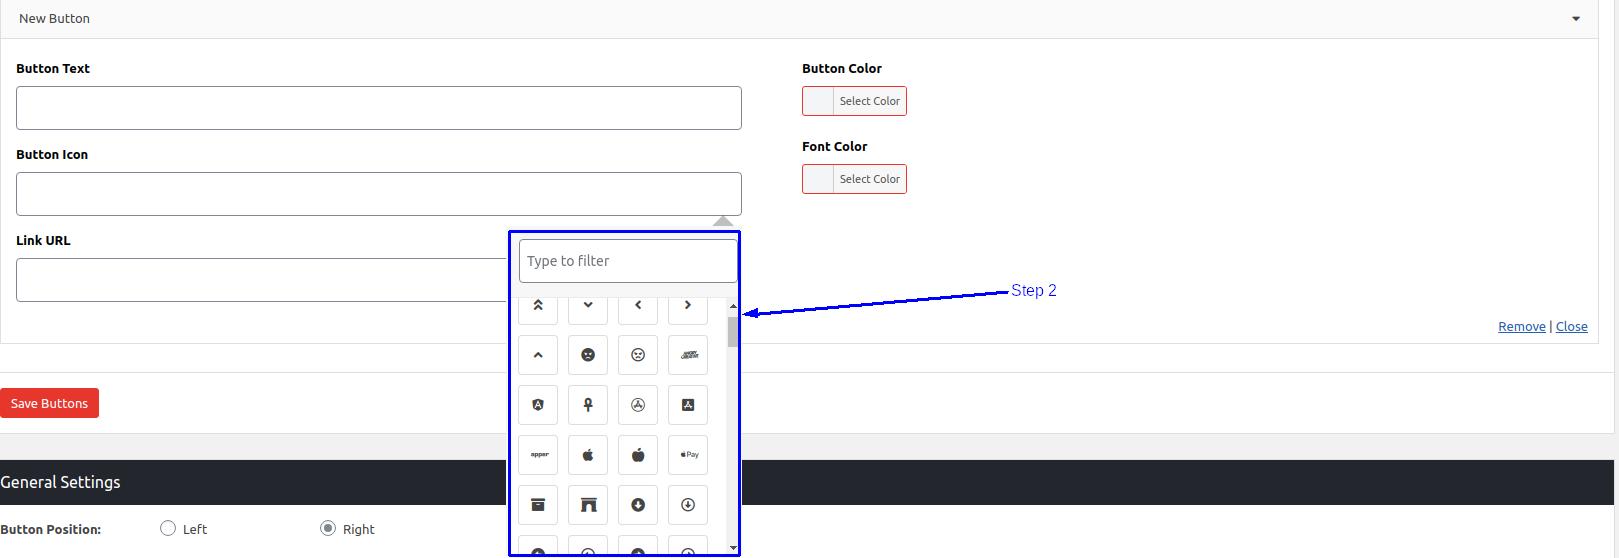
Block 1 – Step 2: Now see the Second Textbox as Button Icon. This Textbox is used to set Icons to the buttons. To set the icon on the button click on the Textbox and Another box will pop-up. You can see the pop-up box in the below image. Choose a Suitable Icon for your button.
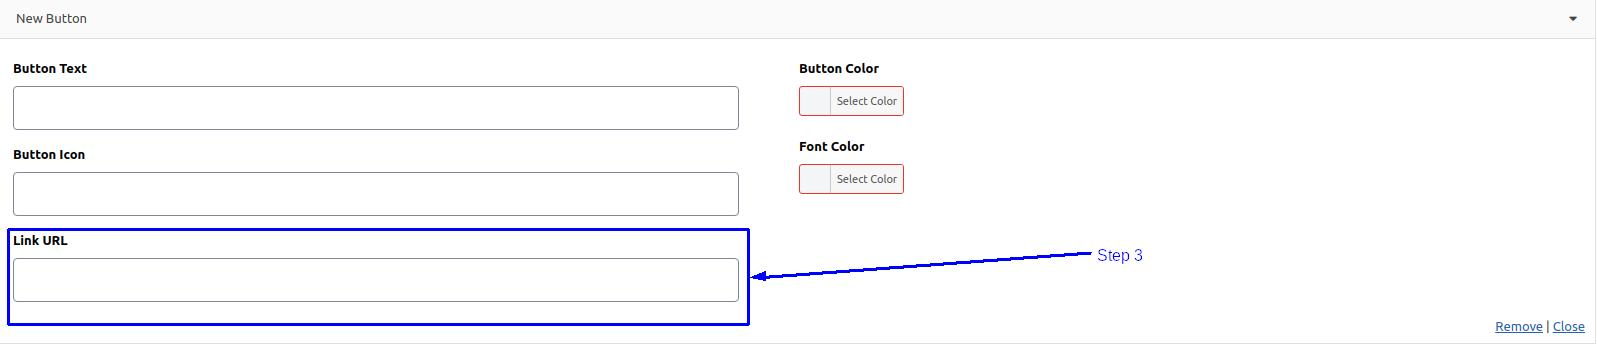
Block 1 – Step 3: now as you can see the third Textbox Named as Link URL. Just Click on the Textbox and type the Address of the page URL which you want to redirect on click. In this case, we can create an E-mail link similar to “mailto:[email protected]”.
Block 2: This section allows you to Customize your button color and your font color. There is another Checkbox available in this Block. Let’s see how we can change the appearance of the buttons.
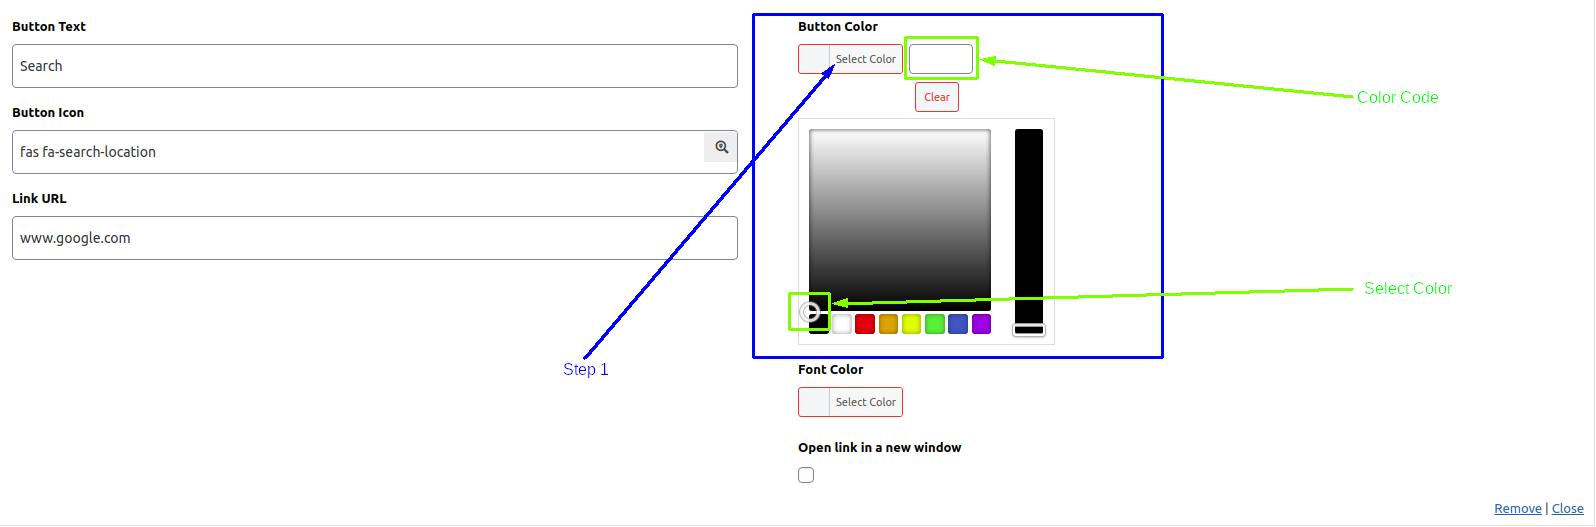
Block 2 – Step 1: You can see a Button named Button Color. The below image will make it easier to find the Block and the Button. Click on the button Select Color to choose the color for your button.
When you click on the button one ColorBox will pop-up as you can see in the image below. Besides the Select color button, there is a box available that allows us to type the color code if you want top set the specific color. It’s not necessary to know the color codes to select the color. The Circle which you can see in the below image is just for fades. Adjust this Circle as per your requirements and select the color you want.
Block 2 – Step 2: Now the second button is to select the Font Color. Use the the same color selector or a color code to set the font color.
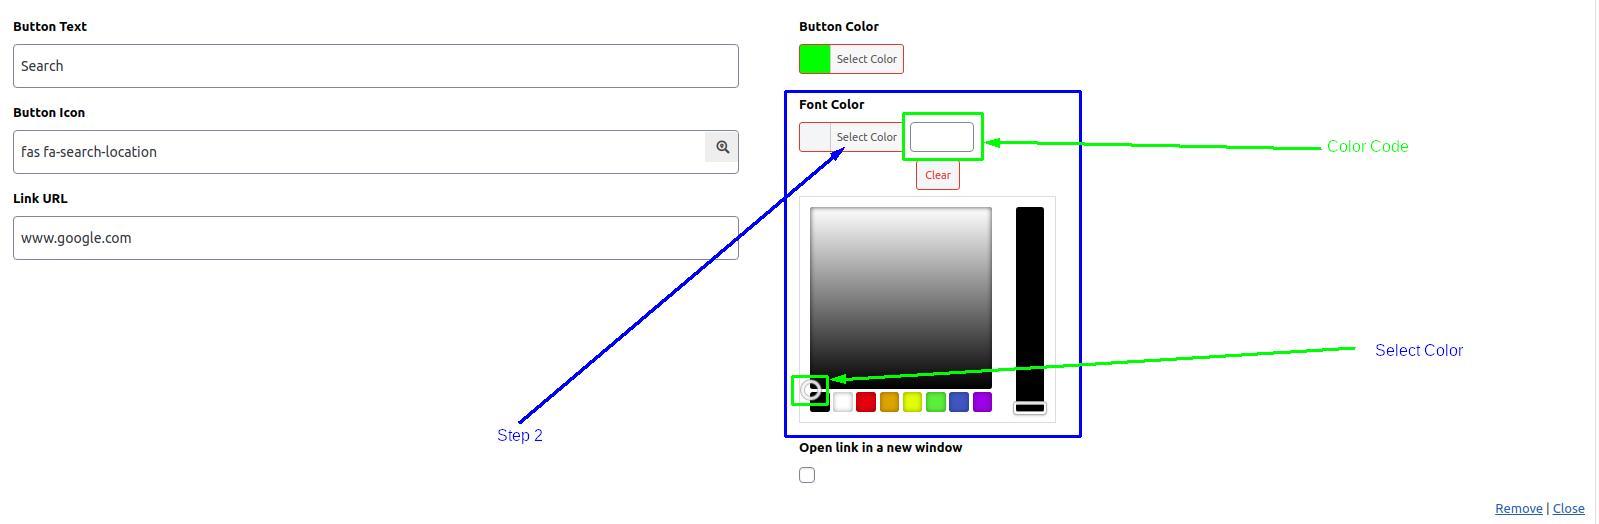
Block 2 – Step 3: In the last step, you can see a check box with the text “Open link in new window” which means if you check this checkbox True or Yes, The user will bedirected to this link in New Window of user’s Browser. But if the Checkbox is False then this link will work in the same window.

Step 7: Next, in the Right-Block-Corner find the link named Remove | Close. When you click on the Remove link, it will Delete the Button and its Configuration. Use this link when you want to delete the Button. The second Link is Close means when you click on this link it will close the button-Setting Tab with Discard all Current Changes in the button settings.
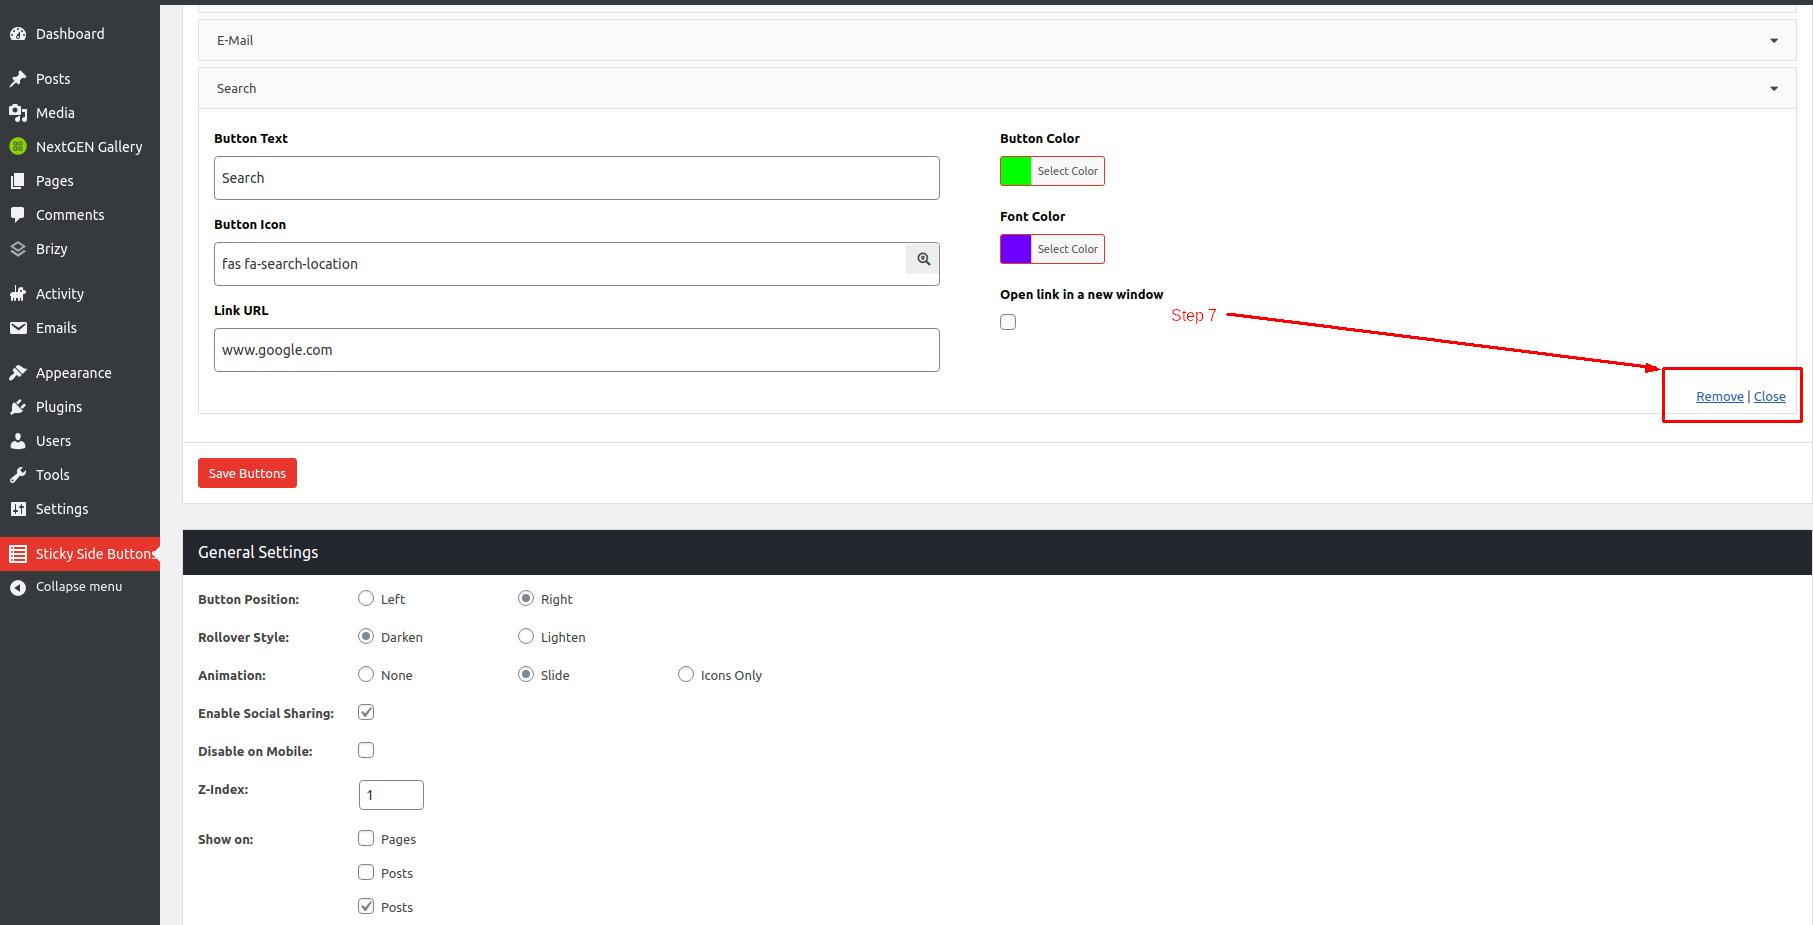
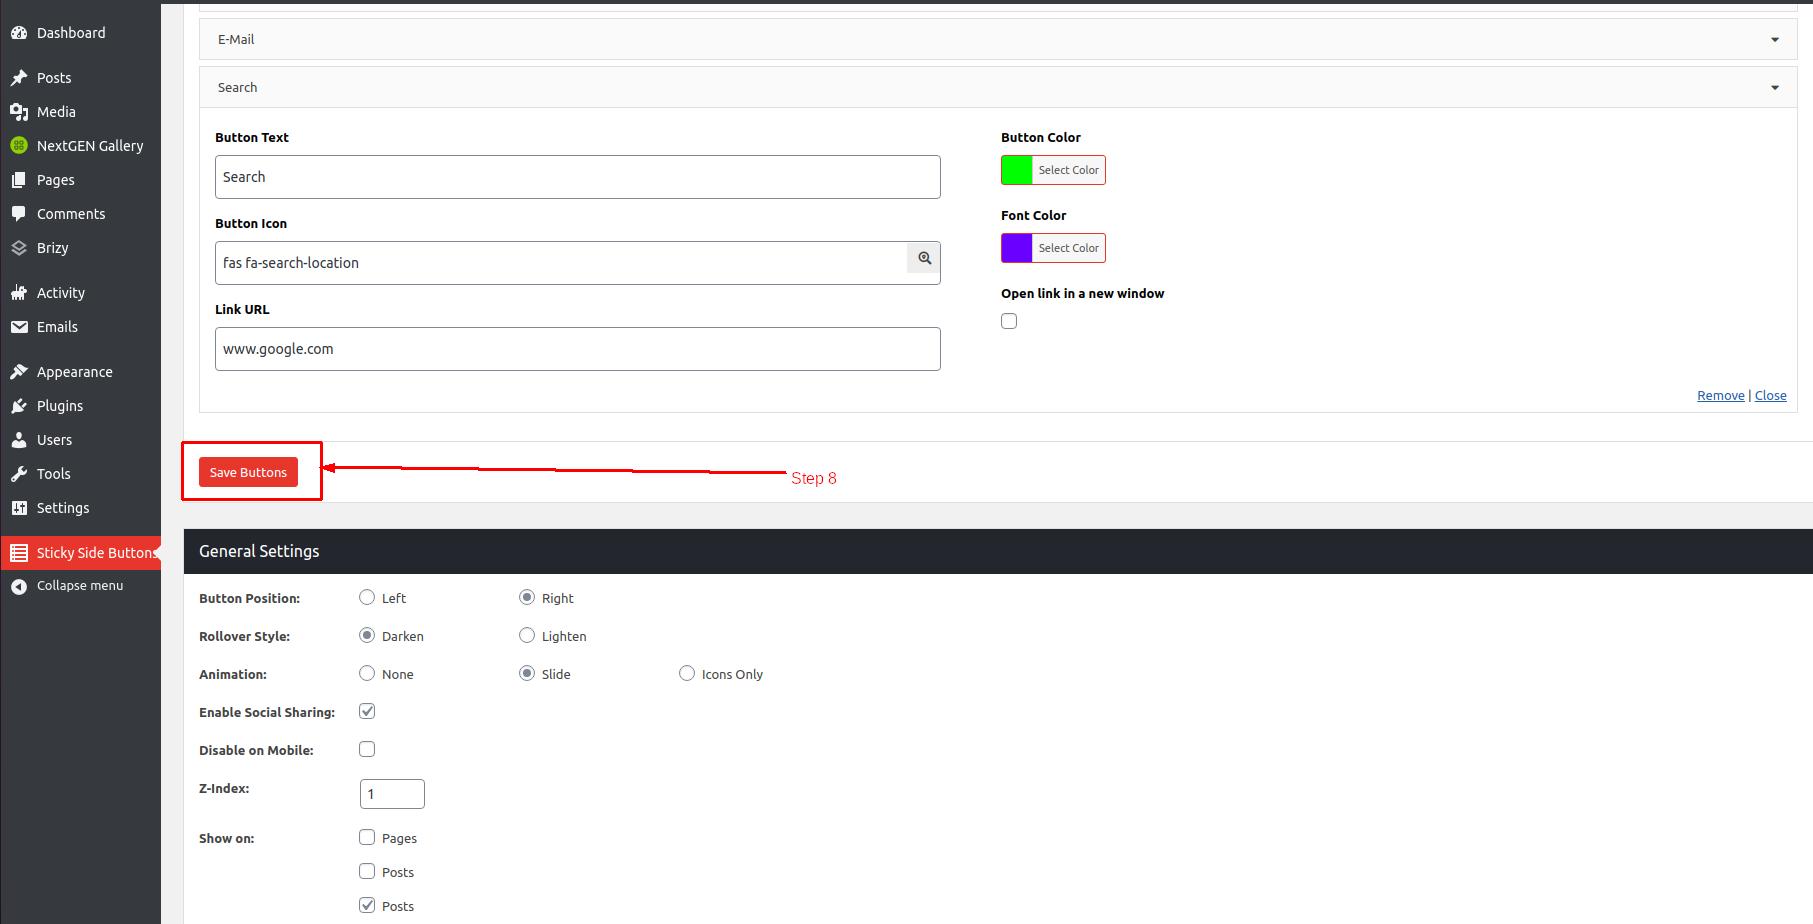
Step 8: Click on the Save Button button to save the buttons and their configurations.
The process for adding buttons on Sticky Side Buttons is very easy, you can add as many buttons as you want in a few steps. You can also use your creativity and create something unique on your website. As we know the how we can add buttons for Sticky Side Buttons with your own customizations. There are many more plugins that are just ready to use.
General Settings for Sticky side buttons
This Sticky Side Buttons plugin has its General settings Like Its position, Style, Smartphone Settings, etc.
Let’s see the settings in brief.
Step 1: Go to your WordPress Dashboard. Click on the Sticky Side Buttons tab which available on the left side of your display.
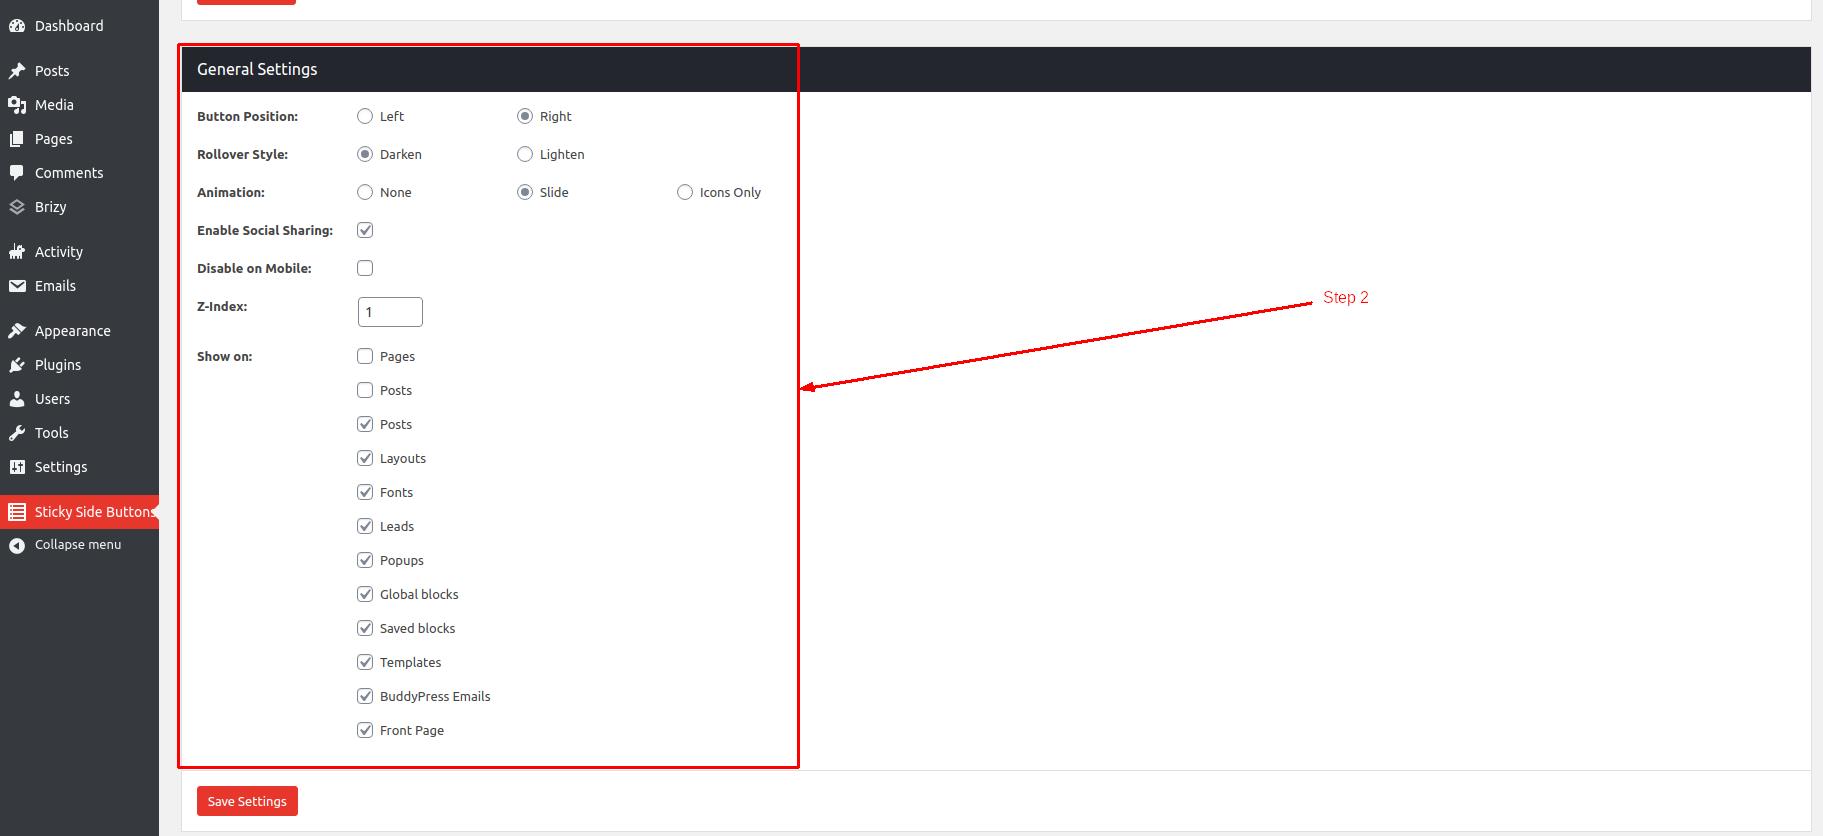
Step 2: Now the click will take you to the Sticky Side Button Settings. Scroll-Down And Find General Setting Section as you can see in the image below.
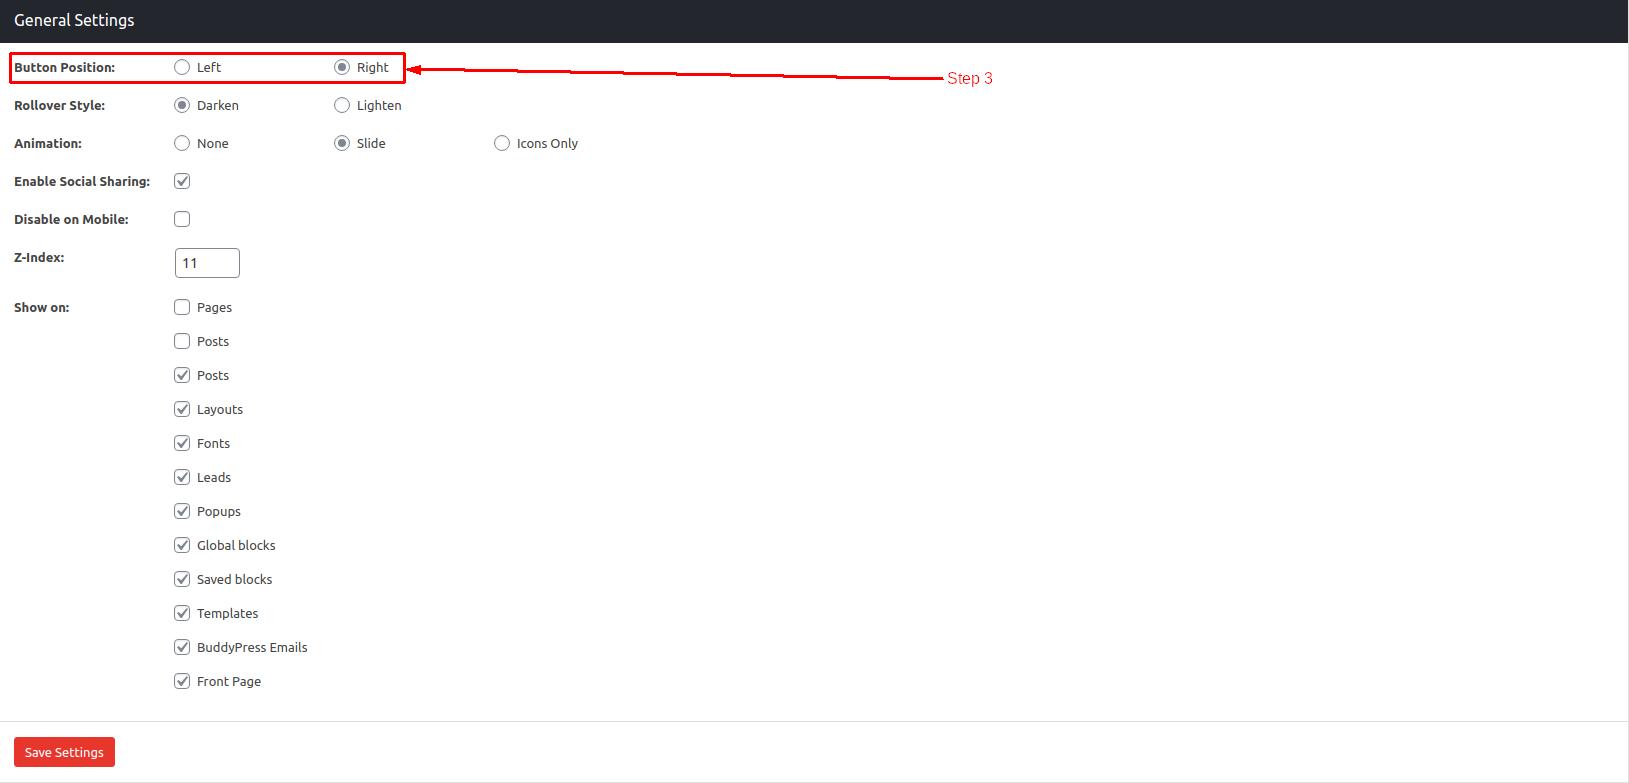
Step 3: The First setting is for Button Position. See the Image below, There are 2 Radio Buttons available in this setting. You can Only Choose 1 Button. There are 2 Options which side do you want your buttons on. If you choose Left, the buttons will display on the left side of your site. The default setting is the Right Side.
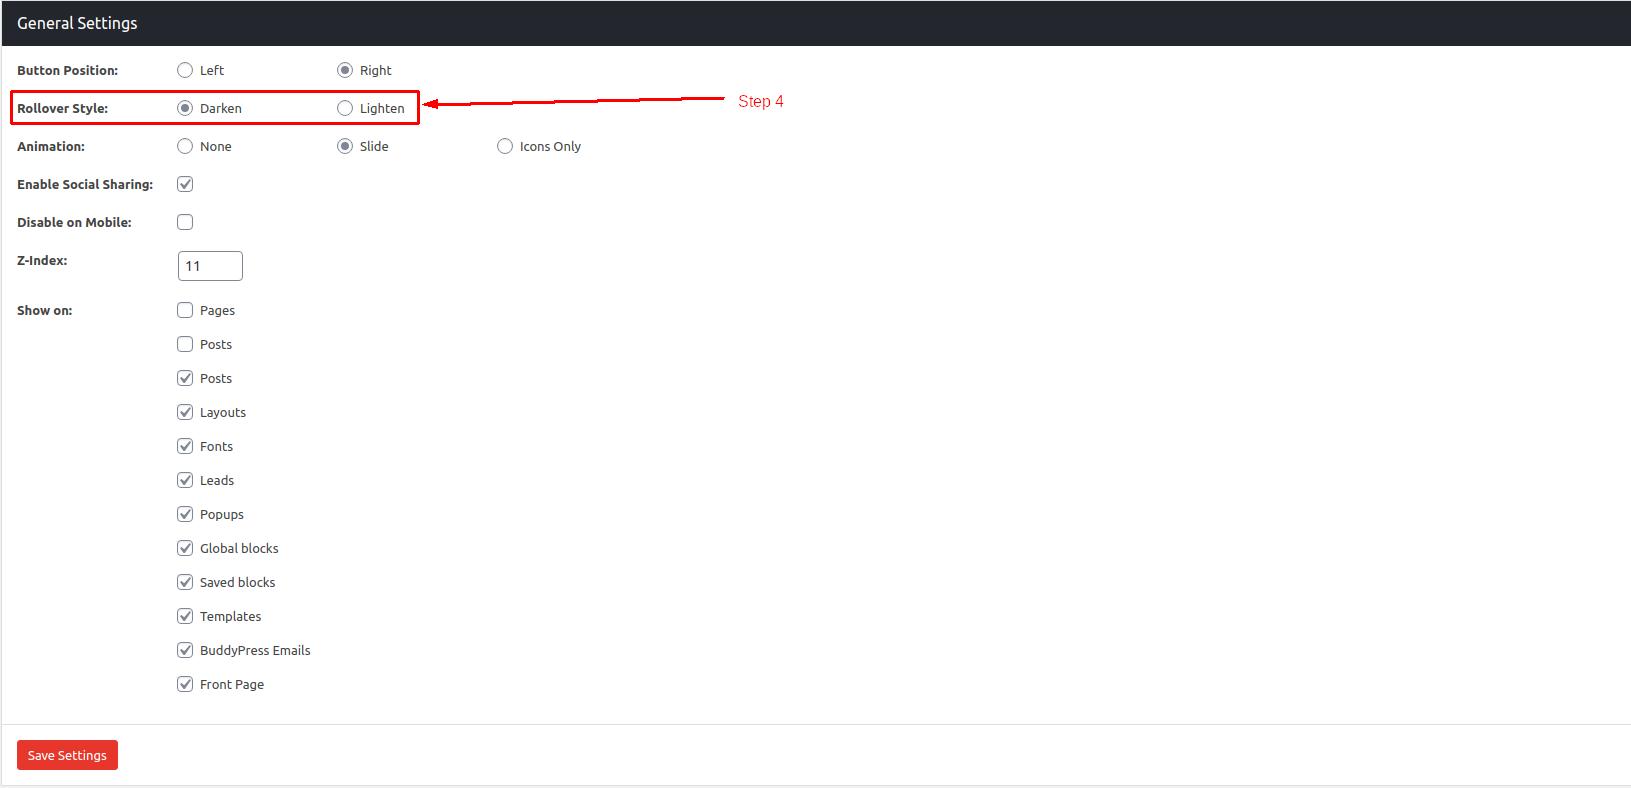
Step 4: The second setting is the Rollover Style. It means the Effect after you move your mouse pointer on this button. There are also 2 options as you can see below image. Choose which effect you want on your website. Darken Means When you take your pointer on this button the button will look in Dark Style.
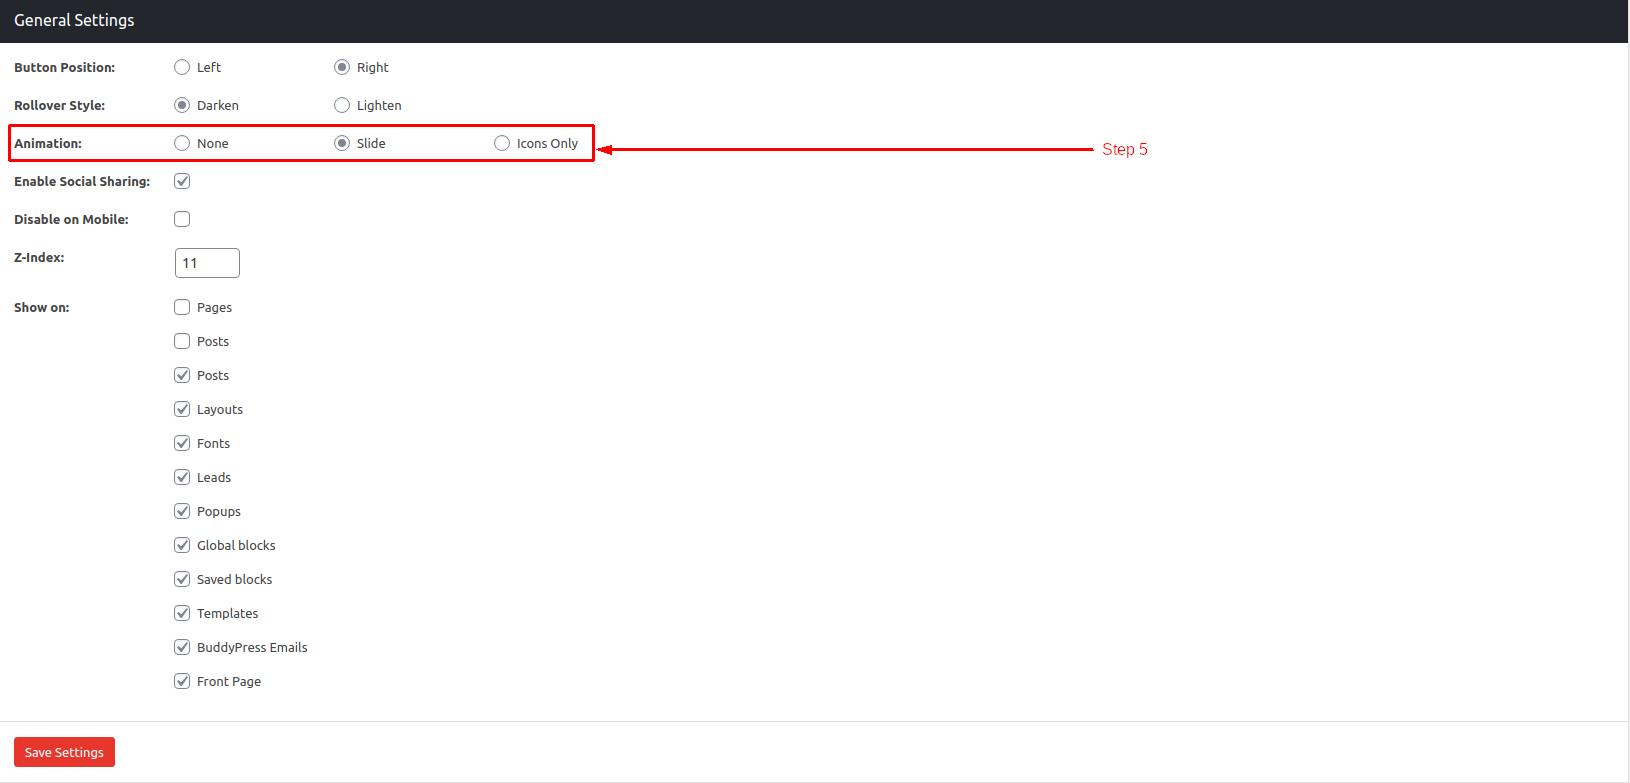
Step 5: The Third setting is Animations. This setting allows you to choose Animations on your Sticky Side Buttons. There are 3 options in this setting. The default setting is Slide means when you take your mouse pointer to the Buttons the button will Slide-out. Select none to avoid animations and select Icons-Only for Only icons.
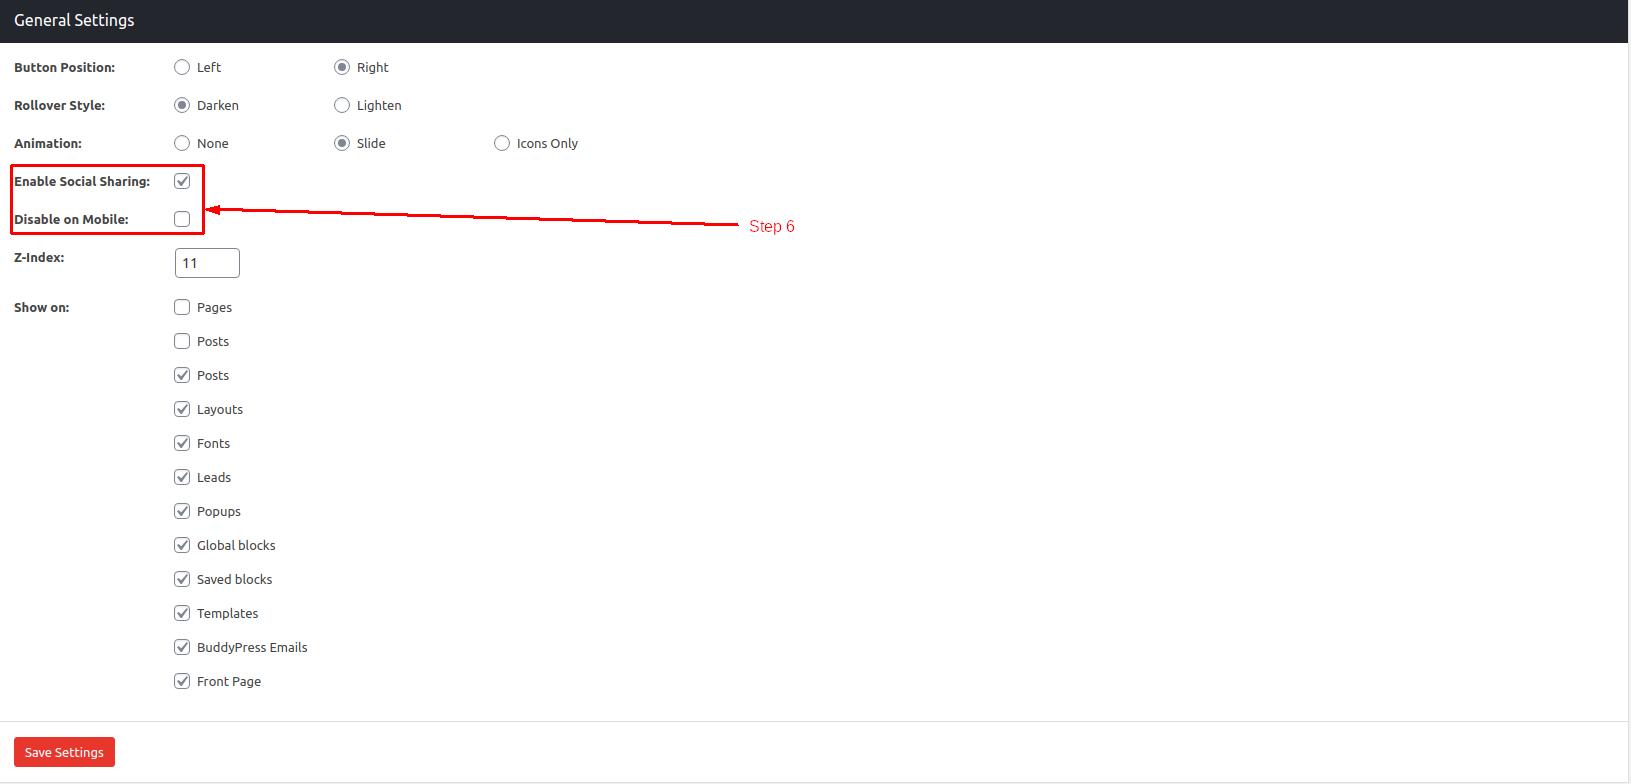
Step 6: The next settings are Enable Social Sharing and Disable On Mobile. Enable Social Sharing means with your customized buttons of Sticky Side Buttons, you can Enable the Social media Buttons which are already created and ready to use. You don’t need to create Social Media Sharing Buttons just check the Checkbox True to Enable the Social buttons.
If you want to disable the buttons on mobile screen, check the “Disable on Mobile” checkbox. That’s all.
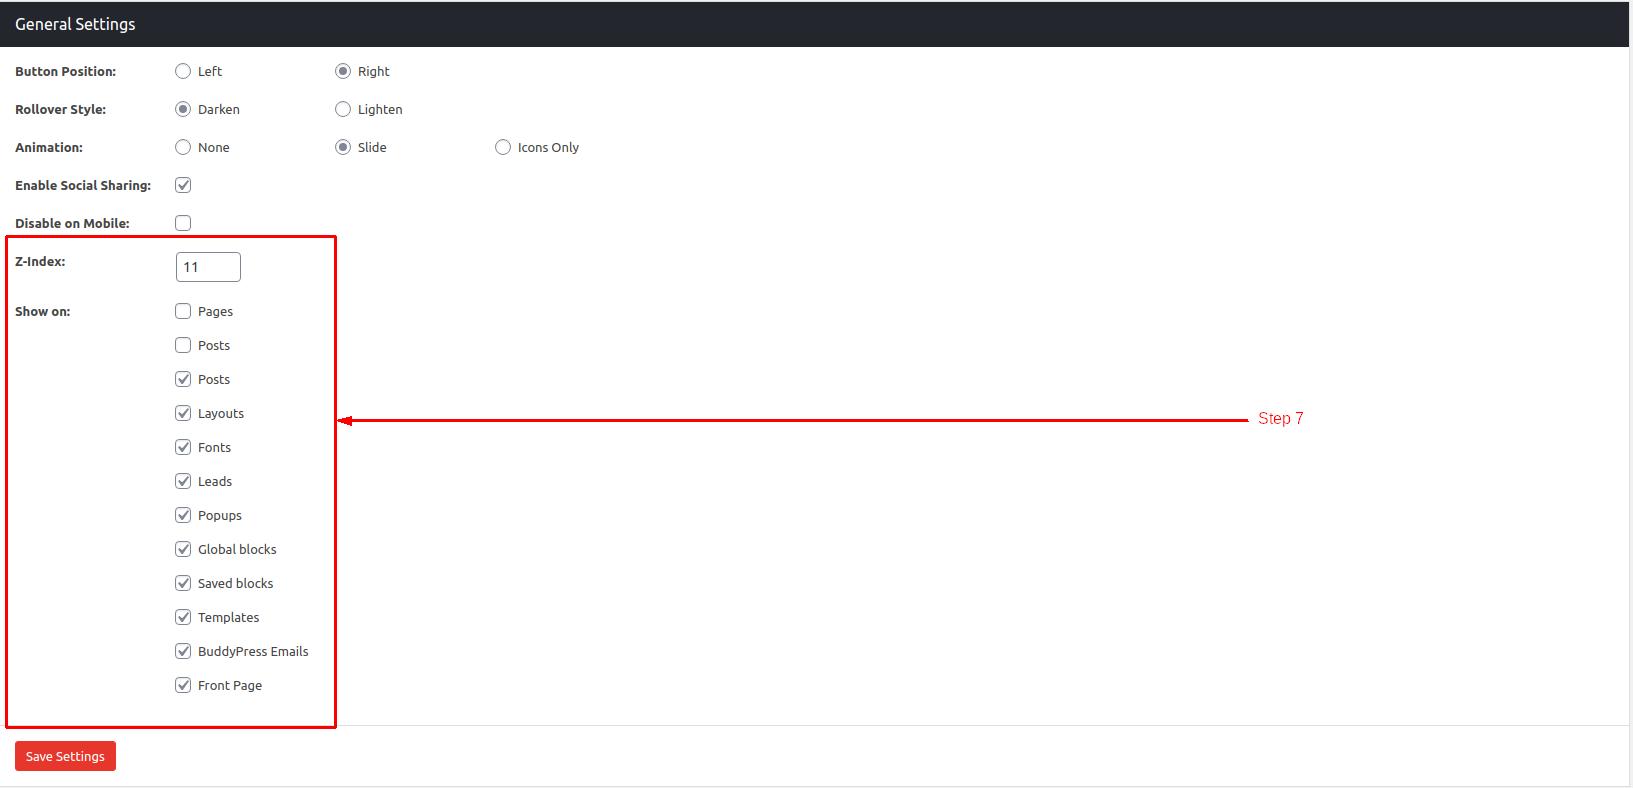
Step 7: The last settings are mostly true and if you want to disable the settings just Uncheck the Checkboxes. These options allows you control where to display the custom sticky buttons in WordPress. Check and uncheck the boxes as per your requirment.
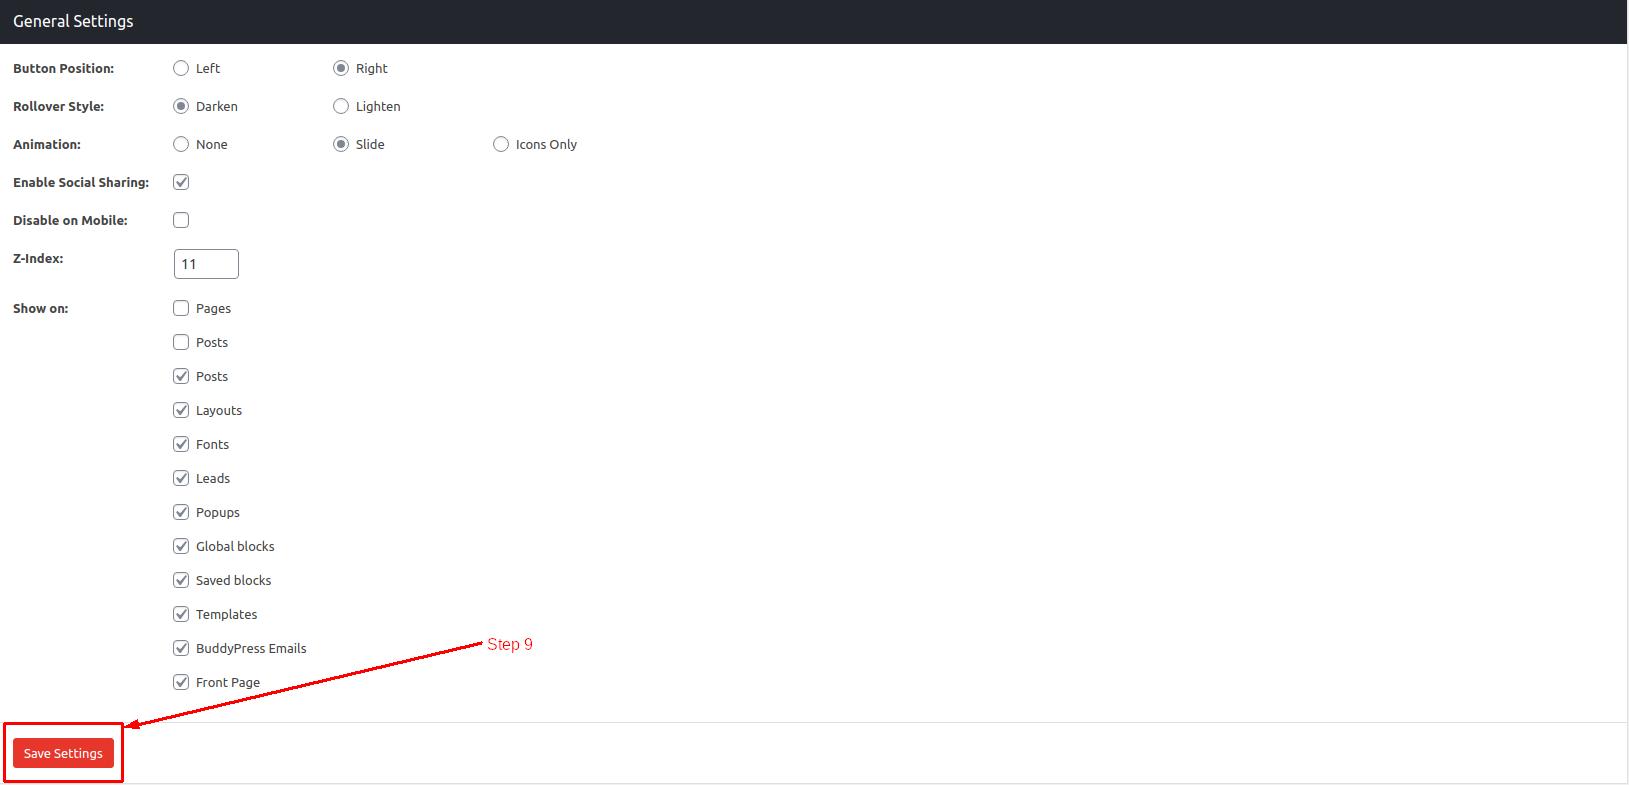
Step 8: To Save the settings just click on Save Settings.
So, that’s how you can create and manage sticky buttons in your WordPress site. We hope this detailed tutorial was helpful for you. If you are stuck somewhere or have a question, please let us know in the comment section given below. We are happy to help!