
GICT knowledge base
How to use Easy Updates manager in WordPress
Published
WordPress is a content management system introducted in May 2003. Right now, WordPress powers more than 35% websites on the internet. It also powers hundreds of websites from the top 1000 websites on the internet. WordPress is very flexible and Easy to understand.
If you want to create a blog or an E-commerce website, you don’t have to hire a developer to do that. You can just get a great web hosting account and install WordPress on your web hosting account. That’s all!
WordPress itself is an open-source system. It means that you can modify your WordPress site and use it as per your will without worrying about licences. The open-source nature allowed many developers to create add-ons and themes that further boosted the capabilities of WordPress.
Right now, there are thousands of Free and Effective plugins available in the WordPress plugin repository. You can install and work with plugins to improve the functionality on your site directly from the WordPress dashboard, without any technical knowledge.
WordPress also has a huge repository of themes created by WordPress theme developers. There are thousands of Free and Powerful themes you can use to create a unique style for your website.
As the plugins and themes are constantly updated by the developers to add new features and eleminate vulnerabilities, you too have to update the plugin in your WordPress site to make sure your code is up to date. Updates for plugins and themes are easy to process in WordPress.
However, WordPress also has a plugin to manage the updates for other plugins in the WordPress. In this tutorial, I will show you How to take control of the updates on your WordPress site using Easy Updates Manager plugin available in WordPress for Free.
How to install Easy Updates Manager in WordPress
Step 1: Log in to your WordPress Account Dashboard with your Username and Password.
Step 2: Now Click on Plugins which can be found on the left sidebar of the admin panel. This click will expand the tab with some options.
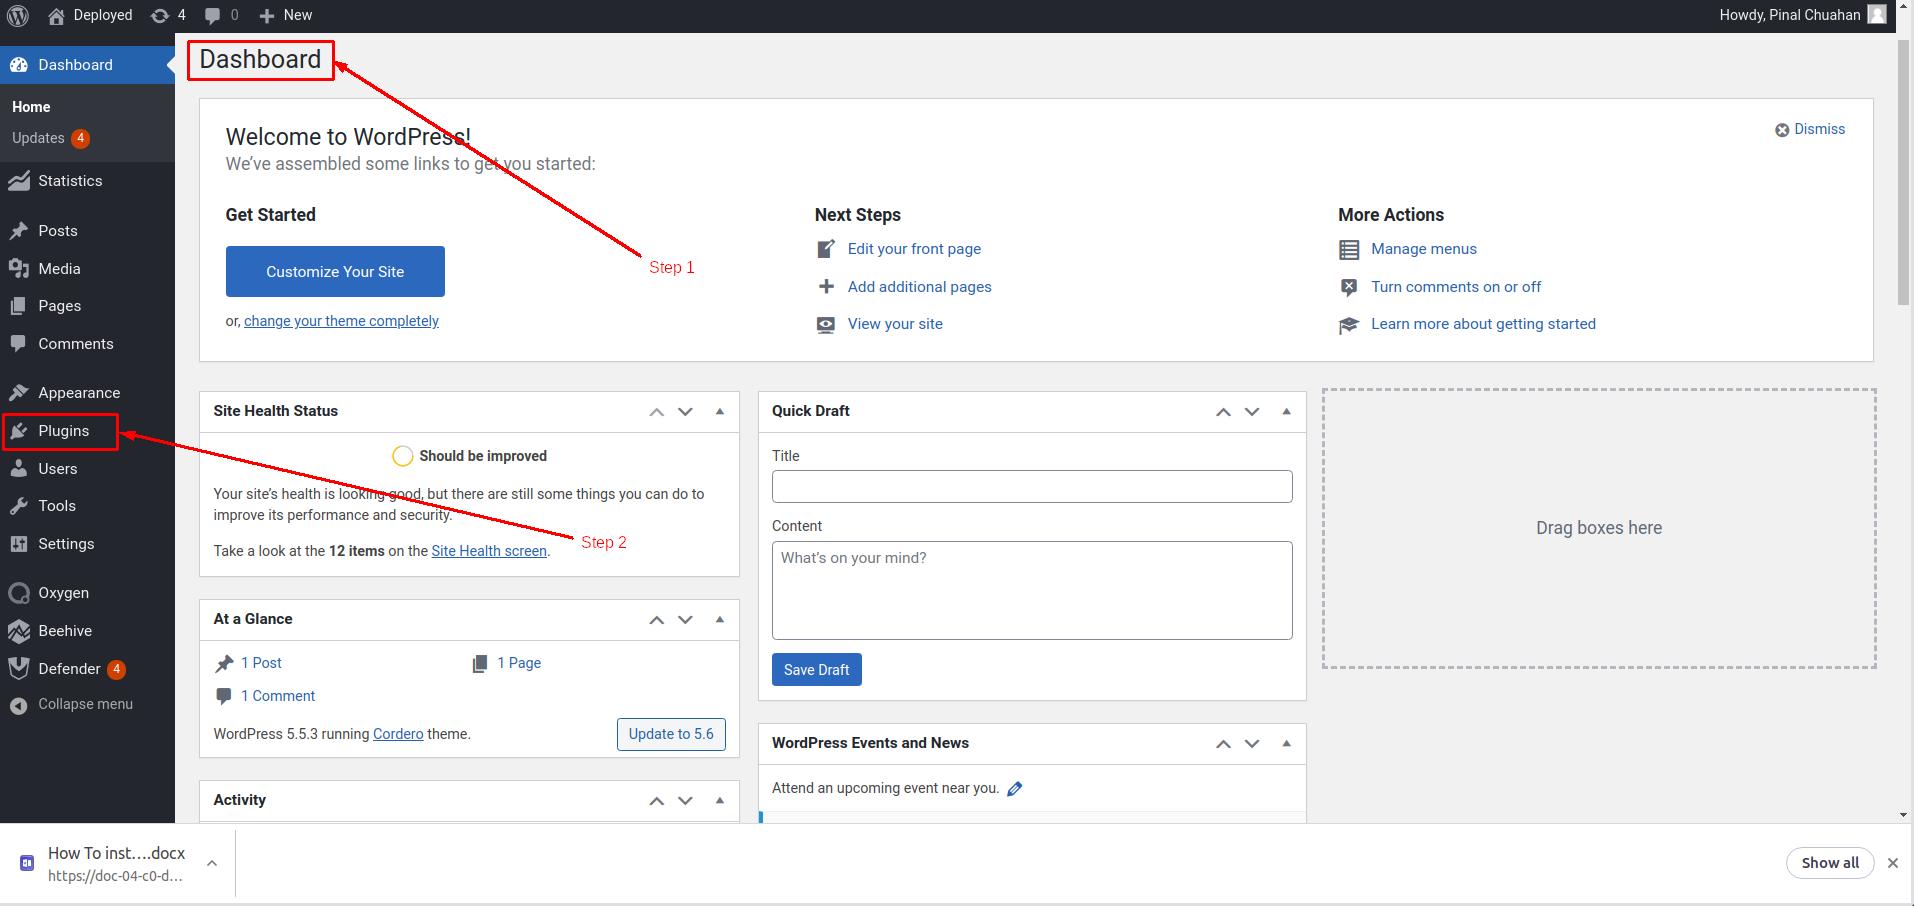
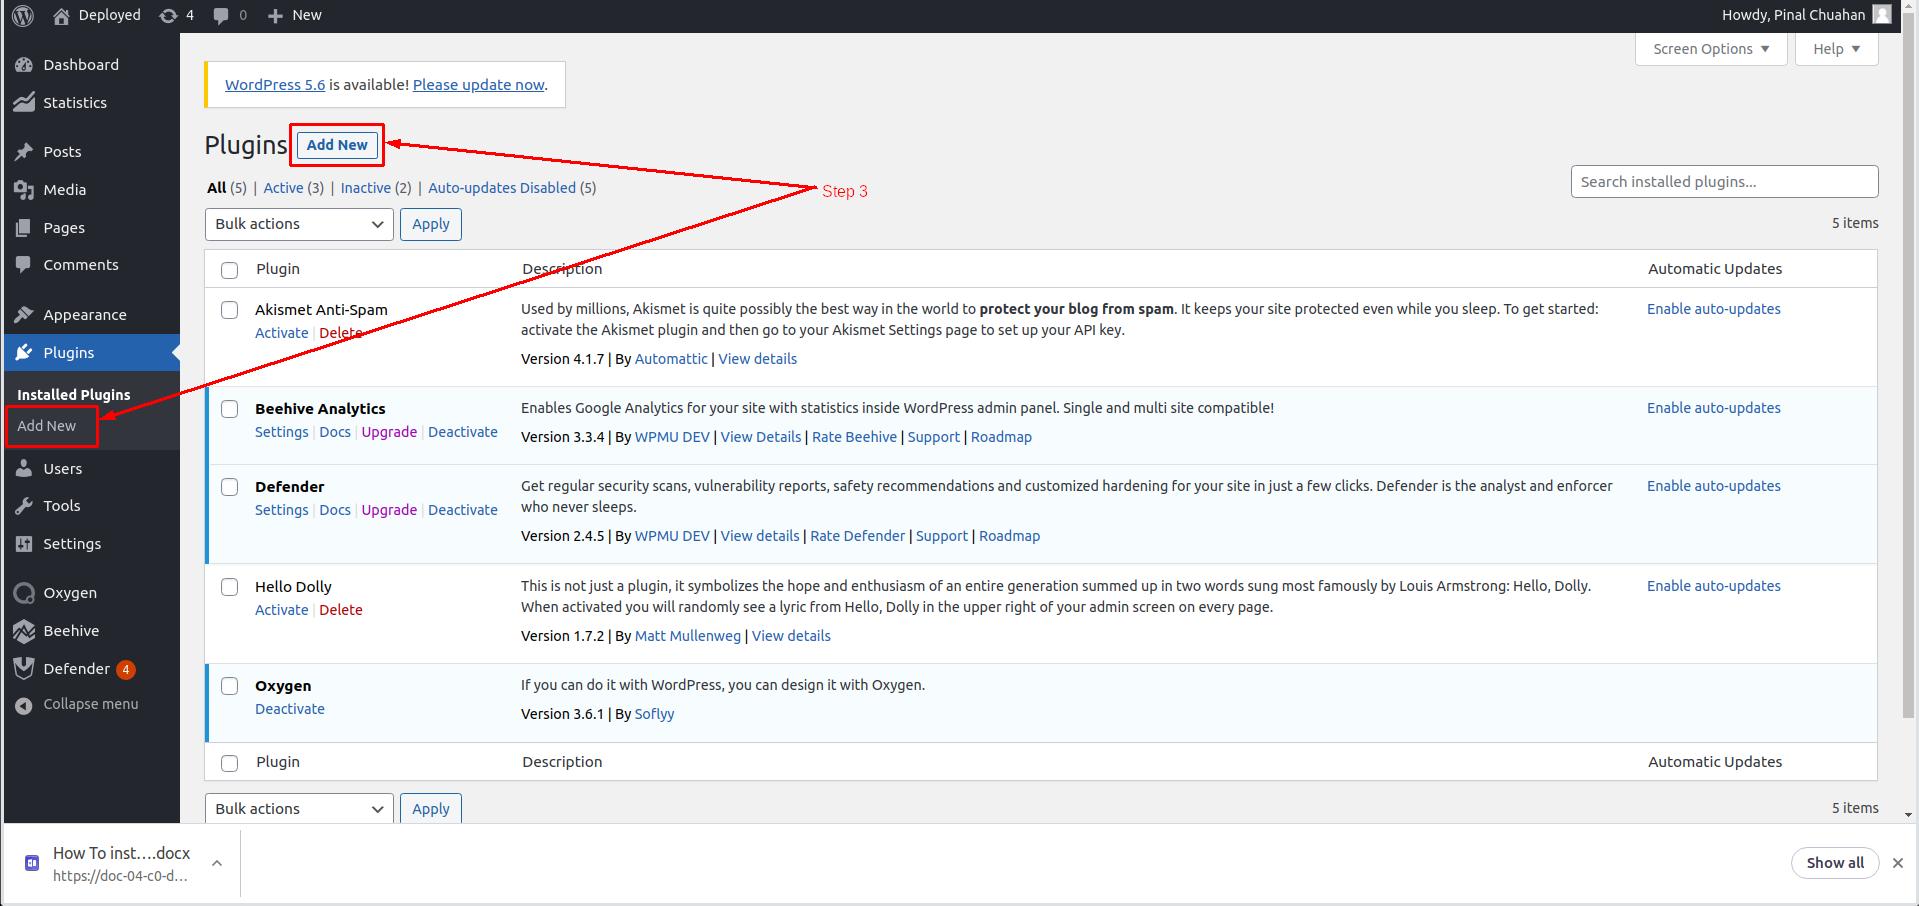
Step 3: Now click on the Add New tab or Add New Button to add a new Plugin to your WordPress as you can see in the below image.
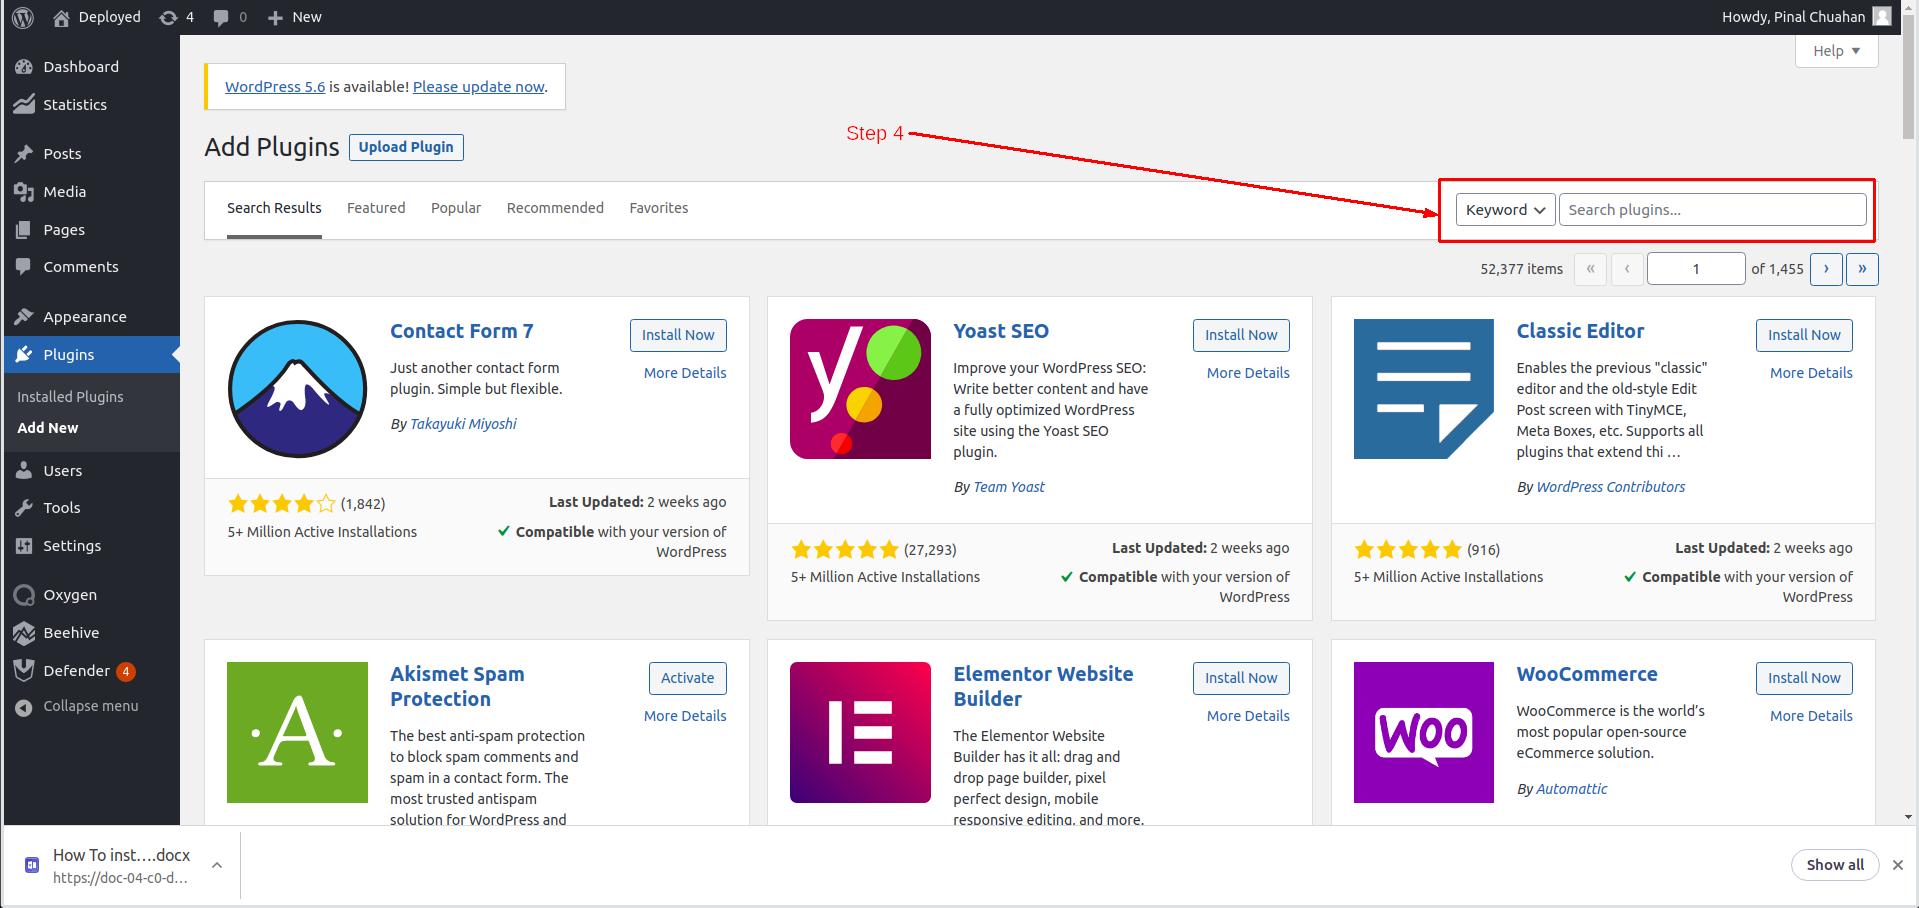
Step 4: Look for the search box available on the top-right side of the screen just like the following image.
Step 5: Now Click on the Searchbox and type “Easy Updates Manager” in the textbox as you can see in the below image.
Step 6: Now find the Orange icon from the Serch Result, It looks like Two Arrows in Circle as you can see in the following image.
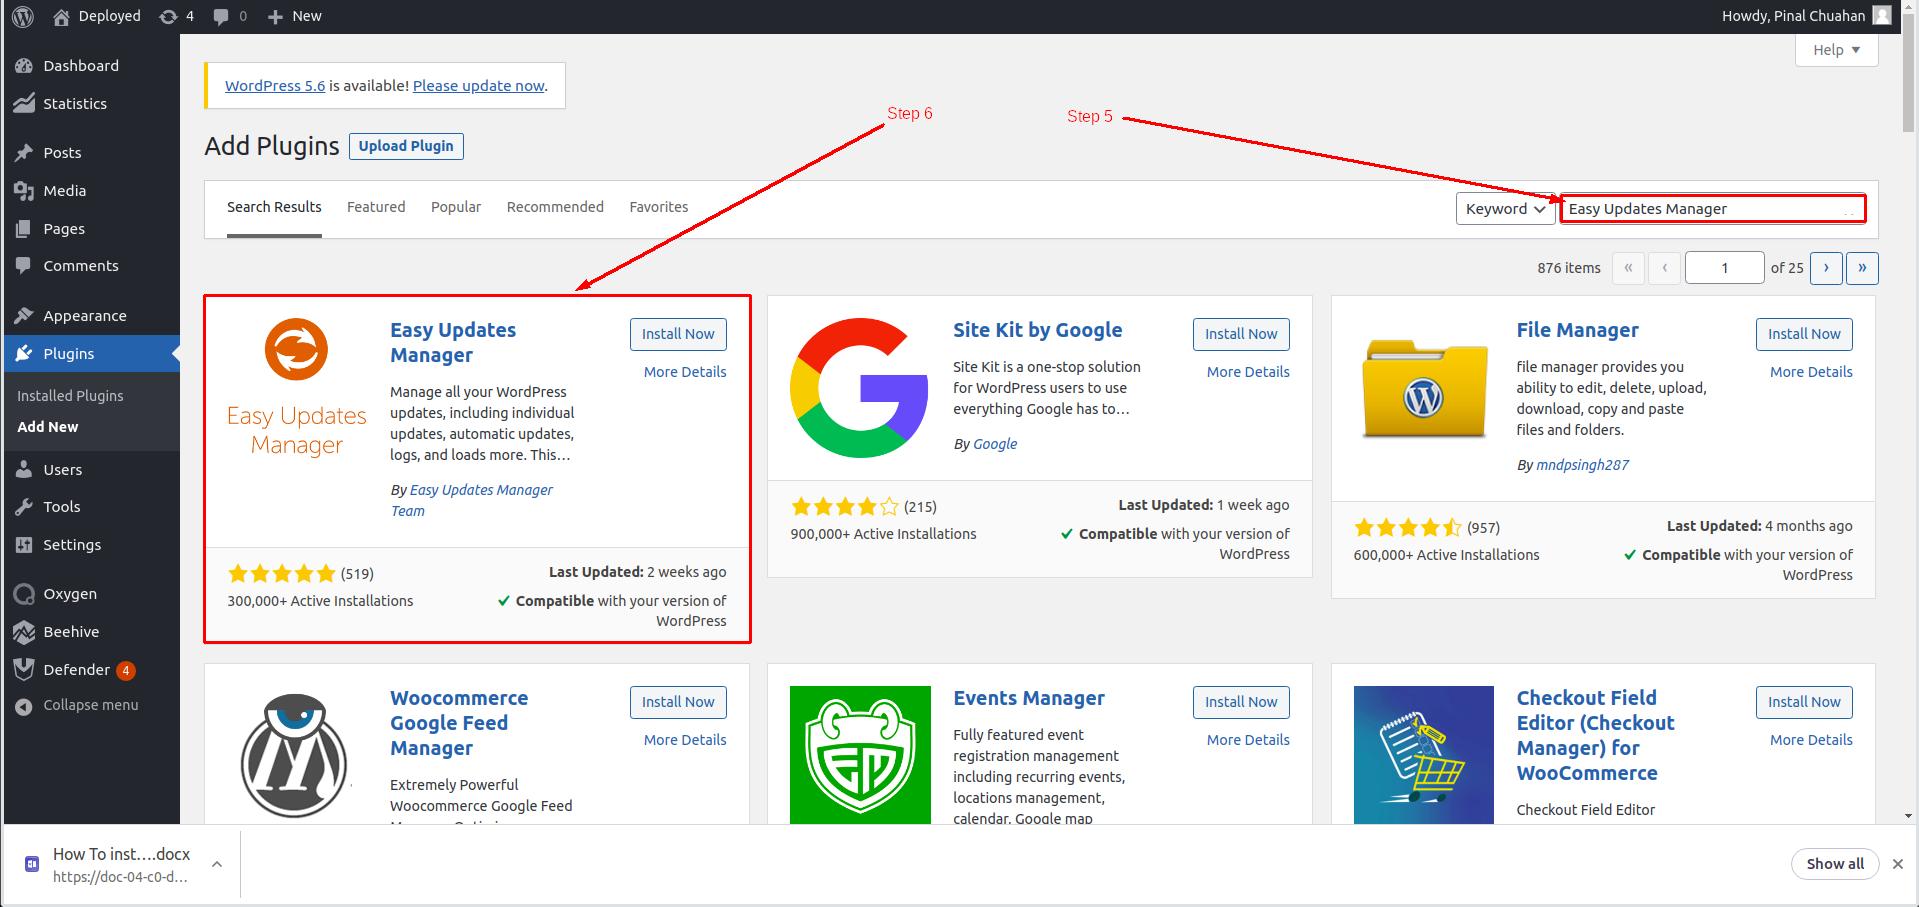
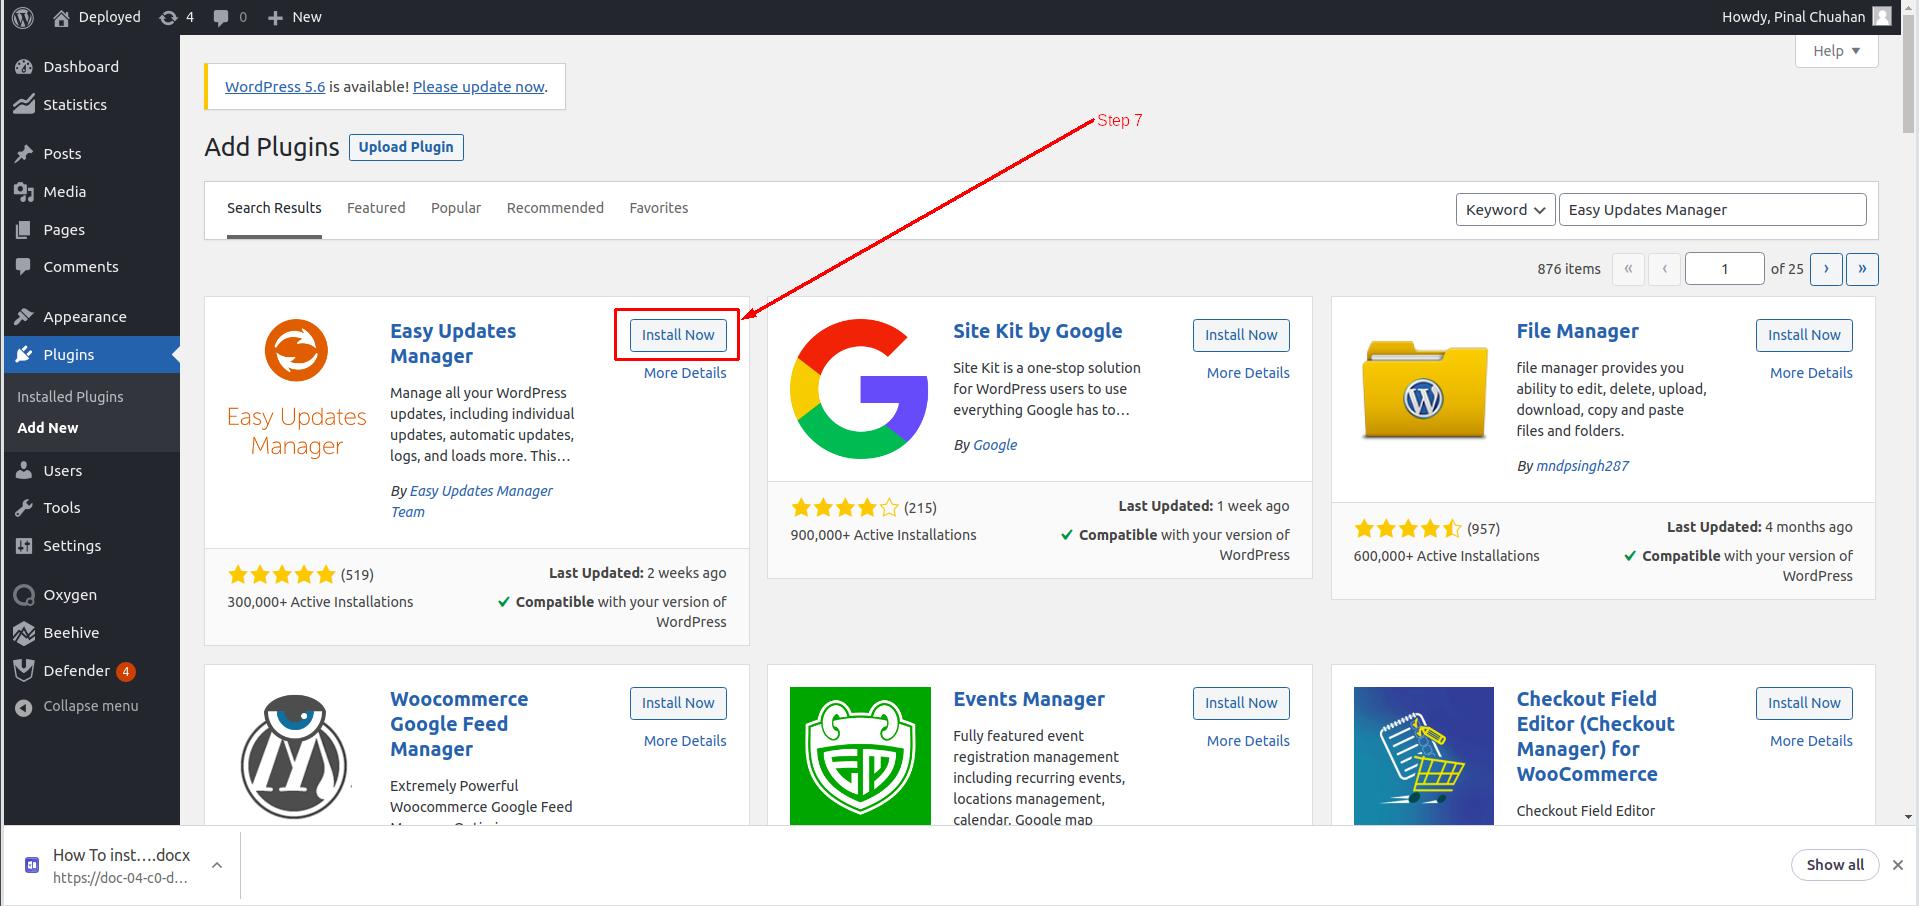
Step 7: Click on the Install Now button to quickly install the plugin.
It might take a few seconds to install a plugin. However, the installation speed also depends on the web hosting service you use.
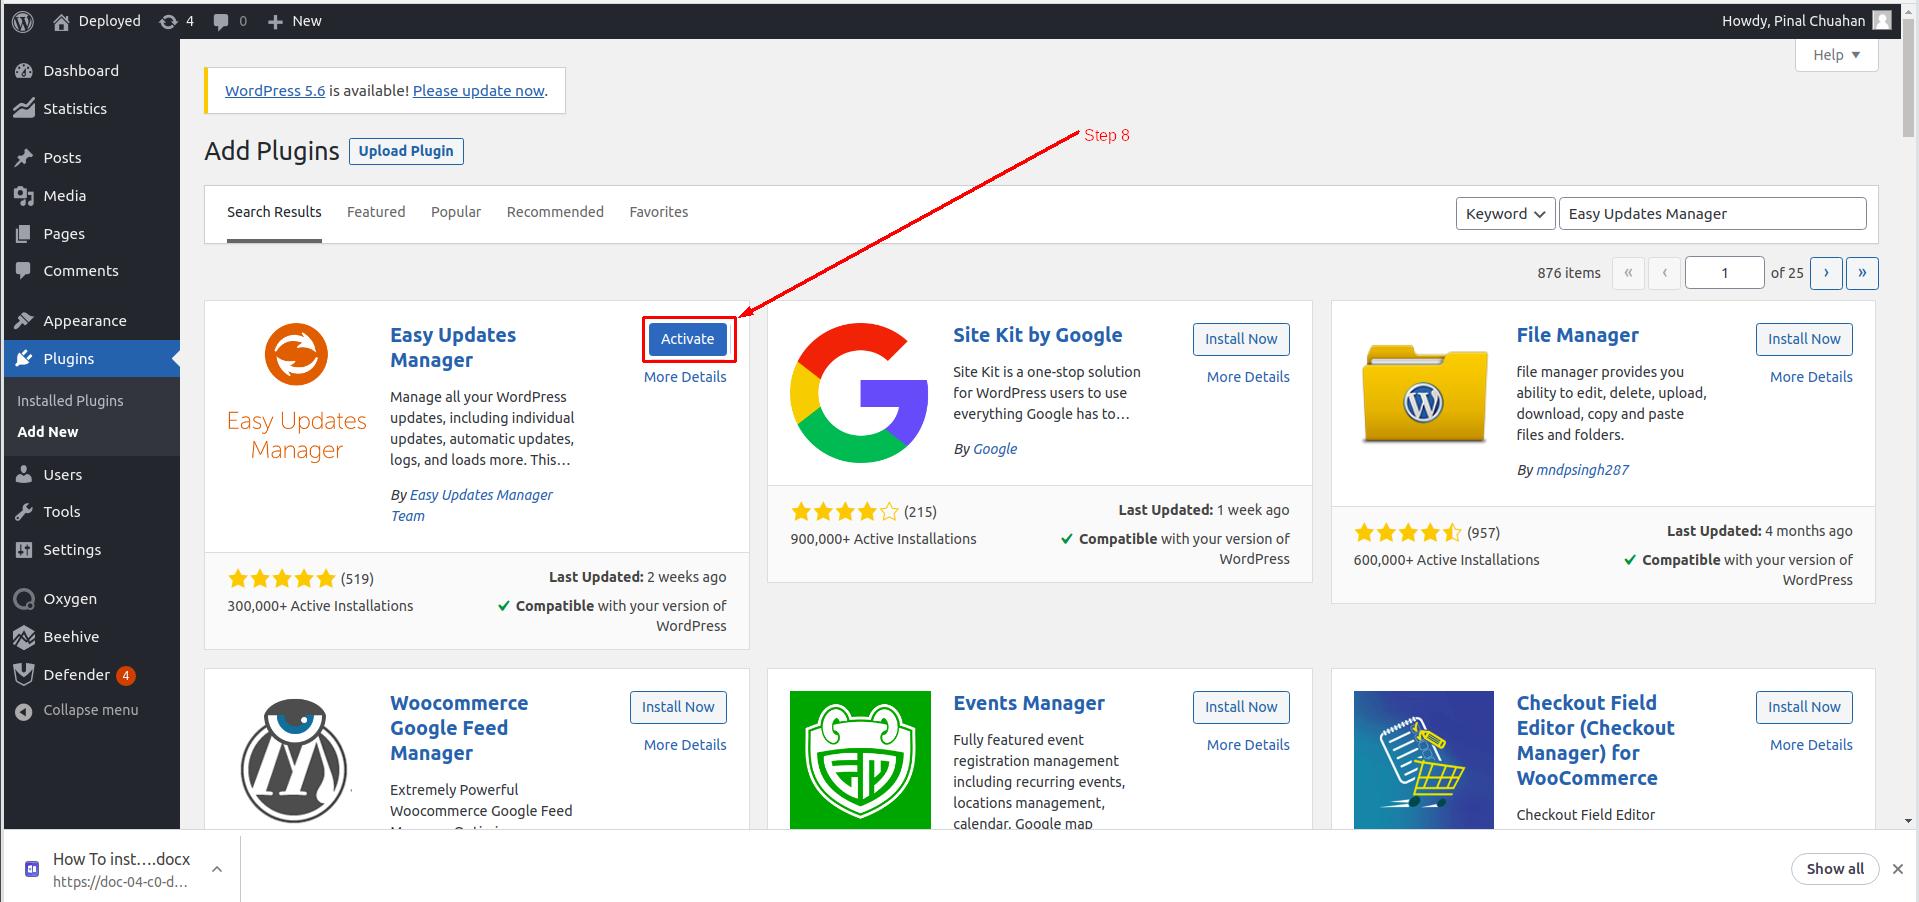
Step 8: After a successful Installation of the Plugin, The Install now button will be Replaced by the Activate button as you can see in the below image.
It’s mandatory to activate the plugin just after the installation to make it work. So, click on Activate Button to Activate the Plugin to start using it.
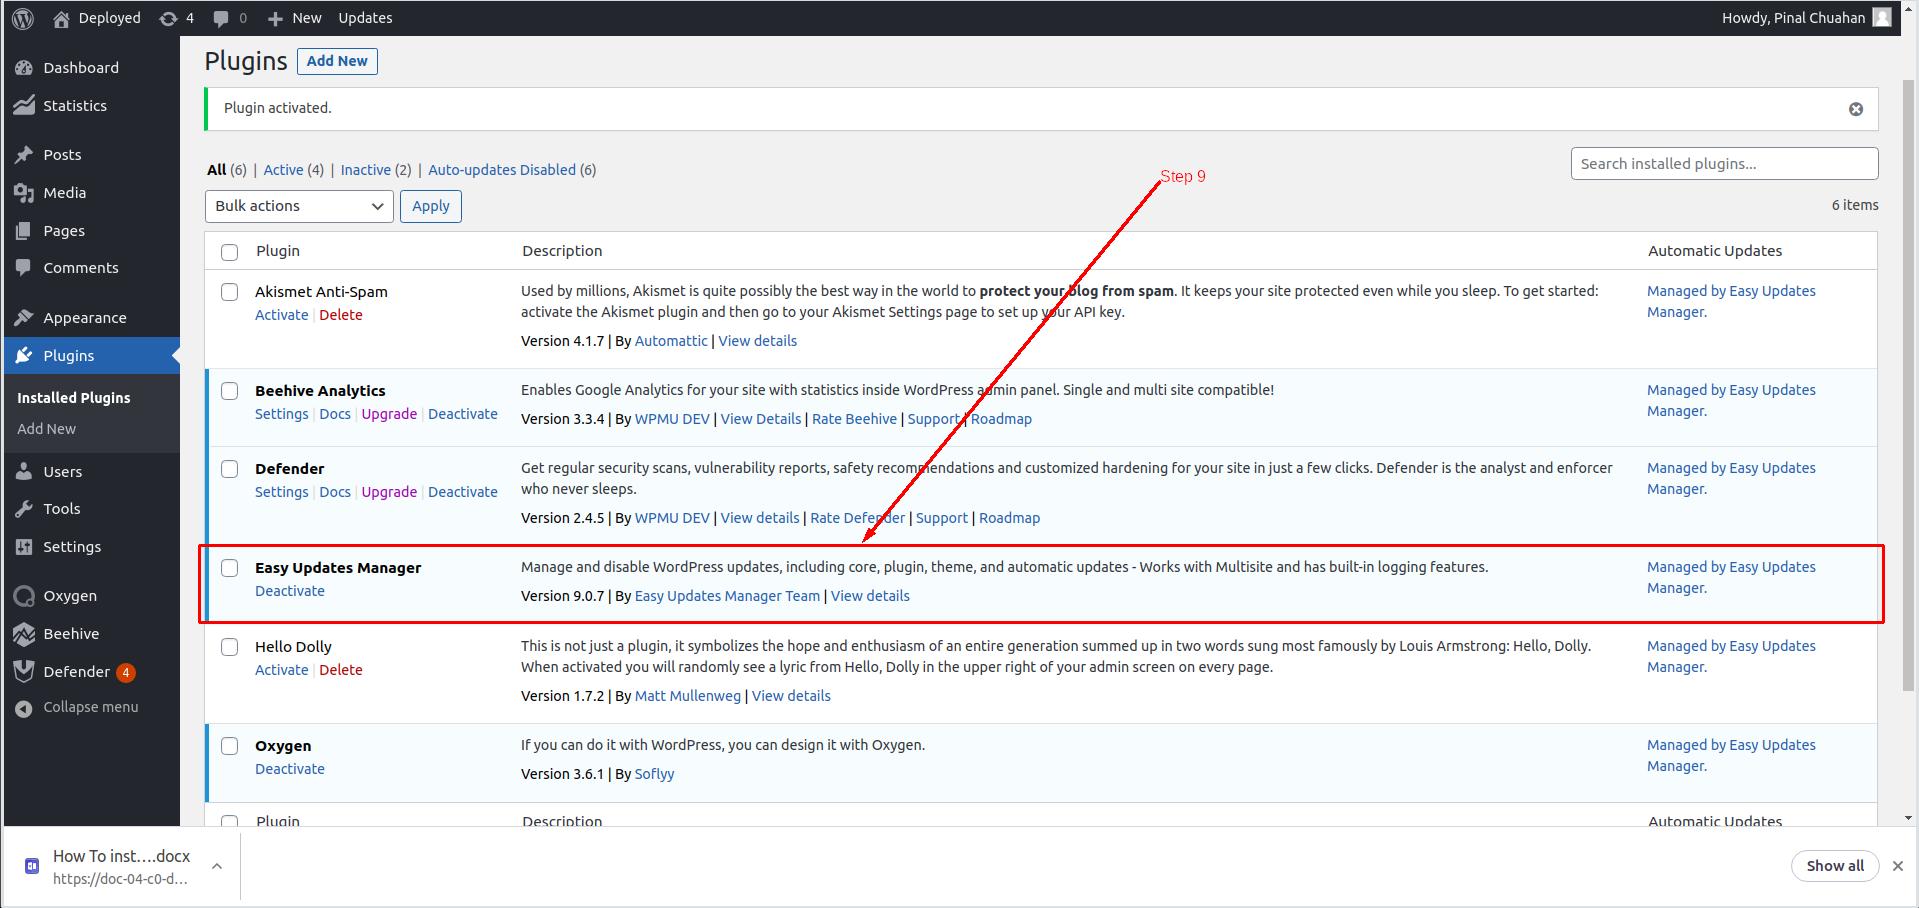
Once you click on the Activate button, you will be redirected to the list of plugins available on your site. Make sure that the plugin we are going to work with is active.
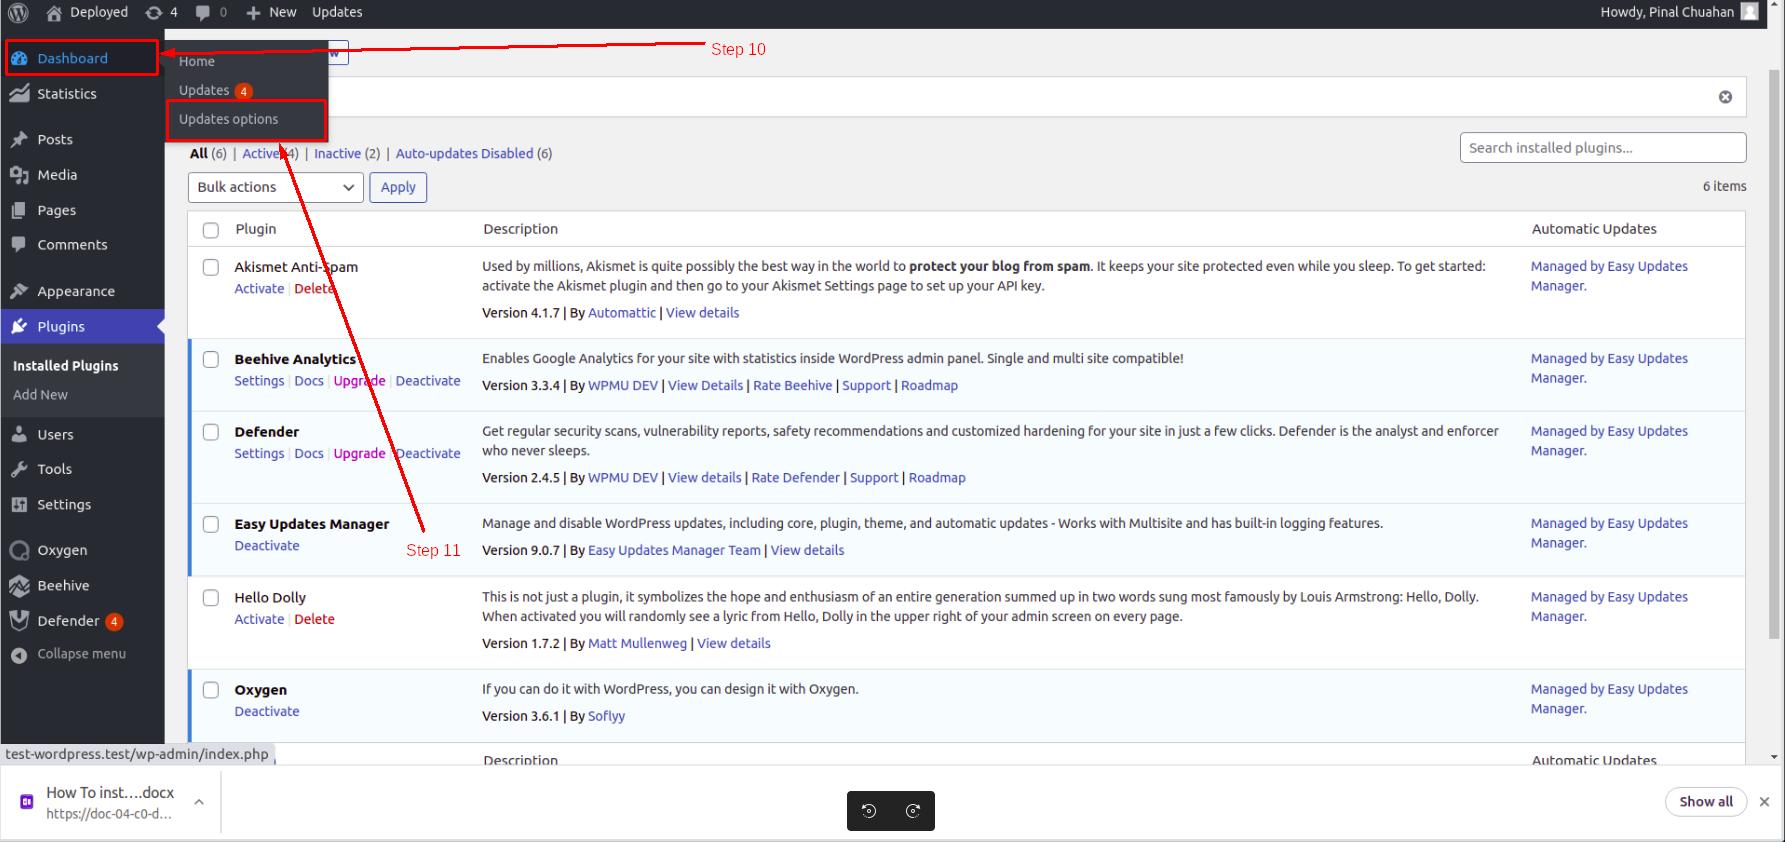
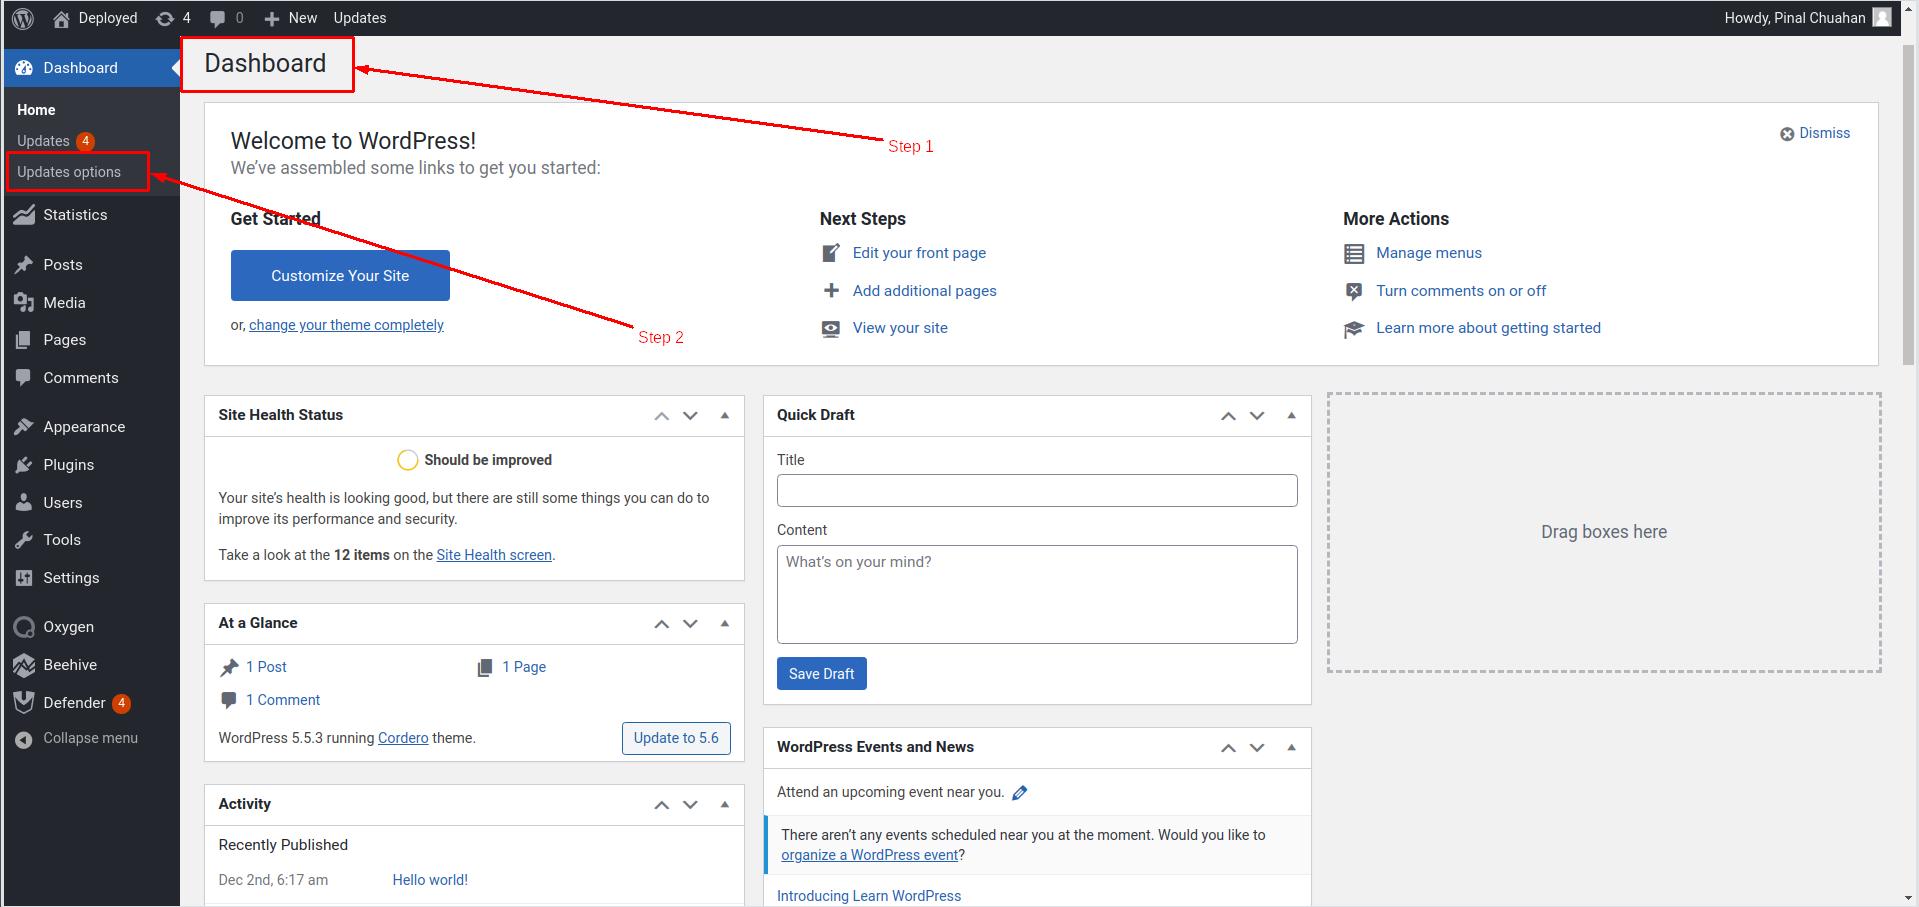
Step 10 and 11: To access the main page of the plugins manager, click on the Dashboard -> Updates Options.
So, the installation of the plugin is done. Now, Let’s see what we can manage using this plugin in WordPress.
How to configure Easy Updates Manager
Step 1: Log in to your WordPress Account Dashboard with Your Username and Password.
Step 2: Now click on “Updates Options” available on the Left-Sided tab section as you can see in the following image.
Step 3: The below image shows the main page of the Easy Updates Manager plugin. You can see menu items on the tabs bar like General, Plugins, Themes, Logs, Advance, etc as you can see in the below image.
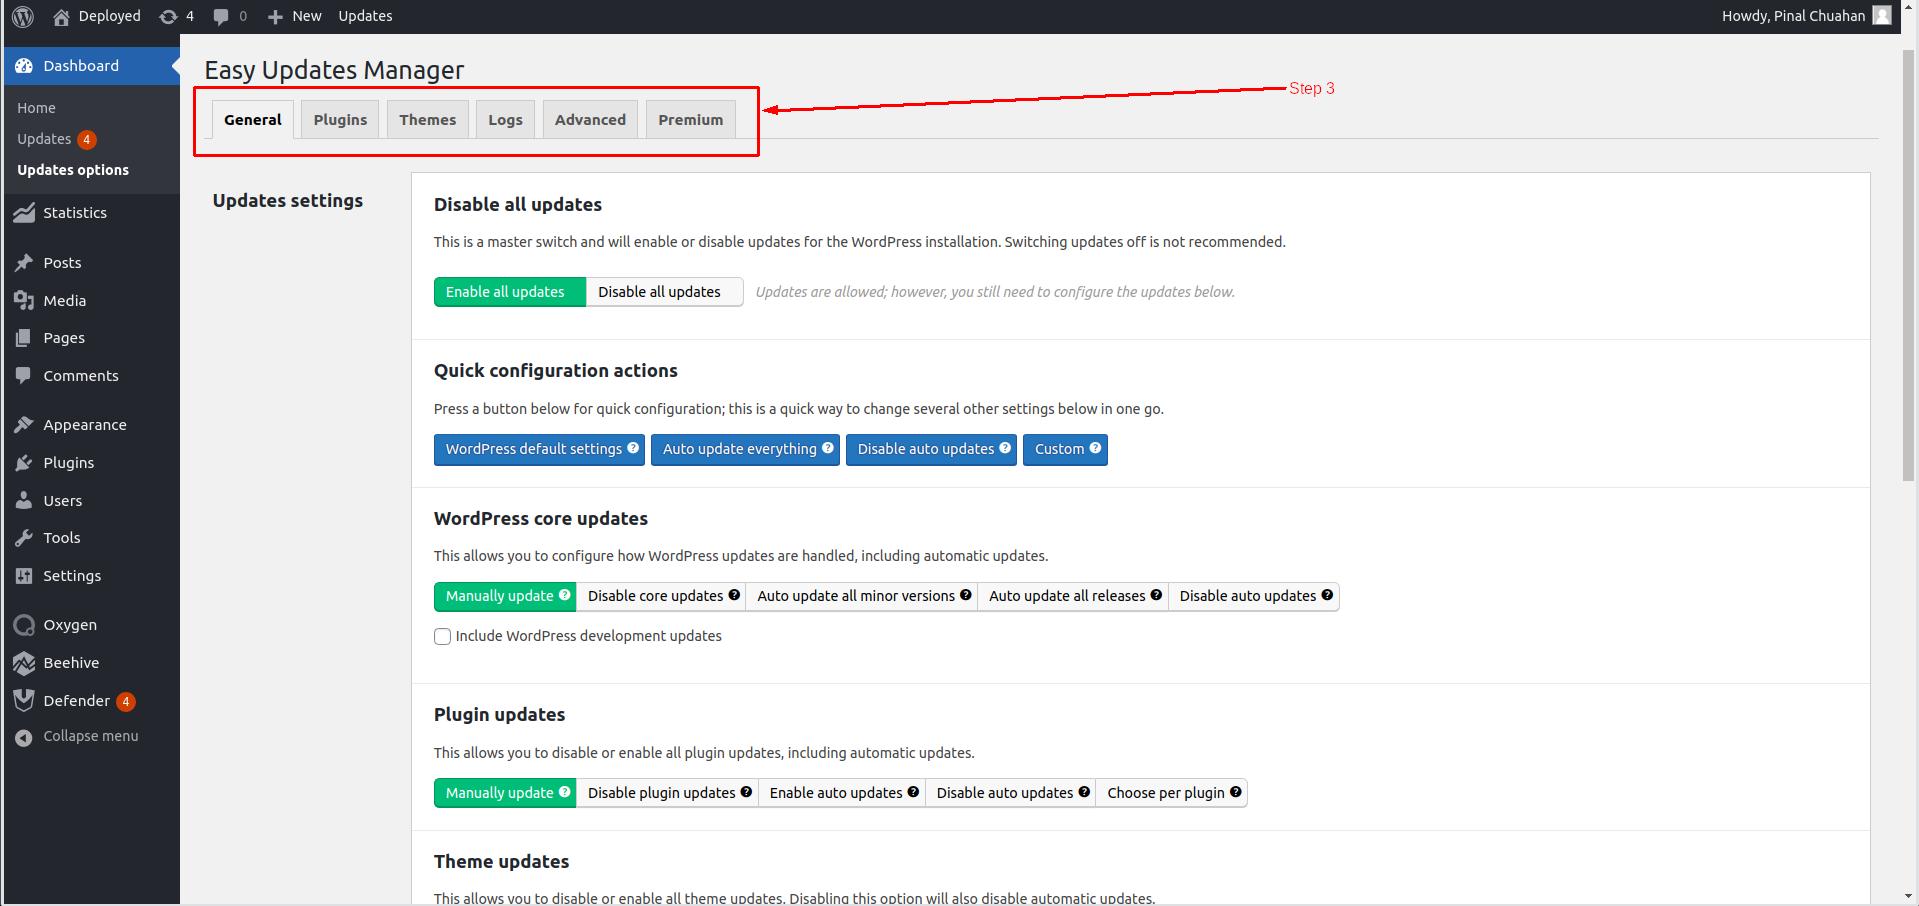
Let’s see every Menu item in Brief. We will continue the steps with each section available for us to configure. First of all, we will get started with the General settings.
General Settings
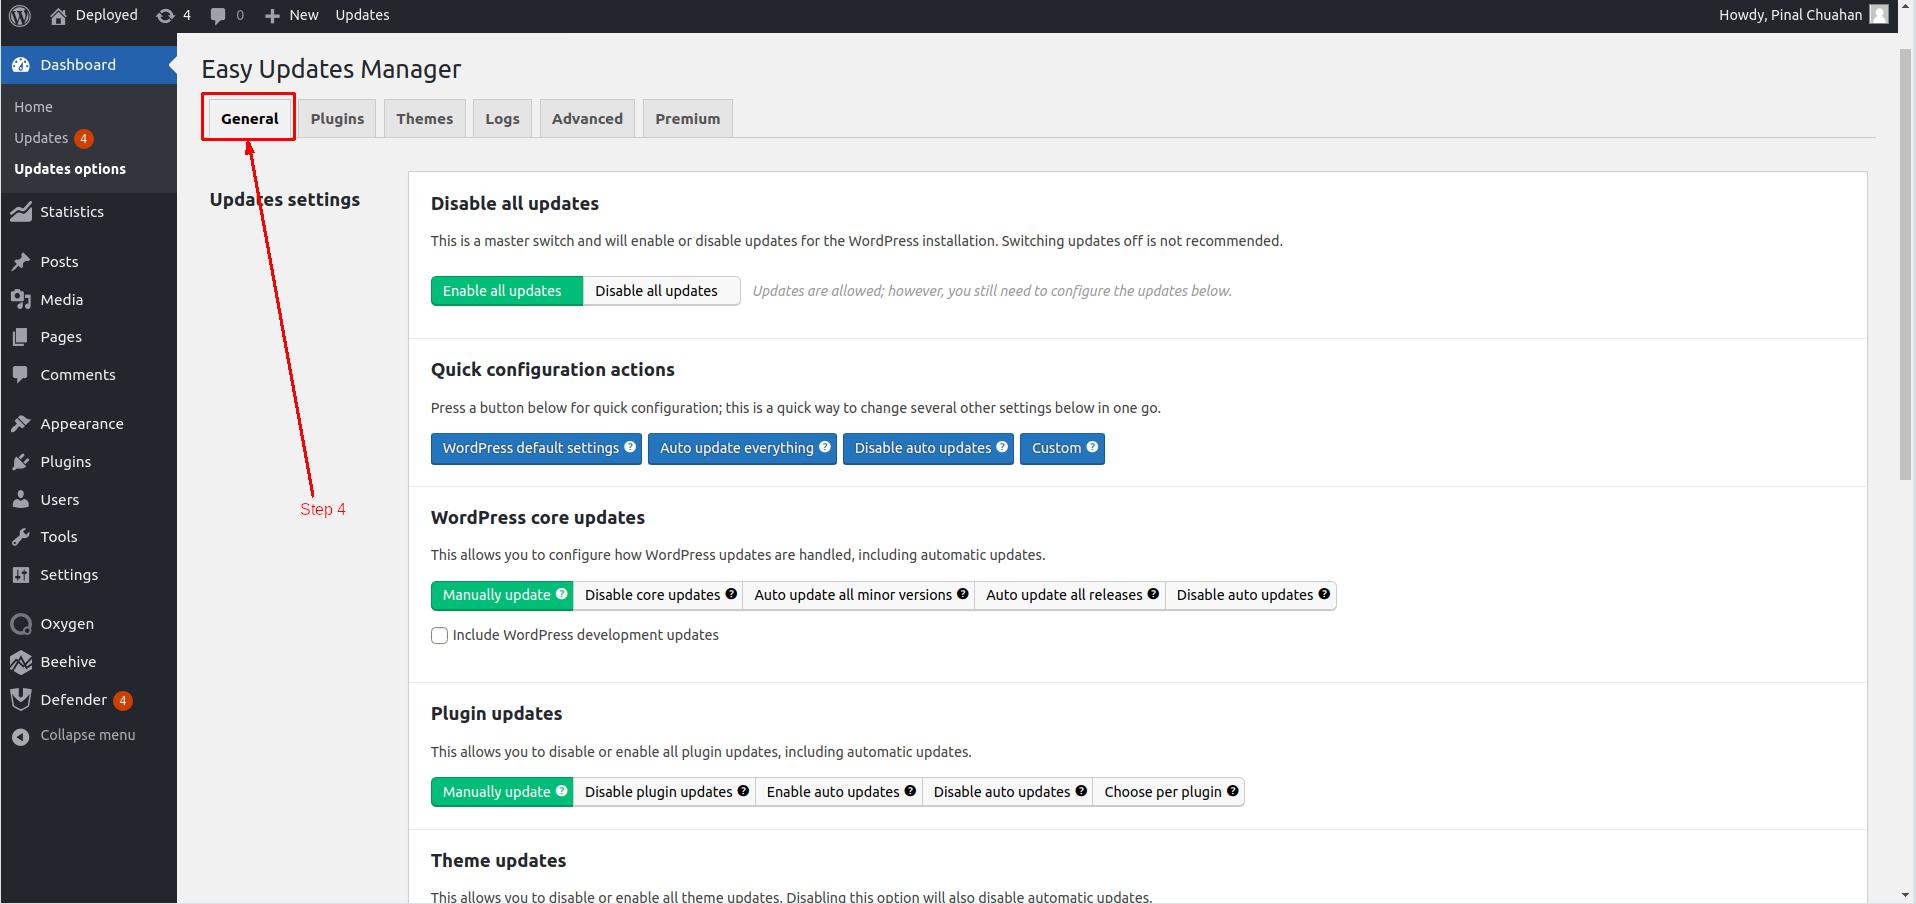
Step 4: Click on the General tab menu to see the General Settings of the Easy Updates Manager plugin.
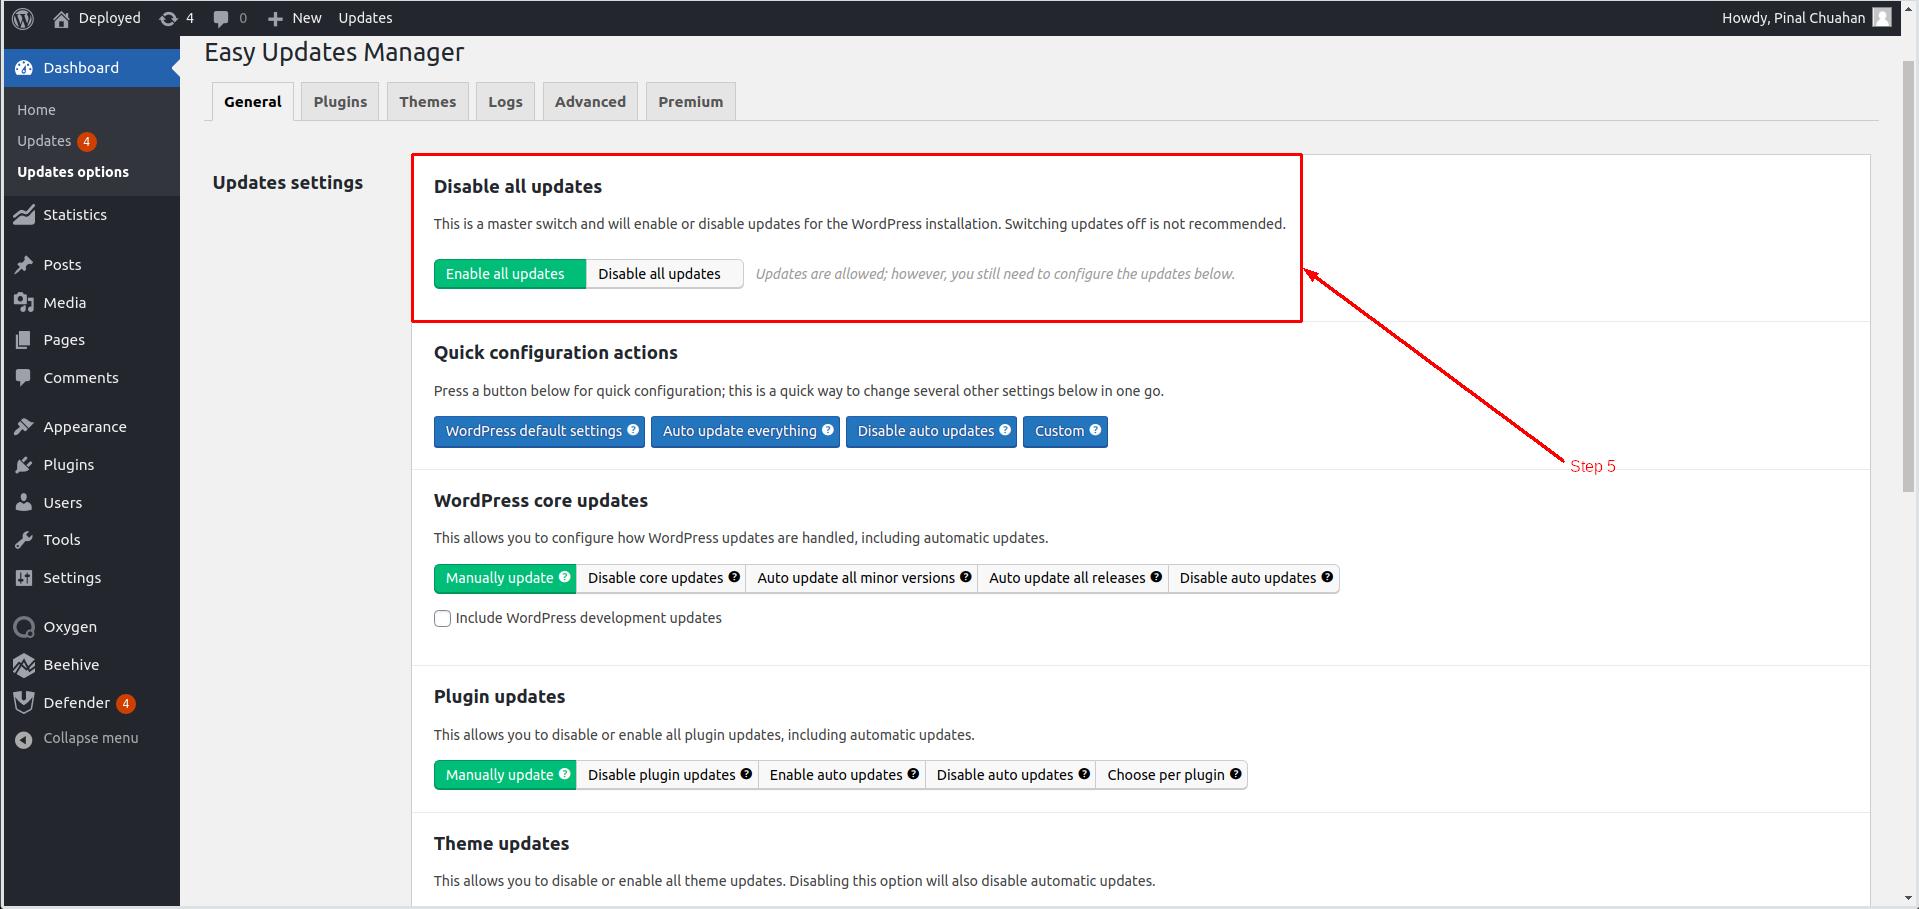
Step 5: The First Setting is a shortcut button to Disable all the updates.
There are two options available to Enable All Updates and Disable all Updates. The first option will Turn on all updates for the Site, like Plugin updates, Theme Updates, etc. Just like that the second option will turn off all of the updates for the Site, Plugin, and themes as you can read the instructions in the below image.
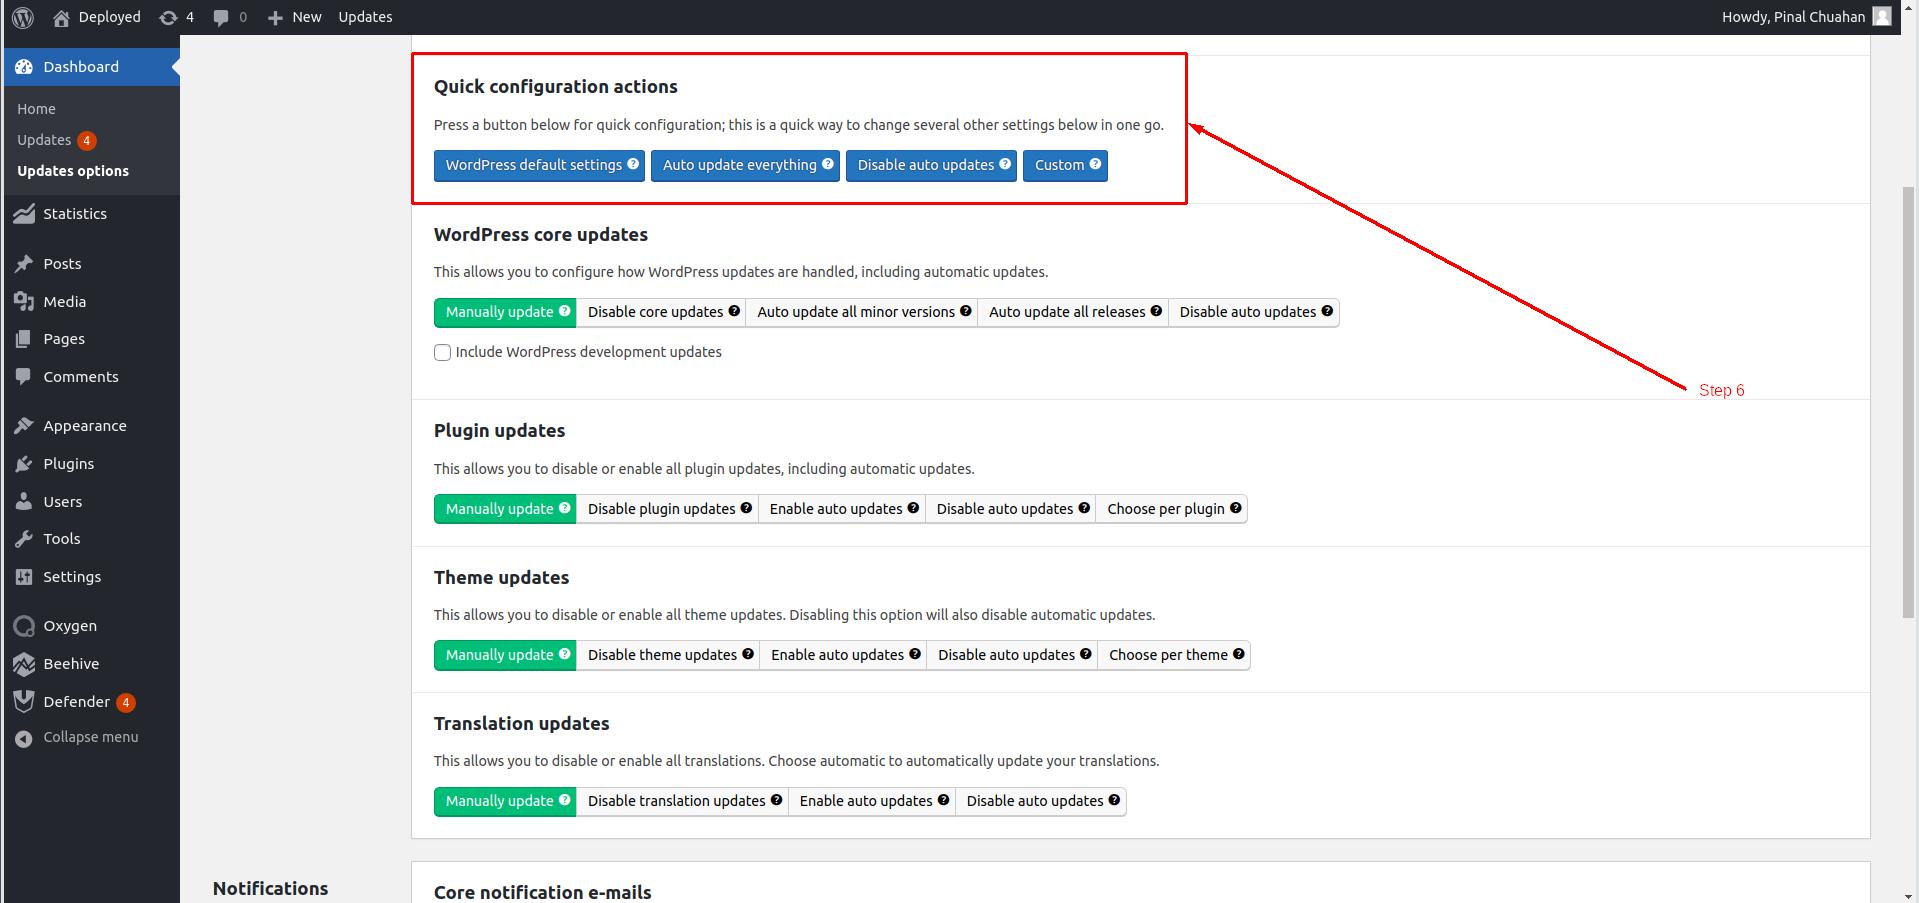
Step 6: Now Scroll-Down and see the second option called “Quick Configuration Actions”.
Read the Instruction just below for the setting name, This is the Quick Configuration way to change the Several settings. You have four options here as you can see in the below image.
- The first option is the WordPress Default setting which means you can just follow the WordPress default settings for Updates. If you want to continue with this option then click on the WordPress Default Settings button as you can see in the below image.
- The second option is Auto-update everything, if you want to update your website, plugins, and other important features then you can go with this option.
- The third option is to Disable auto-updates which means you can disable all the Auto updates with this button.
- And the last option is custom. It means that you can create your custom rules for Updates with these options.
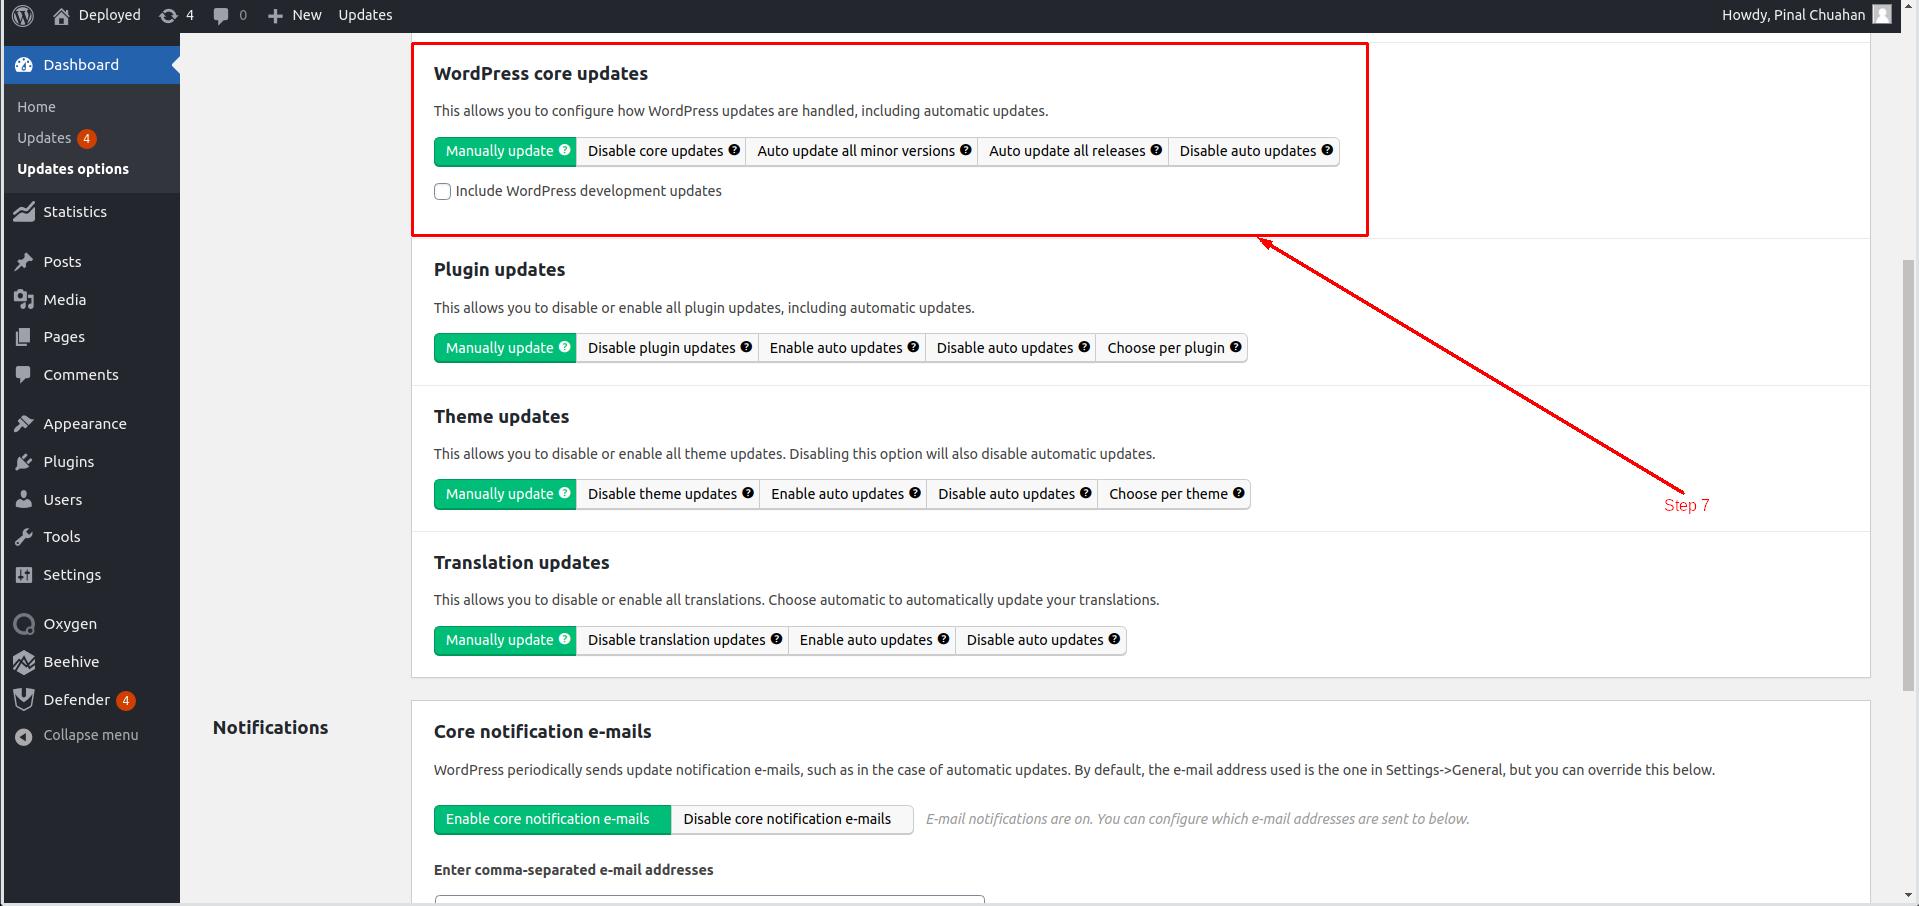
Step 7: Now scroll down and see the next option “WordPress Core updates”.
This option affects the WordPress Core updates. There are several options available like Manually Update, Disable core updates, Auto-update all minor versions, Auto-update all releases, and Disable auto-update as you can see in the below image. Let’s understand each option in brief.
- Manually Update: This option will not do any Auto-Update for the WordPress site. You have to do every update manually one by one as you were doing it before this plugin.
- Disable core updates: This option will Disable all the Core updates of the WordPress site core. You have to Update the WordPress site Core manually after you choose this option for the WordPress core.
- Auto-update all minor versions: This option will help you to update all the Minor versions of WordPress automatically. Minor versions mean basic updates that regularly got from the server.
- Auto-update all releases: This option is available to set the setting for the Releases Updates. Releases means new upgrades of WordPress that are very important.
- Disable auto-update: The last option is available as Disable Auto-update as you can see in the below image. With the help of this option, you can disable all the Auto Updates for WordPress.
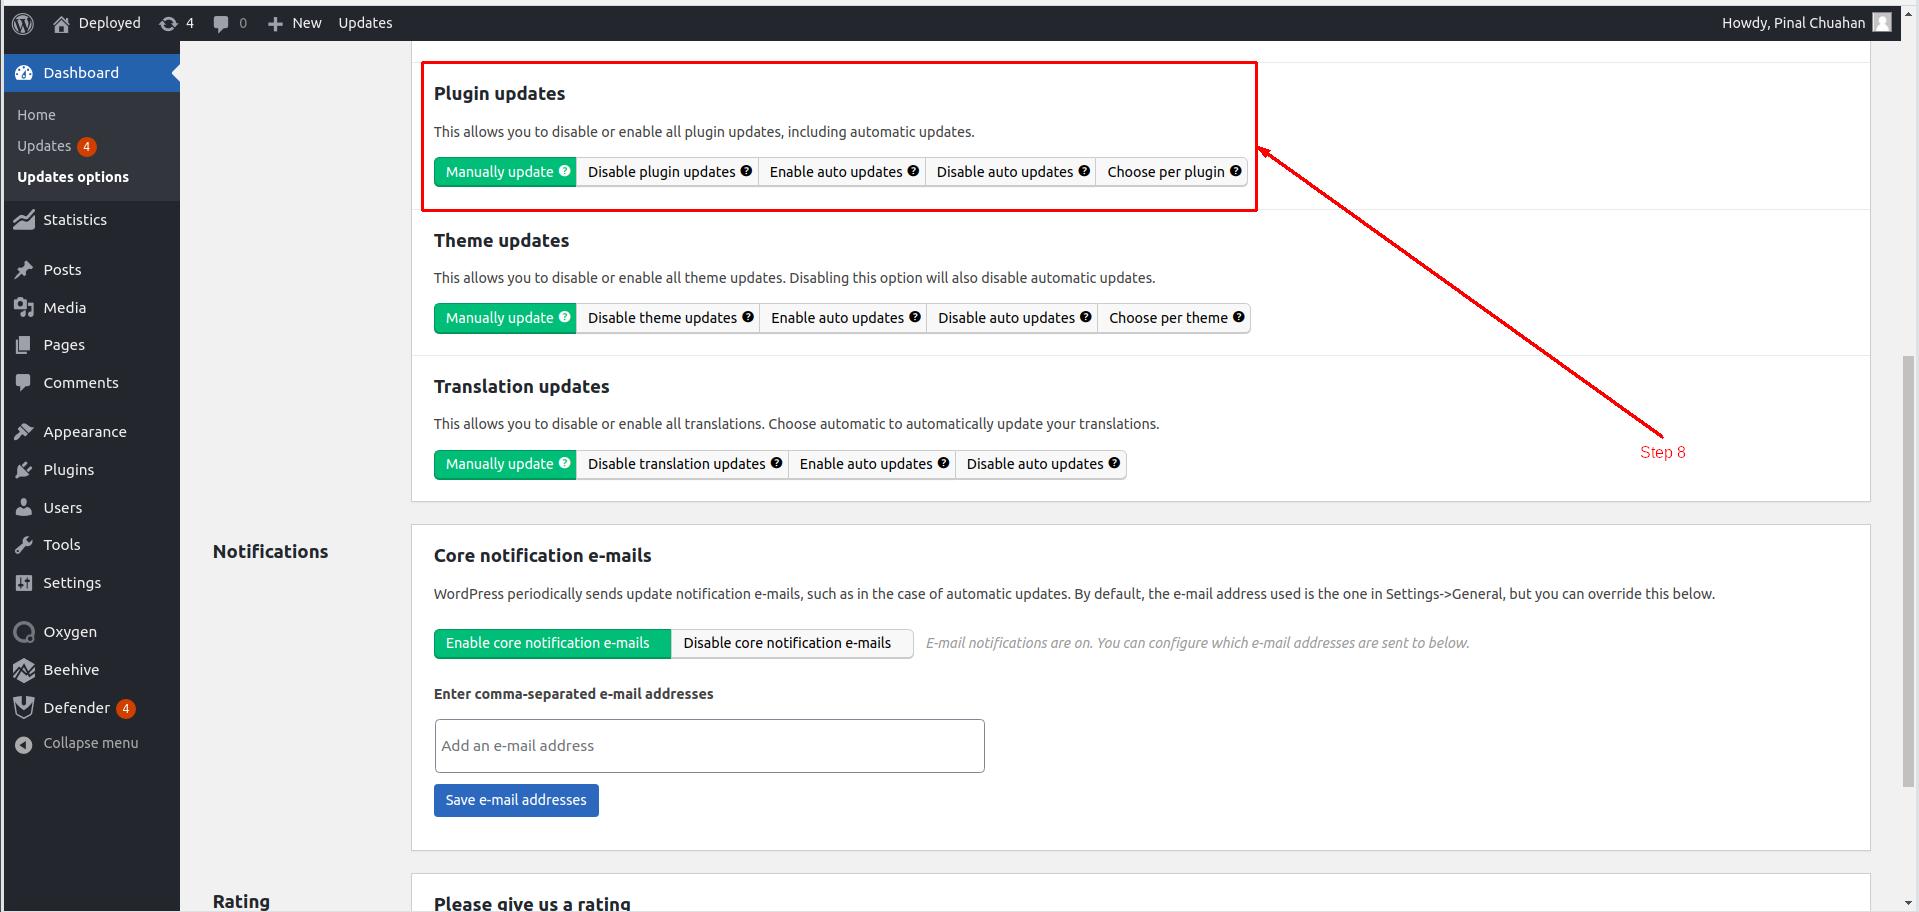
Step 8: Now scroll down and see the next setting as Plugin Update as you can see in the below image.
This option will help you set the update settings for plugins. There are several options available like Manually Update, Disable plugin updates, Enable auto-updates, Disable auto-updates, and Choose per plugin as you can see in the below image. Let’s understand the meaning of each option available for us to select.
- Manually Update: The first setting means you will Newer have auto-updates for Plugins. You have to Install all the Plugins updates manually.
- Disable plugin updates: You can disable the updates for the Plugins permanently with this option.
- Enable auto-updates: the third option will help you to update the Plugins automatically. Just select this option and the Easy Update manager will regularly install the updates for the Important plugins.
- Disable auto-updates: You can Disable Auto-updates for the plugin with this option.
- Choose per plugin: The Last option will help you to choose the specific plugins which you want to automatically update. You can make custom rules for the specific plugins with this option.
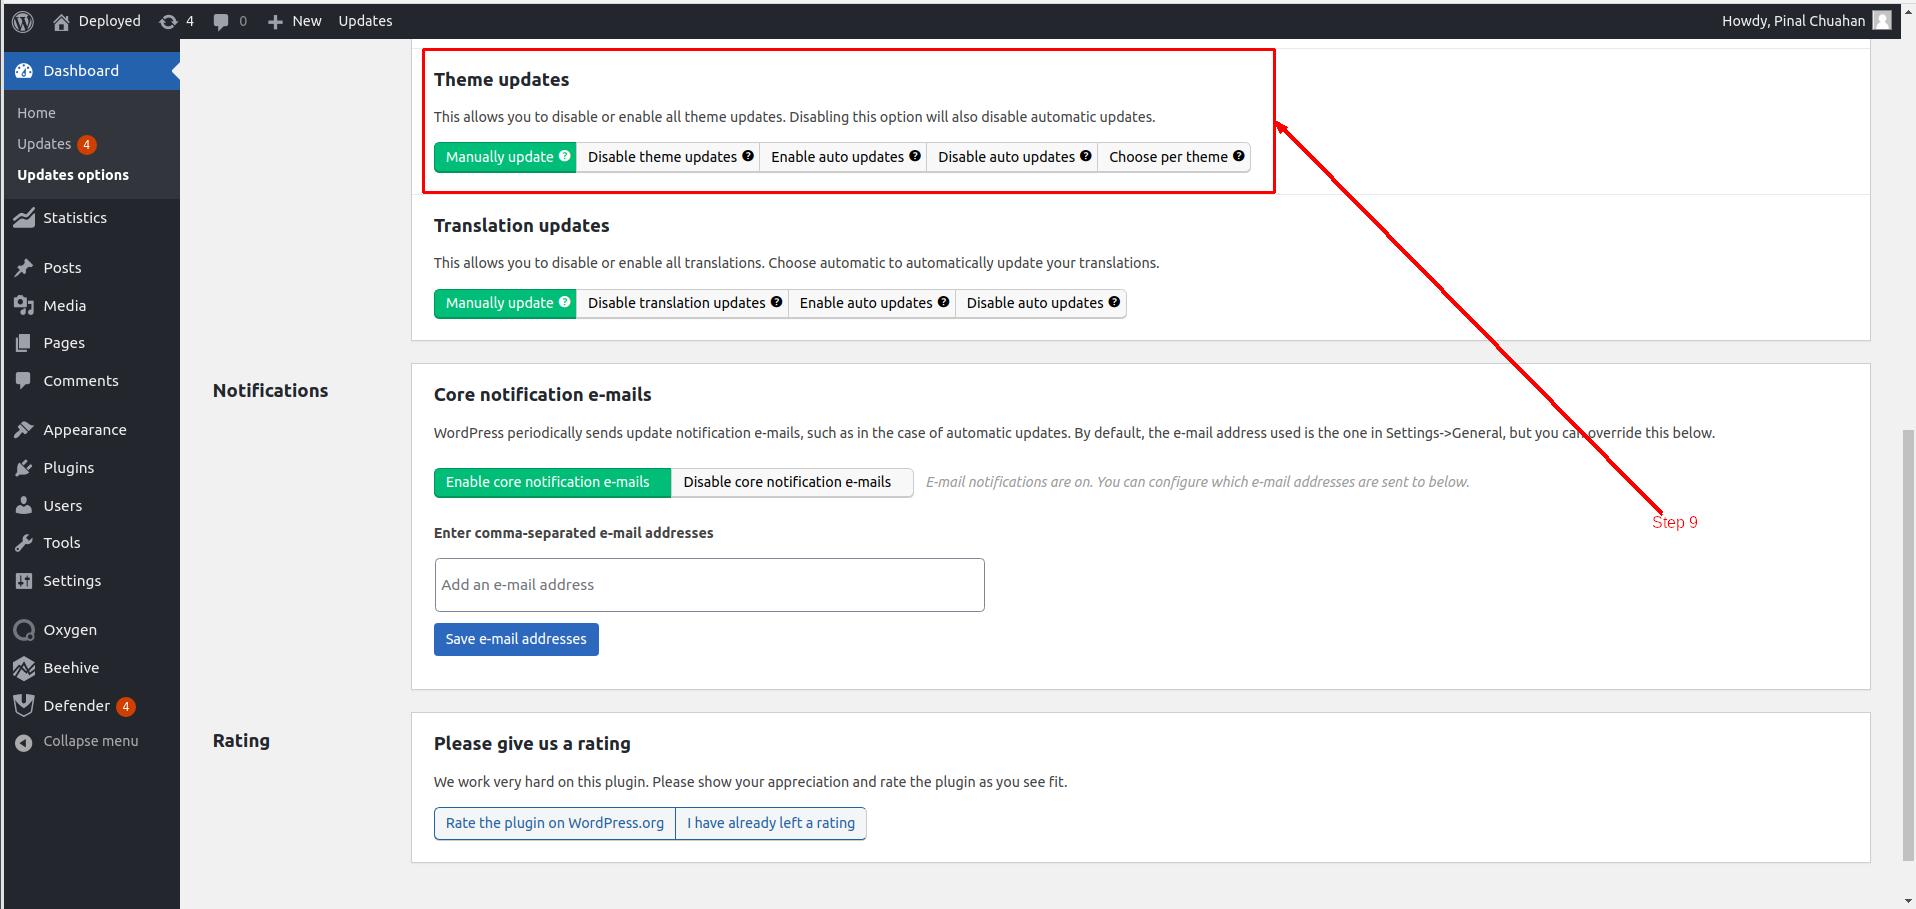
Step 9: The next option is to select the update settings for Themes. As the plugins and themes are almost same for the WordPress to manage, You will get the same update options as plugins. You can select the update frequency as per your requirements.
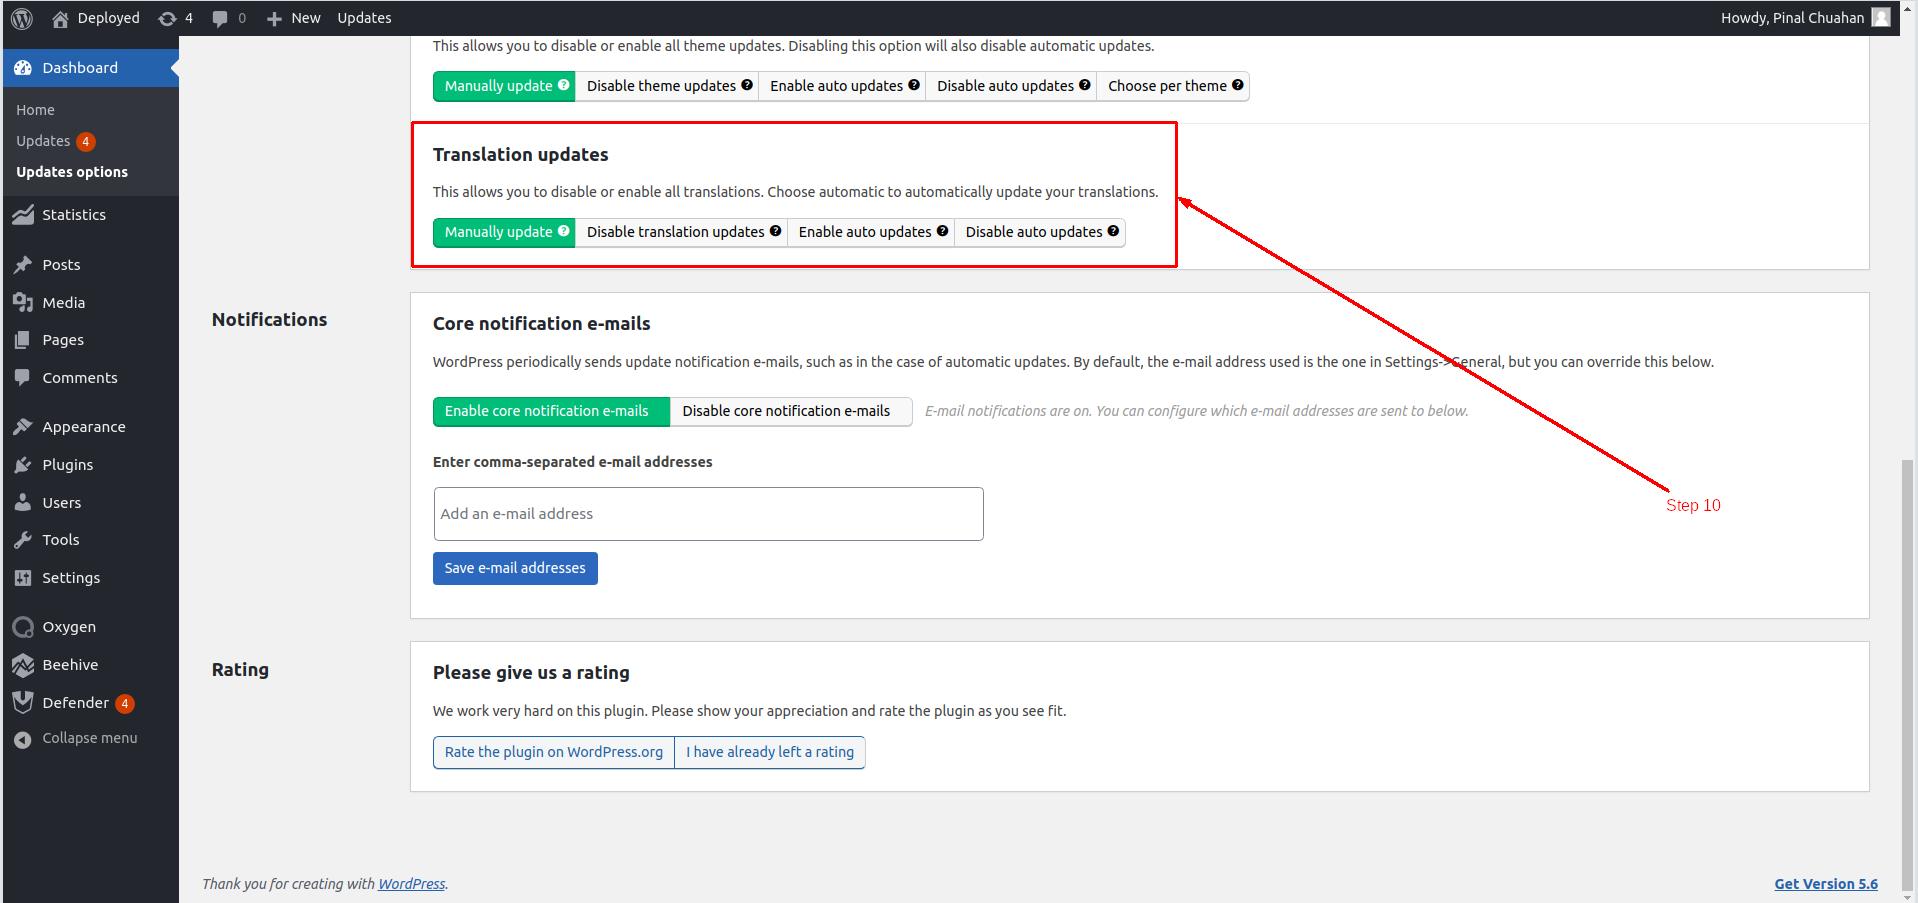
Step 10: The next setting is Translation Updates as you can see in the below image. This setting will help you to set the default settings related to Translation Updates on your WordPress site. There are several options available like Manually update, Disable translation updates, Enable Auto updates, and Disable auto-updates. Let’s see each setting option in Brief.
- Manually update: The first option available is Manual updates which means the Easy Update Manager will not update the Translation updates automatically. If you choose the first option then you have to update the Translation updates manually.
- Disable translation updates: If you want to Disable the translation updates, then you should go with the second option Disable translation updates.
- Enable auto-updates: This option will help you to update the translation updates download automatically on your WordPress. If you want to turn on the translation related updates regularly then choose the enable auto-update option.
- Disable auto-updates: This option is to disable auto-update that disables all the auto-updates for the translation.
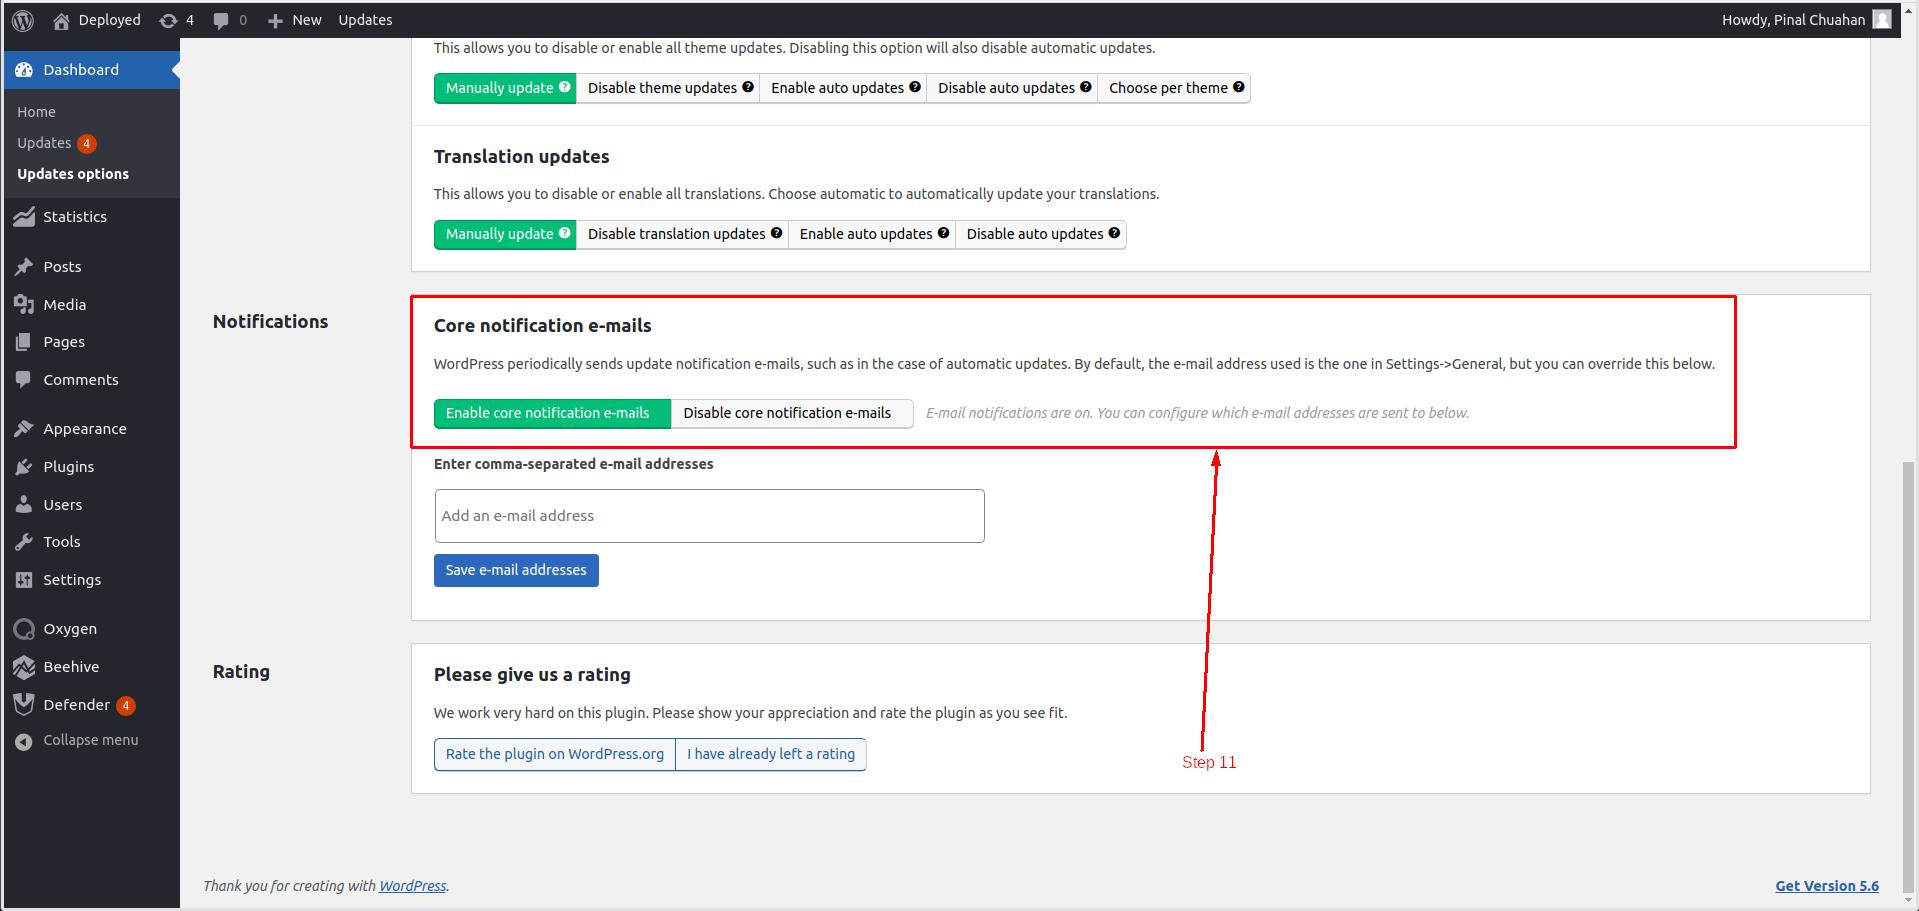
Step 11: Now, It’s time to enable E-mail notifications for you. If you want an E-mail notification whenever the core is updated on your WordPress site, You can do it from Notifications section. See the following image for Reference.
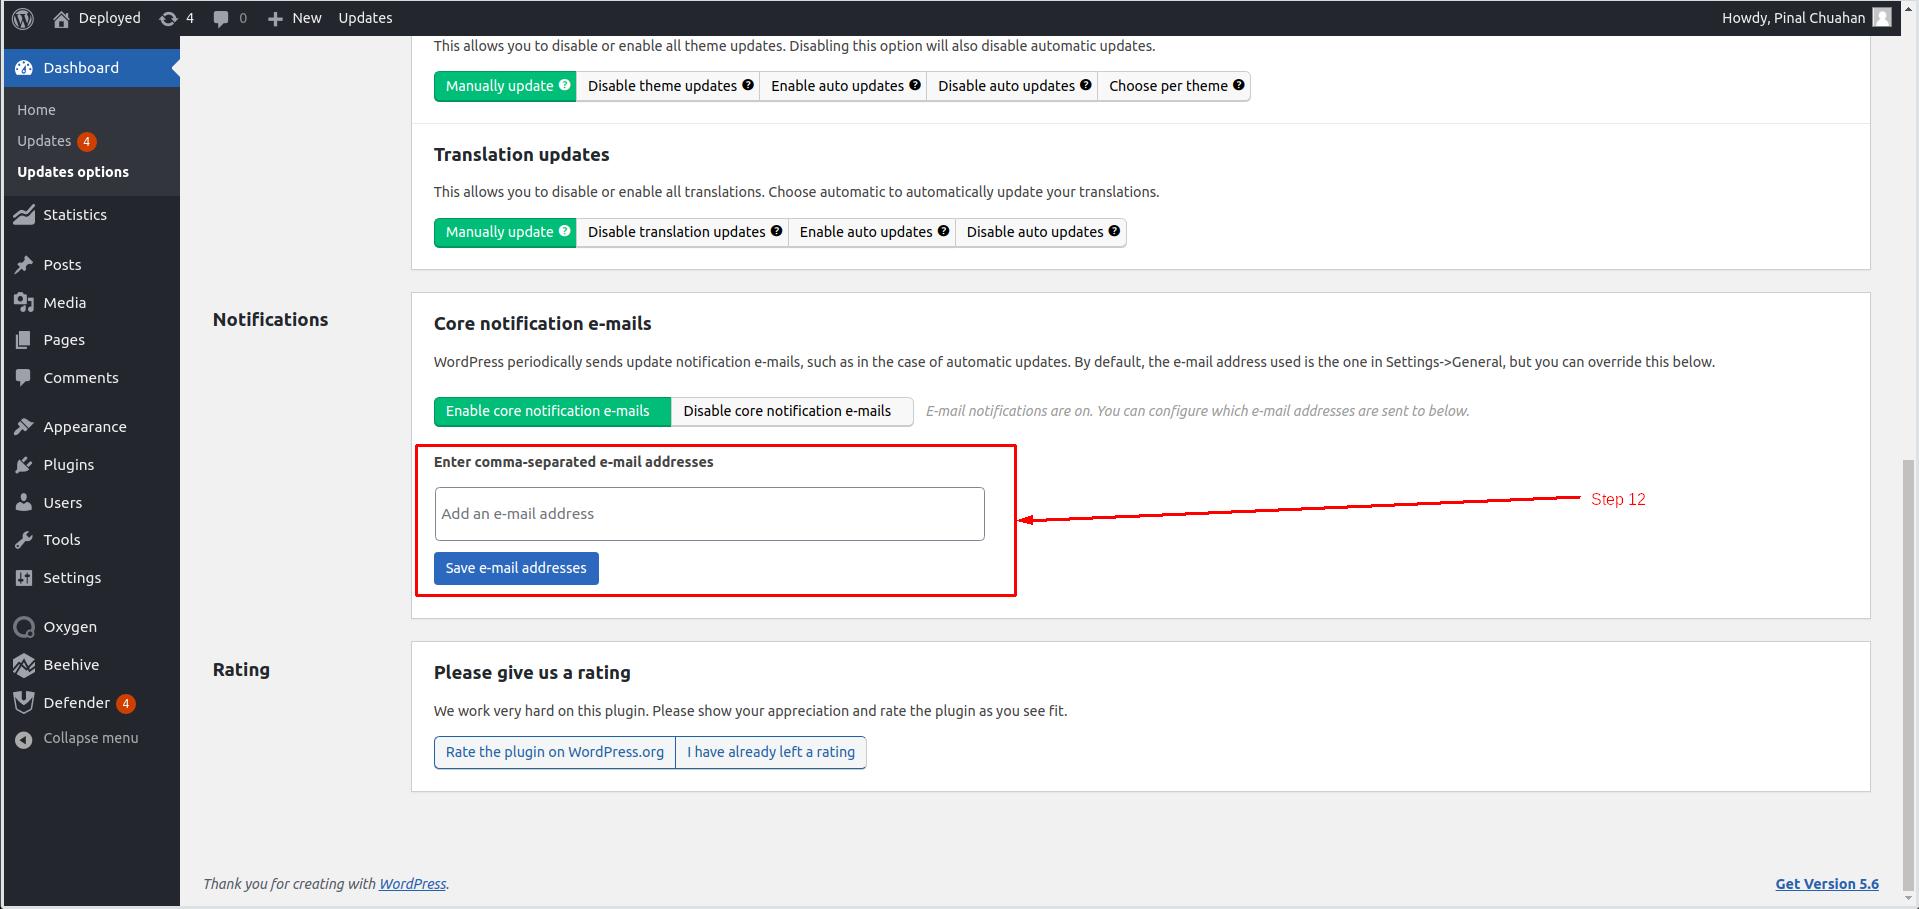
Step 12: If you decide to turn on notifications for updates, You have to provide the E-mail address in the text box given after the toggle.
You can fill up your E-mail address and click on the Save E-mail Address button to start receiving E-mails for updates on that E-mail address.
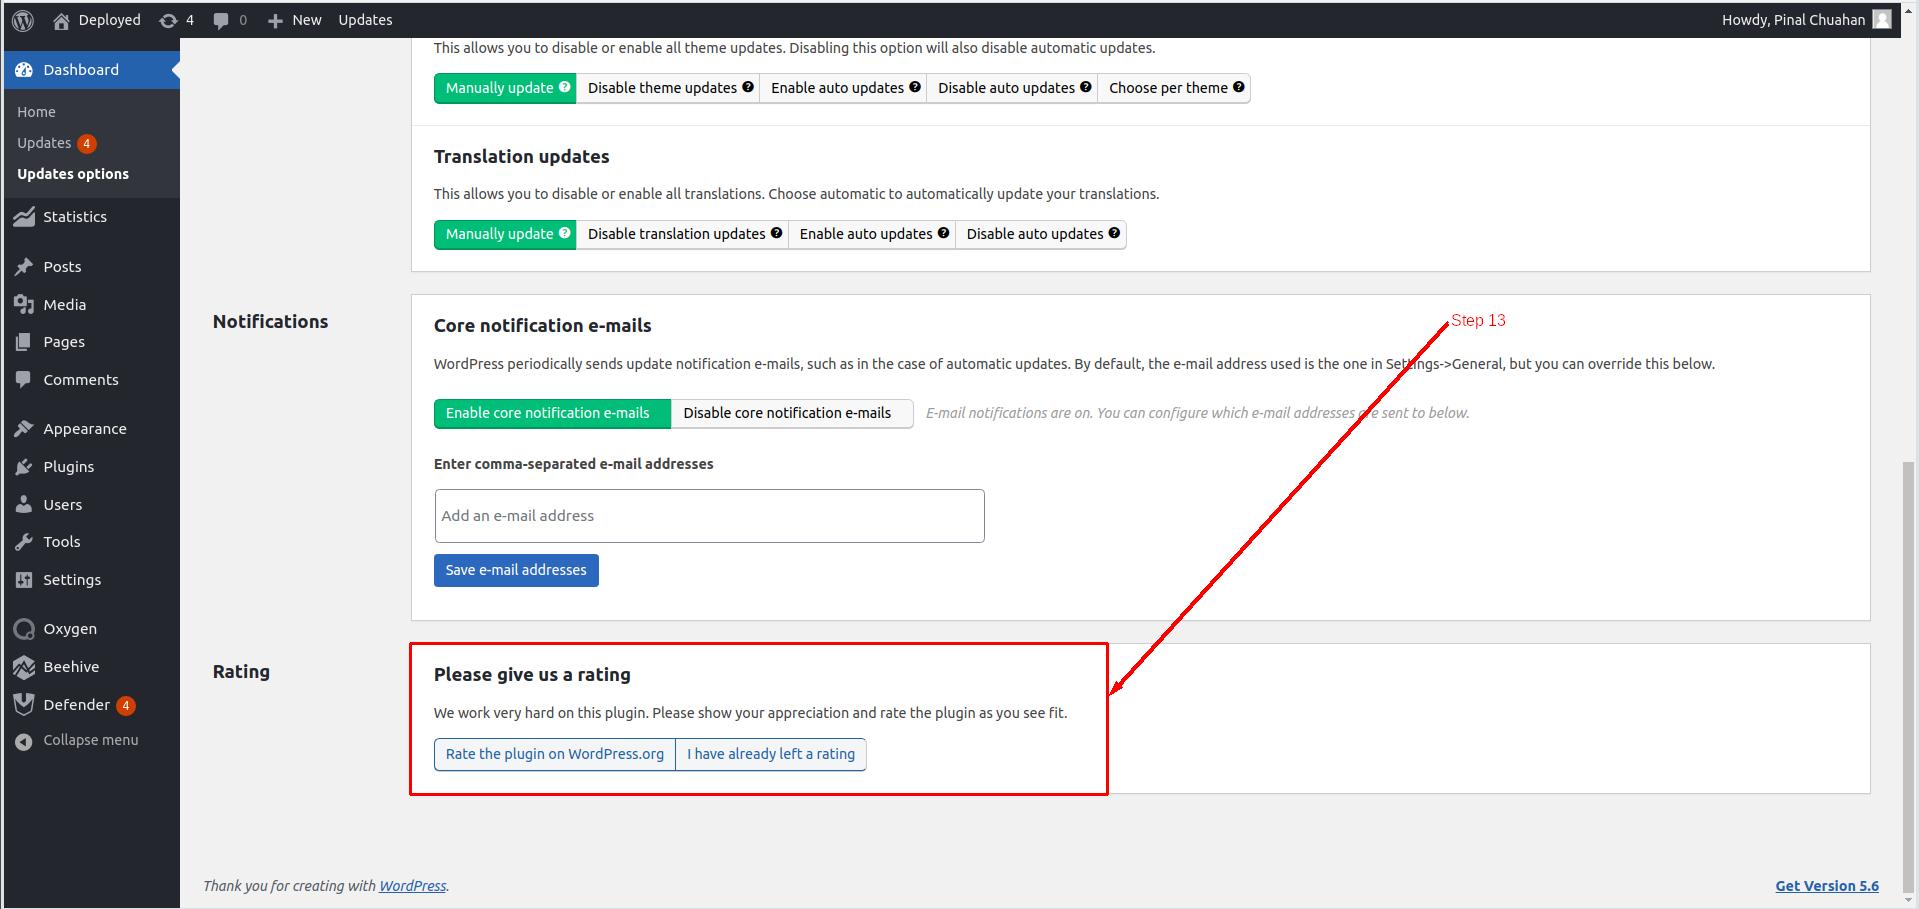
Step 13: The last option is to give ratings to the developer on WordPress.org. You can give ratings if you like the plugin, or just skip this step.
So, we went through the general settings. Now it’s time to manage plugin updates. Easy Updates Manager provides us a dedicated section to manage plugin updates. You can perform almost all the required actions directly from the General settings. However, If you still want to manage a single plugin or theme individually, you can do it using the Plugin specific and theme specific settings.
Plugin Settings
To update the plugin settings specifically, click on the Plugins tab in the Easy Updates Manager.
It will show you the list of plugins available on your site as well as the update status of each one. It will also show you if the plugin is being used frequently or not. If the plugin is not in use since a very long time, Easy Updates Manager will inform you and you can remove the plugin if not needed.
It allows you to perform Bulk actions. It means that if you have tens of plugins on your WordPress site, you can change the update settings in bulk. You can perform bulk actions on plugin update settings just like you perform bulk actions for posts and pages. There is almost no difference in this case.
Easy Updates manager allows you to change the Auto-update status of individual plugin too. It means that if you don’t want a specific plugin to update automatically, you can disable auto-updates for that specific plugin only.
Theme Settings
Just like the plugins, you can also set auto-update settings for themes. At any given time, a specific WordPress website uses one theme only. So, you can also set auto-update for the theme in use and disable auto-updates on all other themes.
However, you can also set Auto-update on all the themes or specific themes. Just like the plugins, you can perform actions in bulk. Easy Updates Manager also shows you the current status of a specific theme in the list. If the theme is not in use, It will show you “This theme is inactive for your site” and if the theme is in use, It will show you “This theme is active for your site”.
You can modify the theme update settings according to your requirement and then forget about the updates!
Logs
In the logs section, you will see a list of actions performed on a specific theme, plugin or the core. As the updates are being performed automatically, the logs are important so that we can check whether the plugins and themes are being updated or not.
You can filter the logs by type, actions, status, and date. You can also clear logs by clicking on the Clear Now button given in the logs section of the Easy Updates Manager plugin.
Conclusion
So, this is all you get in the Free version of this plugin. You can also manage the advanced settings that allows you to force automatic updates, disallow specific users from updating plugins, themes and core. Allowing specific users to perform specific tasks and much more. In the premium version of this plugin, you get many more useful features. However, The free version of this plugin is good enough to handle the updates for the whole site.
We hope this tutorial was helpful for you. If you are facing any problems following this tutorial, please let us know in the comment section given below. We are happy to help!